Open Stack Neutron環境構築 その3:Neutron+OvS+DVR のインストール
Neutron, OvS, DVRのインストールを実施します。*1
ここから徐々に複雑になりますので、ネットワーク、サブネット、ポート、インスタンスなどの作成は次回以降に記載します。
- Neutronのインストール
- Open vSwitch(L2agent)のインストール
- DVR(L3agent)のインストール
- その他設定
構成概要やOpen Stackのインストールは、前々回と前回の記事を参照してください。
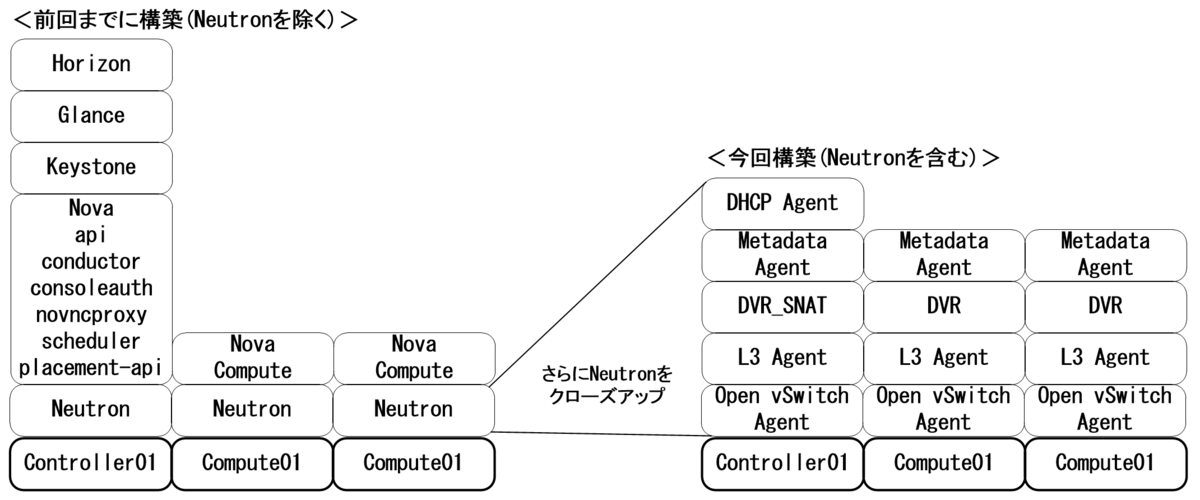
また、前回以上に今回は、Controllerで設定したり、Computeで設定したり、といったことが頻繁に発生するため、今何をやっているのか?が分からなくなってくると思います。
このため、以下の図を参考にしてみてください。ControllerとComputeの役割や機能の違いが少しづつ明確になってくると思います。

1.Neutronのインストール
1-1.DBの設定・ユーザ登録・サービス登録・Endpoint作成・インストール
対象:Controllerのみ
#DBの設定
mysql

CREATE DATABASE neutron;
GRANT ALL PRIVILEGES ON neutron.* TO 'neutron'@'localhost' IDENTIFIED BY 'neutron';
GRANT ALL PRIVILEGES ON neutron.* TO 'neutron'@'%' IDENTIFIED BY 'neutron';
quit;

#ユーザ登録
openstack user create --domain Default --password=neutron neutron
openstack role add --project service --user neutron admin

#サービス登録
openstack service create --name neutron \
--description "OpenStack Networking" network

#Endpoint作成
openstack endpoint create --region RegionOne \
network public http://controller01:9696
openstack endpoint create --region RegionOne \
network internal http://controller01:9696
openstack endpoint create --region RegionOne \
network admin http://controller01:9696

#インストール(NeutronServer, DHCP Agent, Metadata Agent, ML2 Plugin, NeutronClient)
apt -y install neutron-server neutron-dhcp-agent \
neutron-metadata-agent neutron-plugin-ml2 \
python-neutronclient
1-2.neutron.confの設定
対象:Controllerのみ
vi /etc/neutron/neutron.conf

[DEFAULT]
auth_strategy = keystone
transport_url = rabbit://openstack:rabbit@controller01

[database]
#connection = sqlite:////var/lib/neutron/neutron.sqlite
connection = mysql+pymysql://neutron:neutron@controller01/neutron

[keystone_authtoken]
auth_uri = http://controller01:5000
auth_url = http://controller01:35357
memcached_servers = controller01:11211
auth_type = password
project_domain_name = default
user_domain_name = default
project_name = service
username = neutron
password = neutron

[nova]
auth_url = http://controller01:35357
auth_type = password
project_domain_name = default
user_domain_name = default
region_name = RegionOne
project_name = service
username = nova
password = nova
1-3.ML2 Pluginのインストール・neutron.confの設定
対象:Computeのみ
apt -y install neutron-plugin-ml2

vi /etc/neutron/neutron.conf

[DEFAULT]
auth_strategy = keystone
transport_url = rabbit://openstack:rabbit@controller01

[database]
#connection = sqlite:////var/lib/neutron/neutron.sqlite
connection = mysql+pymysql://neutron:neutron@controller01/neutron

[keystone_authtoken]
auth_uri = http://controller01:5000
auth_url = http://controller01:35357
memcached_servers = controller01:11211
auth_type = password
project_domain_name = default
user_domain_name = default
project_name = service
username = neutron
password = neutron
1-4.nova.confの設定
対象:全Node
vi /etc/nova/nova.conf

[neutron]
url= http://controller01:9696
auth_url = http://controller01:35357
auth_type = password
project_domain_name = default
user_domain_name = default
region_name = RegionOne
project_name = service
username = neutron
password = neutron
1-5.DB登録・設定読込み
対象:Controllerのみ
su -s /bin/sh -c "neutron-db-manage \
--config-file /etc/neutron/neutron.conf \
--config-file /etc/neutron/plugins/ml2/ml2_conf.ini \
upgrade head" neutron

systemctl restart nova-api nova-scheduler nova-conductor
以下出力例です。
root@controller01:~# su -s /bin/sh -c "neutron-db-manage \ > --config-file /etc/neutron/neutron.conf \ > --config-file /etc/neutron/plugins/ml2/ml2_conf.ini \ > upgrade head" neutron INFO [alembic.runtime.migration] Context impl MySQLImpl. INFO [alembic.runtime.migration] Will assume non-transactional DDL. Running upgrade for neutron ... INFO [alembic.runtime.migration] Context impl MySQLImpl. INFO [alembic.runtime.migration] Will assume non-transactional DDL. INFO [alembic.runtime.migration] Running upgrade -> kilo, kilo_initial INFO [alembic.runtime.migration] Running upgrade kilo -> 354db87e3225, nsxv_vdr_metadata.py INFO [alembic.runtime.migration] Running upgrade 354db87e3225 -> 599c6a226151, neutrodb_ipam INFO [alembic.runtime.migration] Running upgrade 599c6a226151 -> 52c5312f6baf, Initial operations in support of address scopes INFO [alembic.runtime.migration] Running upgrade 52c5312f6baf -> 313373c0ffee, Flavor framework ~一部省略~ INFO [alembic.runtime.migration] Running upgrade kilo -> 67c8e8d61d5, Initial Liberty no-op script. INFO [alembic.runtime.migration] Running upgrade 67c8e8d61d5 -> 458aa42b14b, fw_table_alter script to makecolumn case sensitive INFO [alembic.runtime.migration] Running upgrade 458aa42b14b -> f83a0b2964d0, rename tenant to project INFO [alembic.runtime.migration] Running upgrade f83a0b2964d0 -> fd38cd995cc0, change shared attribute for firewall resource OK root@controller01:~#
1-6.設定読込み
対象:Computeのみ
systemctl restart nova-compute
1-7.DCHP Agentの設定・nova.conf追記・設定読込み
対象:Controllerのみ
#DCHP Agentの設定
vi /etc/neutron/dhcp_agent.ini

[DEFAULT]
enable_isolated_metadata = True

#設定読込み
systemctl restart neutron-server neutron-dhcp-agent


#nova.conf追記
vi /etc/nova/nova.conf

[neutron]
service_metadata_proxy = true
metadata_proxy_shared_secret = MetadataAgentPasswd123
1-8.MetadataAgentの設定
対象:Controllerのみ
#MetadataAgentの設定
vi /etc/neutron/metadata_agent.ini

[DEFAULT]
nova_metadata_host = controller01
metadata_proxy_shared_secret = MetadataAgentPasswd123

#設定読込み
systemctl restart nova-api neutron-metadata-agent
1-9.簡易動作確認
対象:Controllerのみ
以下のようになっていればOKです。
openstack network agent list

root@controller01:~# openstack network agent list
+--------------------------------------+----------------+--------------+-------------------+-------+-------+------------------------+
| ID                                   | Agent Type     | Host         | Availability Zone | Alive | State | Binary                 |
+--------------------------------------+----------------+--------------+-------------------+-------+-------+------------------------+
| 11fca003-8bb0-49b3-9e39-bc60b1a4cf17 | DHCP agent     | controller01 | nova              | :-)   | UP    | neutron-dhcp-agent     |
| b4cd6ed6-2321-4525-9ffa-b52dcbfe7293 | Metadata agent | controller01 | None              | :-)   | UP    | neutron-metadata-agent |
+--------------------------------------+----------------+--------------+-------------------+-------+-------+------------------------+
2.Open vSwitch(L2agent)のインストール
2-1.ML2の設定
対象:Controllerのみ
vi /etc/neutron/plugins/ml2/ml2_conf.ini

[ml2]
mechanism_drivers = l2population,openvswitch
type_drivers = local,flat,vlan,vxlan
tenant_network_types= vlan,vxlan

[ml2_type_vlan]
network_vlan_ranges = physnet1:32:63

[ml2_type_vxlan]
vni_ranges = 128:255
<補足1>
VlanやVxlanのレンジは任意に変更可能です。
[ml2_type_vlan]
network_vlan_ranges = physnet1:1024:2047

[ml2_type_vxlan]
vni_ranges = 512:4095
<補足2>
ens35以外にも外部NW用NICを複数増やしたい場合は以下のような設定も可能です。
[ml2_type_vlan]
network_vlan_ranges = physnet1:32:63,physnet2:64:95
<補足3>
今回は取り上げませんが、flatネットワークを使用する際は以下の設定を行います。
[ml2_type_flat]
flat_networks = physnet1
2-2.ドライバとOvSエージェントの設定
対象:全Node
apt install neutron-plugin-openvswitch-agent -y

vi /etc/neutron/plugins/ml2/openvswitch_agent.ini

[agent]
tunnel_types = vxlan
l2_population = true
vxlan_udp_port = 8472

[ovs]
bridge_mappings = physnet1:br-ens35
local_ip = 10.20.0.10x
##xは、Nodeごとに変更##

[securitygroup]
firewall_driver = noop

ovs-vsctl add-br br-ens35
ovs-vsctl add-port br-ens35 ens35
ovs-vsctl show
以下出力例です。
ovs-vsctl show

root@compute02:~# ovs-vsctl show
9a905c31-1f4a-48cd-aa3e-9d2fcb50bdf9
    Manager "ptcp:6640:127.0.0.1"
        is_connected: true
    Bridge "br-ens35"
        Port "br-ens35"
            Interface "br-ens35"
                type: internal
        Port "ens35"
            Interface "ens35"
    Bridge br-int
        Controller "tcp:127.0.0.1:6633"
            is_connected: true
        fail_mode: secure
        Port br-int
            Interface br-int
                type: internal
    ovs_version: "2.8.4"
2-3.DHCPエージェントの設定
対象:Controller
#dhcp_agent.iniの設定
vi /etc/neutron/dhcp_agent.ini

[DEFAULT]
interface_driver = openvswitch
dnsmasq_config_file = /etc/neutron/dnsmasq-neutron.conf


#dnsmasq-neutron.confの設定
vi /etc/neutron/dnsmasq-neutron.conf

dhcp-option-force=26,1450


#設定読込み
systemctl restart neutron-dhcp-agent
2-4.簡易動作確認
対象:Controller
以下のように出力されていればOKです。
openstack network agent list

root@controller01:~# openstack network agent list
+--------------------------------------+--------------------+--------------+-------------------+-------+-------+---------------------------+
| ID                                   | Agent Type         | Host         | Availability Zone | Alive | State | Binary                    |
+--------------------------------------+--------------------+--------------+-------------------+-------+-------+---------------------------+
| 11fca003-8bb0-49b3-9e39-bc60b1a4cf17 | DHCP agent         | controller01 | nova              | :-)   | UP    | neutron-dhcp-agent        |
| 16807ec4-c816-47cd-92eb-45e9e1410705 | Open vSwitch agent | controller01 | None              | :-)   | UP    | neutron-openvswitch-agent |
| 980aa42b-562f-47ae-97e1-015d5b600088 | Open vSwitch agent | compute02    | None              | :-)   | UP    | neutron-openvswitch-agent |
| b4cd6ed6-2321-4525-9ffa-b52dcbfe7293 | Metadata agent     | controller01 | None              | :-)   | UP    | neutron-metadata-agent    |
| ddc78656-71f5-40fc-a9e1-66b03d6de317 | Open vSwitch agent | compute01    | None              | :-)   | UP    | neutron-openvswitch-agent |
+--------------------------------------+--------------------+--------------+-------------------+-------+-------+---------------------------+
3.DVR(L3agent)のインストール
3-1.DVRのインストール&設定・OvS&Neutronの追加設定・Horizon設定
対象:Controllerのみ
#DVRのインストール&設定
apt install neutron-l3-agent -y

vi /etc/neutron/l3_agent.ini

[DEFAULT]
interface_driver = openvswitch
agent_mode = dvr_snat
handle_internal_only_routers = false

#OvSの追加設定
vi /etc/neutron/plugins/ml2/openvswitch_agent.ini

[agent]
enable_distributed_routing = True

#Neutronの追加設定
vi /etc/neutron/neutron.conf

[DEFAULT]
service_plugins = router,trunk

#Horizon設定
vi /etc/openstack-dashboard/local_settings.py

OPENSTACK_NEUTRON_NETWORK = {
    'enable_router': True,
    'enable_quotas': False,
    'enable_ipv6': False,
    'enable_distributed_router': True,
    'enable_ha_router': False,
    'enable_lb': False,
    'enable_firewall': False,
    'enable_vpn': False,
    'enable_fip_topology_check': False,
}

#設定読込み
systemctl restart neutron-l3-agent neutron-openvswitch-agent neutron-server apache2
3-2.DVRのインストール&設定・OvSの追加設定
対象:Computeのみ
#DVRのインストール&設定
apt install neutron-l3-agent -y

vi /etc/neutron/l3_agent.ini

[DEFAULT]
interface_driver = openvswitch
agent_mode = dvr
handle_internal_only_routers = false


#OvSの追加設定
vi /etc/neutron/plugins/ml2/openvswitch_agent.ini

[agent]
enable_distributed_routing = True

#設定読込み
systemctl restart neutron-l3-agent neutron-openvswitch-agent
3-3.簡易動作確認
対象:Controllerのみ
この時点で以下のように登録されていればOKです。
openstack network agent list

root@controller01:~# openstack network agent list
+--------------------------------------+--------------------+--------------+-------------------+-------+-------+---------------------------+
| ID                                   | Agent Type         | Host         | Availability Zone | Alive | State | Binary                    |
+--------------------------------------+--------------------+--------------+-------------------+-------+-------+---------------------------+
| 0fdbdf3d-978a-4698-87f5-1d9ec71ccdd7 | Metadata agent     | compute01    | None              | :-)   | UP    | neutron-metadata-agent    |
| 11fca003-8bb0-49b3-9e39-bc60b1a4cf17 | DHCP agent         | controller01 | nova              | :-)   | UP    | neutron-dhcp-agent        |
| 16807ec4-c816-47cd-92eb-45e9e1410705 | Open vSwitch agent | controller01 | None              | :-)   | UP    | neutron-openvswitch-agent |
| 514136b2-cfa0-42ca-8ee5-fe768c895c7c | L3 agent           | controller01 | nova              | :-)   | UP    | neutron-l3-agent          |
| 980aa42b-562f-47ae-97e1-015d5b600088 | Open vSwitch agent | compute02    | None              | :-)   | UP    | neutron-openvswitch-agent |
| b4cd6ed6-2321-4525-9ffa-b52dcbfe7293 | Metadata agent     | controller01 | None              | :-)   | UP    | neutron-metadata-agent    |
| bb83830a-dd80-4ab8-b030-ce1dc1999643 | Metadata agent     | compute02    | None              | :-)   | UP    | neutron-metadata-agent    |
| ddc78656-71f5-40fc-a9e1-66b03d6de317 | Open vSwitch agent | compute01    | None              | :-)   | UP    | neutron-openvswitch-agent |
| e31f5012-53c0-4e84-9c00-37b361a16a82 | L3 agent           | compute02    | nova              | :-)   | UP    | neutron-l3-agent          |
| fbae2b3d-5641-444f-a8eb-00ffc4f45a91 | L3 agent           | compute01    | nova              | :-)   | UP    | neutron-l3-agent          |
+--------------------------------------+--------------------+--------------+-------------------+-------+-------+---------------------------+
<補足>
L3 agentが表示されるまでに多少時間が掛かる場合があります。
そのときは、各Nodeで以下のように確認してみてください。
cat /var/log/neutron/neutron-l3-agent.log

root@controller01:~# cat /var/log/neutron/neutron-l3-agent.log
2019-05-28 08:40:40.631 9773 INFO neutron.common.config [-] Logging enabled!
2019-05-28 08:40:40.631 9773 INFO neutron.common.config [-] /usr/bin/neutron-l3-agent version 11.0.6
2019-05-28 08:40:40.754 9773 ERROR neutron.agent.l3.agent [-] An interface driver must be specified
2019-05-28 08:41:53.553 9847 INFO neutron.common.config [-] Logging enabled!
2019-05-28 08:41:53.553 9847 INFO neutron.common.config [-] /usr/bin/neutron-l3-agent version 11.0.6
2019-05-28 08:42:53.709 9847 ERROR neutron.common.rpc [req-58acf3df-e1c2-47a0-b83f-2aafa1e53e56 - - - - -] Timeout in RPC method get_service_plugin_list. Waiting for 10 seconds before next attempt. If the server is not down, consider increasing the rpc_response_timeout option as Neutron server(s) may be overloaded and unable to respond quickly enough.: MessagingTimeout: Timed out waiting for a reply to message ID 69bdb30bcf314476942d06106fa0b5f2
2019-05-28 08:42:53.711 9847 WARNING neutron.common.rpc [req-58acf3df-e1c2-47a0-b83f-2aafa1e53e56 - - - - -] Increasing timeout for get_service_plugin_list calls to 120 seconds. Restart the agent to restore it to the default value.: MessagingTimeout: Timed out waiting for a reply to message ID 69bdb30bcf314476942d06106fa0b5f2
2019-05-28 08:43:03.252 9847 WARNING neutron.agent.l3.agent [req-58acf3df-e1c2-47a0-b83f-2aafa1e53e56 - - - - -] l3-agent cannot contact neutron server to retrieve service plugins enabled. Check connectivity to neutron server. Retrying... Detailed message: Timed out waiting for a reply to message ID 69bdb30bcf314476942d06106fa0b5f2.: MessagingTimeout: Timed out waiting for a reply to message ID 69bdb30bcf314476942d06106fa0b5f2
2019-05-28 08:43:03.269 9847 INFO neutron.agent.agent_extensions_manager [req-f6aa92b3-2ba4-4cb4-9273-8cb9f54c5f43 - - - - -] Loaded agent extensions: []
2019-05-28 08:43:03.282 9847 INFO eventlet.wsgi.server [-] (9847) wsgi starting up on http:/var/lib/neutron/keepalived-state-change
2019-05-28 08:43:03.347 9847 INFO neutron.agent.l3.agent [-] L3 agent started
3-4.L2構成確認
対象:全Node
どのNodeでも構いませんので、以下のコマンドを打ってみてください。
ovs-vsctl show

root@compute02:~# ovs-vsctl show
c560fe9b-ea3c-4be6-8e94-109299e797aa
    Manager "ptcp:6640:127.0.0.1"
        is_connected: true
    Bridge "br-ens35"
        Controller "tcp:127.0.0.1:6633"
            is_connected: true
        fail_mode: secure
        Port "br-ens35"
            Interface "br-ens35"
                type: internal
        Port "phy-br-ens35"
            Interface "phy-br-ens35"
                type: patch
                options: {peer="int-br-ens35"}
        Port "ens35"
            Interface "ens35"
    Bridge br-tun
        Controller "tcp:127.0.0.1:6633"
            is_connected: true
        fail_mode: secure
        Port br-tun
            Interface br-tun
                type: internal
        Port patch-int
            Interface patch-int
                type: patch
                options: {peer=patch-tun}
    Bridge br-int
        Controller "tcp:127.0.0.1:6633"
            is_connected: true
        fail_mode: secure
        Port br-int
            Interface br-int
                type: internal
        Port patch-tun
            Interface patch-tun
                type: patch
                options: {peer=patch-int}
        Port "int-br-ens35"
            Interface "int-br-ens35"
                type: patch
                options: {peer="phy-br-ens35"}
    ovs_version: "2.8.4"
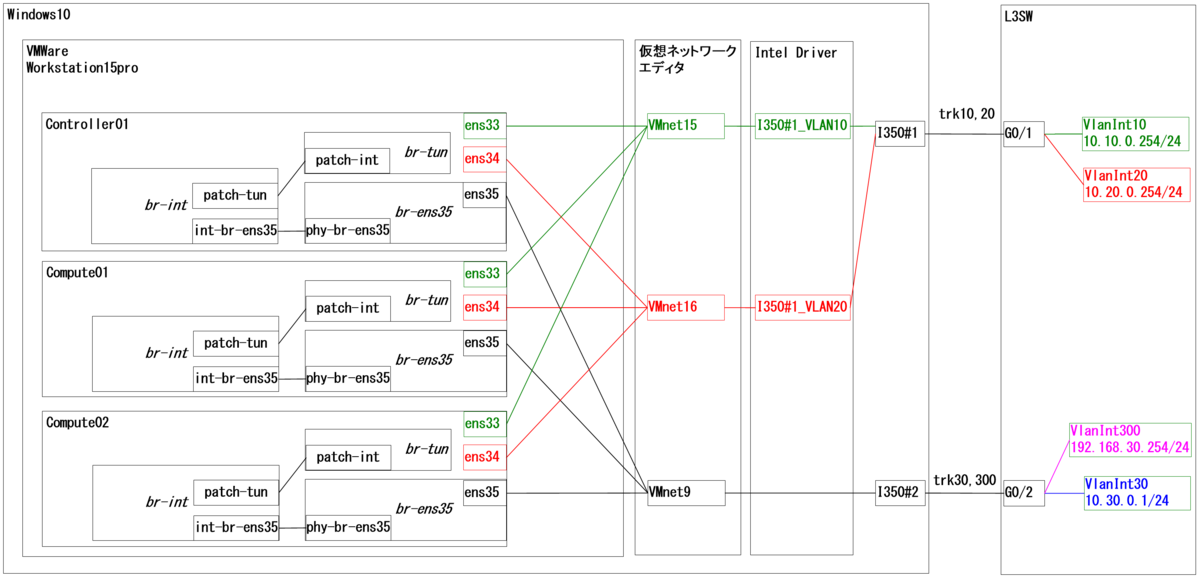
上記出力より、br-ens35, br-tun, br-intの3つのBridgeが全Nodeで作成されています。
図にすると、こんな↓イメージです。

これが素の状態で、全Nodeで同一のBridge 構成となっています。
ここから、Network, Subnet, Port, VMインスタンスを作ったり、VMインスタンスからTrunkしてみたりすると、少しづつ複雑になり始めます。
3-5.各種確認
対象:全Node
以下のコマンドでPortやMacアドレステーブル、フローテーブルが確認可能です。
#Port確認
ovs-ofctl show br-ens35
ovs-ofctl show br-int
ovs-ofctl show br-tun

root@controller01:~# ovs-ofctl show br-ens35
OFPT_FEATURES_REPLY (xid=0x2): dpid:0000000c294300d2
n_tables:254, n_buffers:0
capabilities: FLOW_STATS TABLE_STATS PORT_STATS QUEUE_STATS ARP_MATCH_IP
actions: output enqueue set_vlan_vid set_vlan_pcp strip_vlan mod_dl_src mod_dl_dst mod_nw_src mod_nw_dst mod_nw_tos mod_tp_src mod_tp_dst
 1(ens35): addr:00:0c:29:43:00:d2
     config:     0
     state:      0
     current:    1GB-FD COPPER AUTO_NEG
     advertised: 10MB-HD 10MB-FD 100MB-HD 100MB-FD 1GB-FD COPPER AUTO_NEG
     supported:  10MB-HD 10MB-FD 100MB-HD 100MB-FD 1GB-FD COPPER AUTO_NEG
     speed: 1000 Mbps now, 1000 Mbps max
 2(phy-br-ens35): addr:62:2f:61:76:05:b2
     config:     0
     state:      0
     speed: 0 Mbps now, 0 Mbps max
 LOCAL(br-ens35): addr:00:0c:29:43:00:d2
     config:     PORT_DOWN
     state:      LINK_DOWN
     speed: 0 Mbps now, 0 Mbps max
OFPT_GET_CONFIG_REPLY (xid=0x4): frags=normal miss_send_len=0


#Macアドレステーブル確認
ovs-appctl fdb/show br-ens35
ovs-appctl fdb/show br-int
ovs-appctl fdb/show br-tun

root@controller01:~# ovs-appctl fdb/show br-ens35
 port  VLAN  MAC                Age
    1    30  6c:50:4d:d5:07:da  141
    1     0  2c:53:4a:01:27:67   94
    1   300  6c:50:4d:d5:07:da   92
    1    30  2c:53:4a:01:27:66   65
    1   300  2c:53:4a:01:27:66   65


#フローテーブル確認
ovs-ofctl dump-flows br-ens35
ovs-ofctl dump-flows br-int
ovs-ofctl dump-flows br-tun

root@controller01:~# ovs-ofctl dump-flows br-ens35
 cookie=0xa3dbef6a19c99333, duration=5955.130s, table=0, n_packets=0, n_bytes=0, priority=2,in_port="phy-br-ens35" actions=resubmit(,1)
 cookie=0xa3dbef6a19c99333, duration=5955.218s, table=0, n_packets=0, n_bytes=0, priority=0 actions=NORMAL
 cookie=0xa3dbef6a19c99333, duration=5955.130s, table=0, n_packets=4058, n_bytes=366211, priority=1 actions=resubmit(,3)
 cookie=0xa3dbef6a19c99333, duration=5955.130s, table=1, n_packets=0, n_bytes=0, priority=0 actions=resubmit(,2)
 cookie=0xa3dbef6a19c99333, duration=5955.129s, table=2, n_packets=0, n_bytes=0, priority=2,in_port="phy-br-ens35" actions=drop
 cookie=0xa3dbef6a19c99333, duration=5576.007s, table=3, n_packets=0, n_bytes=0, priority=2,dl_src=fa:16:3f:05:7d:26 actions=output:"phy-br-ens35"
 cookie=0xa3dbef6a19c99333, duration=5529.828s, table=3, n_packets=0, n_bytes=0, priority=2,dl_src=fa:16:3f:53:4c:80 actions=output:"phy-br-ens35"
 cookie=0xa3dbef6a19c99333, duration=5955.129s, table=3, n_packets=4058, n_bytes=366211, priority=1 actions=NORMAL
4.その他設定
直接Neutronには関係ありませんが、インスタンス周りで困るときがあるため、以下の設定を行っておきます。
4-1.NovaDB登録
対象:Controllerのみ
インスタンスが作成できたけど起動しない場合の対処。
openstack compute service list
su -s /bin/sh -c "nova-manage cell_v2 discover_hosts --verbose" nova
systemctl restart nova-api nova-consoleauth nova-scheduler nova-conductor nova-novncproxy
以下出力例です。
root@controller01:~# openstack compute service list
+----+------------------+--------------+----------+---------+-------+----------------------------+
| ID | Binary           | Host         | Zone     | Status  | State | Updated At                 |
+----+------------------+--------------+----------+---------+-------+----------------------------+
|  1 | nova-scheduler   | controller01 | internal | enabled | up    | 2019-05-28T01:26:14.000000 |
|  2 | nova-consoleauth | controller01 | internal | enabled | up    | 2019-05-28T01:26:17.000000 |
|  3 | nova-conductor   | controller01 | internal | enabled | up    | 2019-05-28T01:26:17.000000 |
|  7 | nova-compute     | compute01    | nova     | enabled | up    | 2019-05-28T01:26:14.000000 |
|  8 | nova-compute     | compute02    | nova     | enabled | up    | 2019-05-28T01:26:17.000000 |
+----+------------------+--------------+----------+---------+-------+----------------------------+

#上記のようにcompute01&02が表示されている状態であることを確認の上、以下のようにNovaDBへ登録します。

root@controller01:~# su -s /bin/sh -c "nova-manage cell_v2 discover_hosts --verbose" nova
Found 2 cell mappings.
Skipping cell0 since it does not contain hosts.
Getting computes from cell 'cell1': e0e3f86a-8b85-4184-9287-7e4dcd53db81
Checking host mapping for compute host 'compute01': 521aeaf7-1d0e-4aa9-81b4-d7f39397c33c
Creating host mapping for compute host 'compute01': 521aeaf7-1d0e-4aa9-81b4-d7f39397c33c
Checking host mapping for compute host 'compute02': d32c9aee-af7b-4b90-a767-56dc9897de5f
Creating host mapping for compute host 'compute02': d32c9aee-af7b-4b90-a767-56dc9897de5f
Found 2 unmapped computes in cell: e0e3f86a-8b85-4184-9287-7e4dcd53db81
4-2.MetadataAgent設定
対象:Computeのみ
インスタンスが起動したけど、メタデータ(KeypairとかPasswd設定ファイルなど)が取得できないときの対処。
#MetadataAgent設定
vi /etc/neutron/metadata_agent.ini

[DEFAULT]
nova_metadata_host = controller01
metadata_proxy_shared_secret = MetadataAgentPasswd123

#設定読込み
systemctl restart neutron-metadata-agent
<補足>
インスタンスにUbuntuなど(Cirros以外)を使用する場合、Defaultで鍵認証となっているため、Keypairを取得させるか、Passwd設定&許可ファイルを取得されるなどの方法で、インスタンスにssh接続します。*2
以上です。
5.最後に
少しづつ出来てきた感が出ていれば良いなと思います。
3-4.や3-5.に記載した素の状態をよく確認し構成を理解しておくと良いと思います。