Tcpreplayのセットアップ利用方法について記載します。
また、実用面を考慮し、構成を明示した上で具体的な設定例についても記載します。
1.環境
1-1.VMWare
筐体                             : 自作PC(Win10pro)
VMWare              : VMware(R) Workstation 17 Pro 17.5.0 build-22583795
OS                               : Ubuntu 22.04, Vyos14
Tcpreplay                        : v4.4.4
1-2.全体構成
TcpreplayはUbuntu22.04上にインストールします。
DUT(Device Under Test)はVyosを使用していますが、各種RouterやFWなどでも構成可能です。

1-3 .全体の流れ ~概要~
- インストールとビルド
- 利用方法その1:単純なPcapファイルの送信
- 利用方法その2:Routerを経由したPcapファイルの送受信
2.インストールとビルド
2-1.事前準備
ビルドが必要になるので事前に必要なアプリケーションをaptでインストールしておきます。
apt update && \
apt -y install build-essential libpcap-dev
2-2.Tcpreplayのインストール
/root/tmp/配下で作業を行っていきます。*1
2-2-1.TcpreplayのDL
以下のコマンドにてtarファイルをDLします。
mkdir /root/tmp
cd /root/tmp/
wget https://github.com/appneta/tcpreplay/releases/download/v4.4.4/tcpreplay-4.4.4.tar.gz
tar zxvf tcpreplay-4.4.4.tar.gz
2-2-2.Tcpreplayのビルド
Cのソースからビルドします。
cd /root/tmp/tcpreplay-4.4.4/
./configure
make
make install
./configureの出力例
root@u222c96:~/tmp/tcpreplay-4.4.4# ./configure
checking whether to enable maintainer-specific portions of Makefiles... yes
checking if malloc debugging is wanted... no
checking build system type... x86_64-pc-linux-gnu
checking host system type... x86_64-pc-linux-gnu
checking target system type... x86_64-pc-linux-gnu

### snip ###

config.status: creating src/common/Makefile
config.status: creating src/defines.h
config.status: creating test/Makefile
config.status: creating test/config
config.status: creating scripts/Makefile
config.status: creating src/config.h
config.status: executing depfiles commands
config.status: executing libtool commands

##########################################################################
             TCPREPLAY Suite Configuration Results (4.4.4)
##########################################################################
libpcap:                    /usr (1.10.1)
PF_RING libpcap             no
libdnet:                    no
autogen:                     (unknown - man pages will not be built)
Use libopts tearoff:        yes
64bit counter support:      yes
tcpdump binary path:        /usr/bin/tcpdump
fragroute support:          no
tcpbridge support:          yes
tcpliveplay support:        yes

Supported Packet Injection Methods (*):
Linux TX_RING:              no
Linux PF_PACKET:            yes
BSD BPF:                    no
libdnet:                    no
pcap_inject:                yes
pcap_sendpacket:            yes **
pcap_netmap                 no
Linux/BSD netmap:           no
Tuntap device support:      yes

* In order of preference; see configure --help to override
** Required for tcpbridge
makeの出力例
root@u222c96:~/tmp/tcpreplay-4.4.4# make
Making all in scripts
make[1]: Entering directory '/root/tmp/tcpreplay-4.4.4/scripts'
make[1]: Nothing to be done for 'all'.
make[1]: Leaving directory '/root/tmp/tcpreplay-4.4.4/scripts'
Making all in lib
make[1]: Entering directory '/root/tmp/tcpreplay-4.4.4/lib'
  CC       strlcat.o
  CC       strlcpy.o
  AR       libstrl.a

### snip ###

  CCLD     tcpbridge
  CC       tcpliveplay-tcpliveplay_opts.o
  CC       tcpliveplay-tcpliveplay.o
  CCLD     tcpliveplay
make[3]: Leaving directory '/root/tmp/tcpreplay-4.4.4/src'
make[2]: Leaving directory '/root/tmp/tcpreplay-4.4.4/src'
make[1]: Leaving directory '/root/tmp/tcpreplay-4.4.4/src'
make[1]: Entering directory '/root/tmp/tcpreplay-4.4.4'
make[1]: Nothing to be done for 'all-am'.
make[1]: Leaving directory '/root/tmp/tcpreplay-4.4.4'
make installの出力例
root@u222c96:~/tmp/tcpreplay-4.4.4# make install
Making install in scripts
make[1]: Entering directory '/root/tmp/tcpreplay-4.4.4/scripts'
make[2]: Entering directory '/root/tmp/tcpreplay-4.4.4/scripts'
make[2]: Nothing to be done for 'install-exec-am'.
make[2]: Nothing to be done for 'install-data-am'.
make[2]: Leaving directory '/root/tmp/tcpreplay-4.4.4/scripts'
make[1]: Leaving directory '/root/tmp/tcpreplay-4.4.4/scripts'
Making install in lib
make[1]: Entering directory '/root/tmp/tcpreplay-4.4.4/lib'

### snip ###

libtool: install: /usr/bin/install -c tcprewrite /usr/local/bin/tcprewrite
libtool: install: /usr/bin/install -c tcpreplay-edit /usr/local/bin/tcpreplay-edit
libtool: install: /usr/bin/install -c tcpcapinfo /usr/local/bin/tcpcapinfo
libtool: install: /usr/bin/install -c tcpbridge /usr/local/bin/tcpbridge
libtool: install: /usr/bin/install -c tcpliveplay /usr/local/bin/tcpliveplay
 /usr/bin/mkdir -p '/usr/local/share/man/man1'
 /usr/bin/install -c -m 644 tcpreplay.1 tcpprep.1 tcprewrite.1 tcpreplay-edit.1 tcpcapinfo.1 tcpbridge.1 tcpliveplay.1 '/usr/local/share/man/man1'
make[4]: Leaving directory '/root/tmp/tcpreplay-4.4.4/src'
make[3]: Leaving directory '/root/tmp/tcpreplay-4.4.4/src'
make[2]: Leaving directory '/root/tmp/tcpreplay-4.4.4/src'
make[1]: Leaving directory '/root/tmp/tcpreplay-4.4.4/src'
make[1]: Entering directory '/root/tmp/tcpreplay-4.4.4'
make[2]: Entering directory '/root/tmp/tcpreplay-4.4.4'
make[2]: Nothing to be done for 'install-exec-am'.
make[2]: Nothing to be done for 'install-data-am'.
make[2]: Leaving directory '/root/tmp/tcpreplay-4.4.4'
make[1]: Leaving directory '/root/tmp/tcpreplay-4.4.4'
3.利用方法その1:単純なPcapファイルの送信
test.pcapファイルを利用して、Pcapファイルのリプレイを行います。
3-1.事前準備
以下のサイトから、サンプルPcapファイル test.pcap をDLしておきます。
ページの一番下に test.pcap のリンクがあります。
https://tcpreplay.appneta.com/wiki/captures.html
DL後、以下のPathに保存しておいてください。
/root/tmp/test.pcap
3-2.構成
以下の構成では、Ubuntuのens34からVyosのeth1へ、test.pcapに含まれる全パケットを送信します。

Ubuntuのens35とVyosのeth2は利用しません。
また、パケットに含まれるSrc/Dst-MAC, Src/Dst-IPには何も変更を加えません。*2
3-3.コマンドの実行
以下のPathにcdした後、
cd /root/tmp
以下のコマンドを実行してください。
tcpreplay \
-i ens34 \
test.pcap
出力例
root@u222c96:~/tmp# tcpreplay \
-i ens34 \
test.pcap
Actual: 141 packets (62704 bytes) sent in 2.78 seconds
Rated: 22539.0 Bps, 0.180 Mbps, 50.68 pps
Flows: 37 flows, 13.29 fps, 140 unique flow packets, 1 unique non-flow packets
Statistics for network device: ens34
        Successful packets:        141
        Failed packets:            0
        Truncated packets:         0
        Retried packets (ENOBUFS): 0
        Retried packets (EAGAIN):  0
3-4.Vyos側でのPcap
3-3.コマンドの実行の前に、Vyos側でPcapを実行しておくと、Ubuntuから送信されたパケットを確認することができます。
Vyos側で以下のコマンドによりPcapを実施してください。
Ctrl+cでPcapを停止できます。
monitor traffic interface eth1 save test.pcap
出力例
vyos@vyos14c163:~$ monitor traffic interface eth1 save test.pcap
tcpdump: listening on eth1, link-type EN10MB (Ethernet), snapshot length 262144 bytes
^C141 packets captured
141 packets received by filter
0 packets dropped by kernel
保存したPcapファイルは自身のPCにDLして、Wiresharkなどで閲覧可能です。

3-5.ユースケース
Vyosのeth1に記載の通り、受信側はTapポートなどで全パケットを受信します。
受信側において、トラフィックの中身をInspectするような機器(FWやセキュリティセンサ機器など)の場合に活用することができます。
別のユースケースとして、負荷試験などを想定し、一方的にUDPトラフィックを送り付けるような場合も活用できると思います。
Tcpreplayの出力例には、以下のように各種Rate(Bps, Mbps, pps)やfpsなどが表示されます。
Rated: 22539.0 Bps, 0.180 Mbps, 50.68 pps
Flows: 37 flows, 13.29 fps, 140 unique flow packets, 1 unique non-flow packets
4.利用方法その2:Routerを経由したPcapファイルの送受信
前項では、test.pcapをそのままリプレイするだけでした。
本項では、test.pcapに含まれるSrc/Dst-MAC, Src/Dst-IPを、今回の構成用に変更します。
これにより、DUTであるVyosにてパケット転送処理を発生させ、パケットを通過させることができます。
なお、test.pcap を再利用しますので事前準備は不要です。
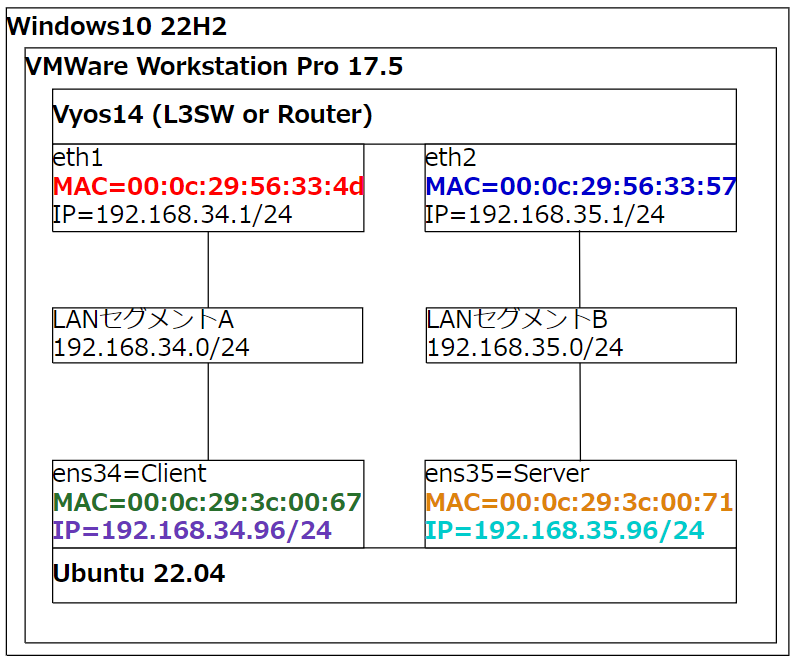
4-1.構成
以下のように、パケットの送受信ができるようにします。
行き:Ubuntu ens34 ー> Vyos eth1 ー>Switching&Routing処理 ー> Vyos eth2 ー>Ubuntu ens35
戻り:Ubuntu ens35 ー> Vyos eth2 ー>Switching&Routing処理 ー> Vyos eth1 ー>Ubuntu ens34
以降は、
Ubuntu ens34 と Vyos eth1 をClient Side
Ubuntu ens35 と Vyos eth2 をServer Side
として説明していきます。
4-2.Vyos側でのPcap
Tcpreplayコマンドの実行前に、Vyos側でPcapを仕掛けておきます。
Vyosでは、ClientSideとServerSideのそれぞれでPcapを実施しますので、sshセッションを2つ張っておいてください。
これにより、ClientSideとServerSideにて、Src/Dst-MACの確認が可能です。
ClientSideのsshコンソール上
monitor traffic interface eth1 save test21.pcap
ServerSideのsshコンソール上
monitor traffic interface eth2 save test22.pcap
4-3.コマンドの実行
以下のコマンドを実行してください。
tcpprep \
--auto=client \
--pcap=test.pcap \
--cachefile=test.cache

tcprewrite \
--enet-dmac=00:0c:29:56:33:4d,00:0c:29:56:33:57 \
--enet-smac=00:0c:29:3c:00:67,00:0c:29:3c:00:71 \
--endpoints=192.168.34.96:192.168.35.96 \
--cachefile=test.cache \
--infile=test.pcap \
--outfile=test2.pcap \
--skipbroadcast

tcpprep \
--auto=client \
--pcap=test2.pcap \
--cachefile=test2.cache

tcpreplay \
--cachefile=test2.cache \
--intf1=ens34 \
--intf2=ens35 \
test2.pcap
<出力例>
tcpprepやtcprewriteはコマンドが正常に終了した場合、何も出力されません。
root@u222c96:~/tmp# tcpreplay \
--cachefile=test2.cache \
--intf1=ens34 \
--intf2=ens35 \
test2.pcap
Actual: 141 packets (62704 bytes) sent in 2.78 seconds
Rated: 22537.7 Bps, 0.180 Mbps, 50.67 pps
Flows: 37 flows, 13.29 fps, 140 unique flow packets, 1 unique non-flow packets
Statistics for network device: ens34
        Successful packets:        74
        Failed packets:            0
        Truncated packets:         0
        Retried packets (ENOBUFS): 0
        Retried packets (EAGAIN):  0
        Flows total:               20
        Flows unique:              0
        Flows expired:             0
        Flow packets:              74
        Non-flow packets:          0
        Invalid flow packets:      0
Statistics for network device: ens35
        Successful packets:        67
        Failed packets:            0
        Truncated packets:         0
        Retried packets (ENOBUFS): 0
        Retried packets (EAGAIN):  0
        Flows total:               17
        Flows unique:              0
        Flows expired:             0
        Flow packets:              66
        Non-flow packets:          1
        Invalid flow packets:      0
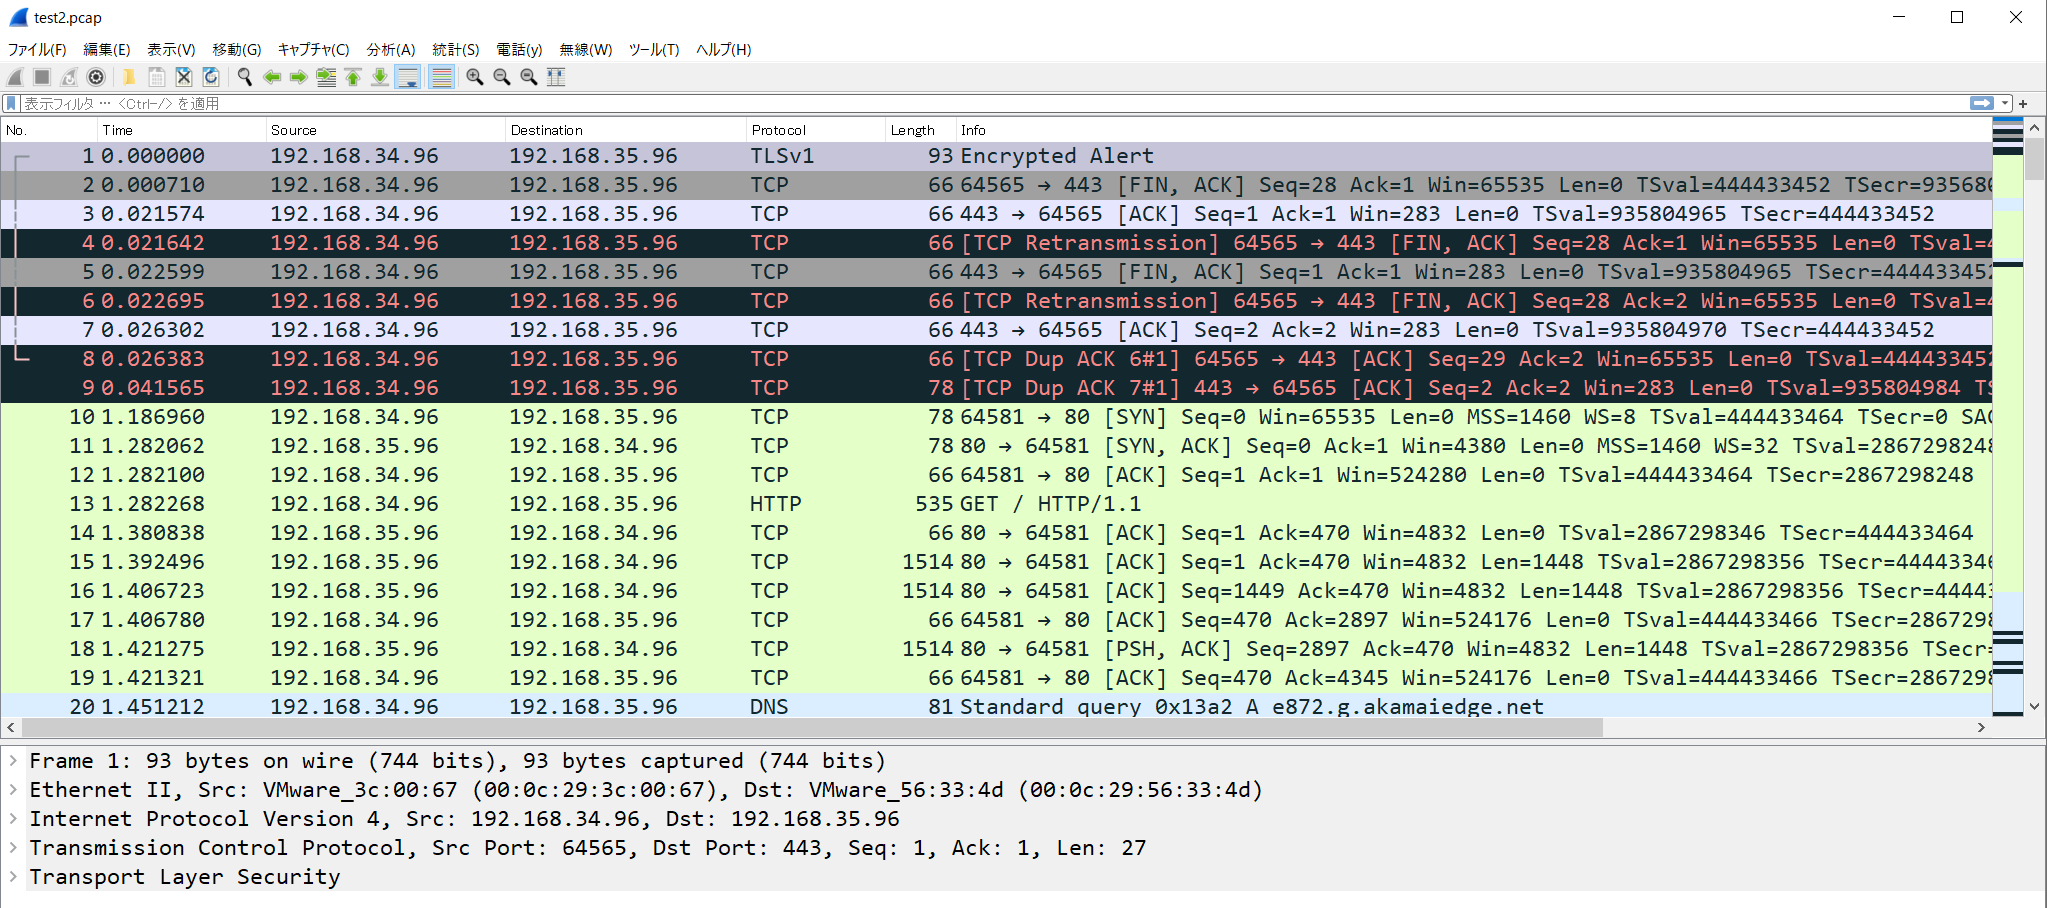
<WiresharkのScreeShot>
以下のスクショはClientSideのPcapとなります。
4-4.各コマンドの詳細
4-4-1.tcpprepコマンド
tcpprepコマンドにて、キャッシュファイルを生成します。
tcpprepコマンドのポイントは、NICが2つある場合、どのNICからどのパケットを送信するか決定することにあります。
1回目
tcpprep \
--auto=client \
--pcap=test.pcap \
--cachefile=test.cache

2回目
tcpprep \
--auto=client \
--pcap=test2.pcap \
--cachefile=test2.cache
2回目のtcpprepについて
tcprewriteコマンドにて、Src/Dst-MAC と Src/Dst-IPを変更した新たなtest2.pcapファイルが生成されます。
このため、test2.pcapに対して、新たにキャッシュファイルを生成しています。
tcpprepコマンドの詳細については以下のサイトを参照ください。
英語サイト
https://tcpreplay.appneta.com/wiki/tcpprep
日本語サイト(非公式)
https://otsuka752.github.io/wiki/tcpprep.html
4-4-2.tcprewriteコマンド
tcprewriteコマンドにて、実際の環境に合わせたSrc/Dst-MAC と Src/Dst-IPに変更します。
tcprewrite \
--enet-dmac=00:0c:29:56:33:4d,00:0c:29:56:33:57 \
--enet-smac=00:0c:29:3c:00:67,00:0c:29:3c:00:71 \
--endpoints=192.168.34.96:192.168.35.96 \
--cachefile=test.cache \
--infile=test.pcap \
--outfile=test2.pcap \
--skipbroadcast
アドレス部分が難解なので構成図と見比べてみてください。
tcprewrite \
--enet-dmac=Vyos eth1-MAC,Vyos eth2-MAC \
--enet-smac=Ubuntu ens34-MAC,Ubuntu ens35-MAC \
--endpoints=Ubuntu ens34-IP:Ubuntu ens35-IP \
--cachefile=test.cache \
--infile=test.pcap \
--outfile=test2.pcap \
--skipbroadcast
その他の部分について
test.pcapとtest.cacheをInputとして、Src/Dst-MAC と Src/Dst-IPを変更したtest2.pcapを新たに生成しています。
--skipbroadcastはオプションですが、BUMトラフィックに対して、MAC アドレスの書き換えをしないようにしています。
4-4-3.tcpreplayコマンド
--intf1がClientSide、--intf2がServerSideと明示的に指定することにより、Router経由のトラフィック送受信を実現しています。
tcpreplay \
--cachefile=test2.cache \
--intf1=ens34 \
--intf2=ens35 \
test2.pcap
4-5.ユースケース
今回のケースでは、
Ubuntu ens34 と Vyos eth1 をClient Side
Ubuntu ens35 と Vyos eth2 をServer Side
として、定義しています。
これにより、DUT(Vyos)でパケット転送処理を発生させ、実際にトラフィックを通過させることができます。
加えて、ClientとServer間でトラフィック送受信を模倣することが可能です。
これらを踏まえたユースケースとしては、トラブル発生時の再現性確認には極めて有用と考えられます。
自社製機器と他社製機器間でのトラブル時において、他社製機器をすぐに準備できないケースなどではその有用性が上がると思います。
また、FWやセキュリティセンサ機器などでアラート発生確認を実施する場合にも活用できます。
特にステートフルな処理を行っている機器に対しては有用ではないかと考えられます。
加えて、負荷試験の用途においても活用できると思います。*3
但し、遅延やジッターの考慮が必要なケースにおいては、慎重に検証を進めることが重要だと考えられます。
今回のケースであれば、test2.pcapとtest21.pcapの時間を比較してみてください。
test2.pcapは、Tcpreplayを実行する際に使用したPcapファイルです。
test21.pcapは、Tcpreplayコマンドにより発生させた実トラフィックのPcapファイルです。
ms(ミリセカンド)レベルではほぼ同時刻ですが、μs(マイクロセカンド)レベルでは差異が発生しています。
また、DUT(Vyos)において高負荷が発生するようなケースでは、転送遅延が加算されることも考慮する必要があると思います。
Appendix.インストール後の確認:make testについて
2-2-3.インストール後の確認において、より詳細な確認を行うため、make testコマンドを利用することが可能です。
やり方は、ビルドしたPathにて、make testコマンドを実行するだけです。
cd /root/tmp/tcpreplay-4.4.4/
make test
但し、Defaultでは、インターフェース名がeth0に固定されているため、いくつかのテスト項目でエラーが発生します。
<出力例>
### snip ###

[tcpreplay] Basic test: make[1]: *** [Makefile:819: replay_basic] Error 255
[tcpreplay] Cache test: make[1]: *** [Makefile:825: replay_cache] Error 255
[tcpreplay] Packets/sec test: make[1]: *** [Makefile:1100: replay_pps] Error 255
[tcpreplay] Mbps test: make[1]: *** [Makefile:1106: replay_rate] Error 255
[tcpreplay] Topspeed test: make[1]: *** [Makefile:1124: replay_top] Error 255
[tcpreplay] Config file/VLAN add test: make[1]: *** [Makefile:1142: replay_config] Error 255
[tcpreplay] Multiplier test: make[1]: *** [Makefile:1112: replay_multi] Error 255
[tcpreplay] Packets/sec Multiplier test: make[1]: *** [Makefile:1118: replay_pps_multi] Error 255
[tcpreplay] Precache test: make[1]: *** [Makefile:1130: replay_precache] Error 255
[tcpreplay] Statistics test: make[1]: *** [Makefile:837: replay_stats] Error 255
[tcpreplay] Dual file test: make[1]: *** [Makefile:1148: replay_dualfile] Error 255
[tcpreplay] Maximum sleep test: make[1]: *** [Makefile:1154: replay_maxsleep] Error 255

### snip ###

make[1]: Target 'test' not remade because of errors.
make[1]: Leaving directory '/root/tmp/tcpreplay-4.4.4/test'
make: *** [Makefile:904: test] Error 2
これを回避するため、以下のコマンドにて事前にインターフェース名を変更しておきます。
sed -i -e "/intf1/s/eth0/ens34/g" /root/tmp/tcpreplay-4.4.4/test/config
sed -i -e "/intf2/s/eth0/ens35/g" /root/tmp/tcpreplay-4.4.4/test/config

sed -i -e "/nic1/s/eth0/ens34/g" /root/tmp/tcpreplay-4.4.4/test/Makefile
sed -i -e "/nic2/s/eth0/ens35/g" /root/tmp/tcpreplay-4.4.4/test/Makefile
改めて、make testコマンドを実行します。
cd /root/tmp/tcpreplay-4.4.4/
make test
<出力例>
root@u222c96:~/tmp/tcpreplay-4.4.4# make test
echo Making test in ./test
Making test in ./test
cd ./test && make test
make[1]: Entering directory '/root/tmp/tcpreplay-4.4.4/test'
NOTICE: Tests must be run as root
Sending traffic on 'ens34' and 'ens35'
[tcpprep] Auto/Router mode test:                OK
[tcpprep] Auto/Bridge mode test:                OK
[tcpprep] Auto/Client mode test:                OK
[tcpprep] Auto/Server mode test:                OK
[tcpprep] Auto/First mode test:                 OK
[tcpprep] CIDR mode test:                       OK
[tcpprep] Regex mode test:                      OK
[tcpprep] Port mode test:                       OK
[tcpprep] MAC mode test:                        OK
[tcpprep] Comment mode test:                    OK
[tcpprep] Print info mode test:                 OK
[tcpprep] Print comment mode test:              OK
[tcpprep] Config mode test:                     OK
[tcpprep] MAC reverse mode test:                OK
[tcpprep] CIDR reverse mode test:               OK
[tcpprep] Regex reverse mode test:              OK
[tcpprep] exclude packets test:                 OK
[tcpprep] include packets test:                 OK
[tcpprep] include source test:                  OK
[tcpprep] include destination test:             OK
[tcpreplay] Basic test:                         OK
[tcpreplay] Cache test:                         OK
[tcpreplay] Packets/sec test:                   OK
[tcpreplay] Mbps test:                          OK
[tcpreplay] Topspeed test:                      OK
[tcpreplay] Config file/VLAN add test:          OK
[tcpreplay] Multiplier test:                    OK
[tcpreplay] Packets/sec Multiplier test:        OK
[tcpreplay] Precache test:                      OK
[tcpreplay] Statistics test:                    OK
[tcpreplay] Dual file test:                     OK
[tcpreplay] Maximum sleep test:                 OK
[tcprewrite] Portmap test:                      OK
[tcprewrite] Portmap range test:                OK
[tcprewrite] Endpoint test:                     OK
[tcprewrite] Pseudo NAT test:                   OK
[tcprewrite] Truncate test:                     OK
[tcprewrite] Pad test:                          OK
[tcprewrite] Seed IP test:                      OK
[tcprewrite] Src/Dst MAC test:                  OK
[tcprewrite] Layer2 test:                       OK
[tcprewrite] Config/VLAN Add test:              OK
[tcprewrite] Skip bcast test:                   OK
[tcprewrite] DLT User test:                     OK
[tcprewrite] DLT Cisco HDLC test:               OK
[tcprewrite] VLAN 802.1ad test:                 OK
[tcprewrite] VLAN Delete test:                  OK
[tcprewrite] Remove EFCS:                       OK
[tcprewrite] Force TTL:                         OK
[tcprewrite] Increase TTL:                      OK
[tcprewrite] Reduce TTL:                        OK
[tcprewrite] TOS test:                          OK
[tcprewrite] MTU Truncate test:                 OK
[tcprewrite] Substitute Src/Dst MAC test:       OK
[tcprewrite] Seeded MAC test:                   OK
[tcprewrite] Seeded Keep MAC test:              OK
[tcprewrite] L7 fuzzing test:                   OK
[tcprewrite] TCP sequence test:                 OK
[tcprewrite] Fix checksum test:                 OK
[tcprewrite] Fix length and pad test:           OK
[tcprewrite] Fix length and truncate test:      OK
[tcprewrite] Fix length and delete test:        OK
make[1]: Leaving directory '/root/tmp/tcpreplay-4.4.4/test'
以上です。
5.最後に
以下のサイトを参考にさせて頂きました。
Tcpreplay - Pcap editing and replaying utilities
Tcpreplay - pcap ファイルの書き換えと再送信ユーティリティ
TcpreplayはPcapファイルのリプレイをすることにより、様々なユースケースにおいて応用できることがわかりました。
今回は取り上げませんでしたが、netmapをビルドして組み込むことにより、ワイヤレートに近い性能が出せるようなので、負荷試験においても活用できると思います。
負荷試験ツールに関しては、過去にこのブログでCisco Trexやdperfを取り上げましたが、Tcpreplayもラインナップに加えられそうです。
CentOS7 Cisco TRex利用方法 その1 - Metonymical Deflection
CentOS7 Cisco TRex利用方法 その2 - Metonymical Deflection
CentOS baidu dperf 設定方法 - Metonymical Deflection
私の個人的な考えですが、この手のツールは優劣を比較してもあまり意味がなく、あくまでも適材適所だと思っています。
また、これらのツールは、いざという時にゴリゴリ使える人として活躍できるよう、常日頃から遊び感覚*4で練習しておくことが重要だと考えています。