vi /etc/bind/named.conf.intzone

zone "example.com" IN {
        type master;
        file "/etc/bind/example.com.lan";
        allow-update { none; };
};
zone "75.168.192.in-addr.arpa" IN {
        type master;
        file "/etc/bind/75.168.192.db";
        allow-update { none; };
};
vi /etc/bind/example.com.lan

$TTL 60
@   IN  SOA     ns.example.com. root.example.com. (
        2024062401  ;Serial
        60          ;Refresh
        30          ;Retry
        120         ;Expire
        60          ;Minimum TTL
)
        IN  NS      ns.example.com.
        IN  A       192.168.74.147
        IN  MX 10   ns.example.com.

ns      IN  A       192.168.74.147
vyos    IN  A       192.168.74.1
vyos    IN  A       192.168.75.1
tail -f /var/log/syslog

Jul  7 09:12:36 u222c2148 dhcpd[886]: DHCPDISCOVER from 00:0c:29:c7:31:a6 via 192.168.75.1
Jul  7 09:12:37 u222c2148 dhcpd[886]: DHCPOFFER on 192.168.75.32 to 00:0c:29:c7:31:a6 (u222c2149) via 192.168.75.1
Jul  7 09:12:37 u222c2148 dhcpd[886]: DHCPREQUEST for 192.168.75.32 (192.168.74.148) from 00:0c:29:c7:31:a6 (u222c2149) via 192.168.75.1
Jul  7 09:12:37 u222c2148 dhcpd[886]: DHCPACK on 192.168.75.32 to 00:0c:29:c7:31:a6 (u222c2149) via 192.168.75.1
root@u222c2147:/etc/bind# ddns-confgen -k dhcp75.ddns.lan
# To activate this key, place the following in named.conf, and
# in a separate keyfile on the system or systems from which nsupdate
# will be run:
key "dhcp75.ddns.lan" {
        algorithm hmac-sha256;
        secret "4g7Jwcozsh5s35M1gOJ7VLNVa9mJSK3s9lwVw06MKRc=";
};

# Then, in the "zone" statement for each zone you wish to dynamically
# update, place an "update-policy" statement granting update permission
# to this key.  For example, the following statement grants this key
# permission to update any name within the zone:
update-policy {
        grant dhcp75.ddns.lan zonesub ANY;
};

# After the keyfile has been placed, the following command will
# execute nsupdate using this key:
nsupdate -k
vi /etc/bind/named.conf.intzone

include "/etc/bind/dhcp75.key";

zone "example.com" IN {
        type master;
        file "/var/lib/bind/example.com.lan";
        update-policy {
        grant dhcp75.ddns.lan wildcard *.example.com A DHCID;
        };
};
zone "75.168.192.in-addr.arpa" IN {
        type master;
        file "/var/lib/bind/75.168.192.db";
        update-policy {
        grant dhcp75.ddns.lan wildcard *.75.168.192.in-addr.arpa PTR;
        };
};
Jul  7 09:49:26 u222c2148 dhcpd[1305]: DHCPDISCOVER from 00:0c:29:c7:31:a6 via 192.168.75.1
Jul  7 09:49:27 u222c2148 dhcpd[1305]: DHCPOFFER on 192.168.75.32 to 00:0c:29:c7:31:a6 (u222c2149) via 192.168.75.1
Jul  7 09:49:27 u222c2148 dhcpd[1305]: DHCPREQUEST for 192.168.75.32 (192.168.74.148) from 00:0c:29:c7:31:a6 (u222c2149) via 192.168.75.1
Jul  7 09:49:27 u222c2148 dhcpd[1305]: DHCPACK on 192.168.75.32 to 00:0c:29:c7:31:a6 (u222c2149) via 192.168.75.1
Jul  7 09:49:27 u222c2148 dhcpd[1305]: Added new forward map from u222c2149.example.com to 192.168.75.32
Jul  7 09:49:27 u222c2148 dhcpd[1305]: Added reverse map from 32.75.168.192.in-addr.arpa. to u222c2149.example.com
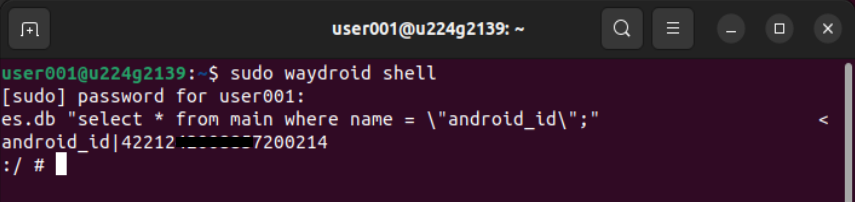
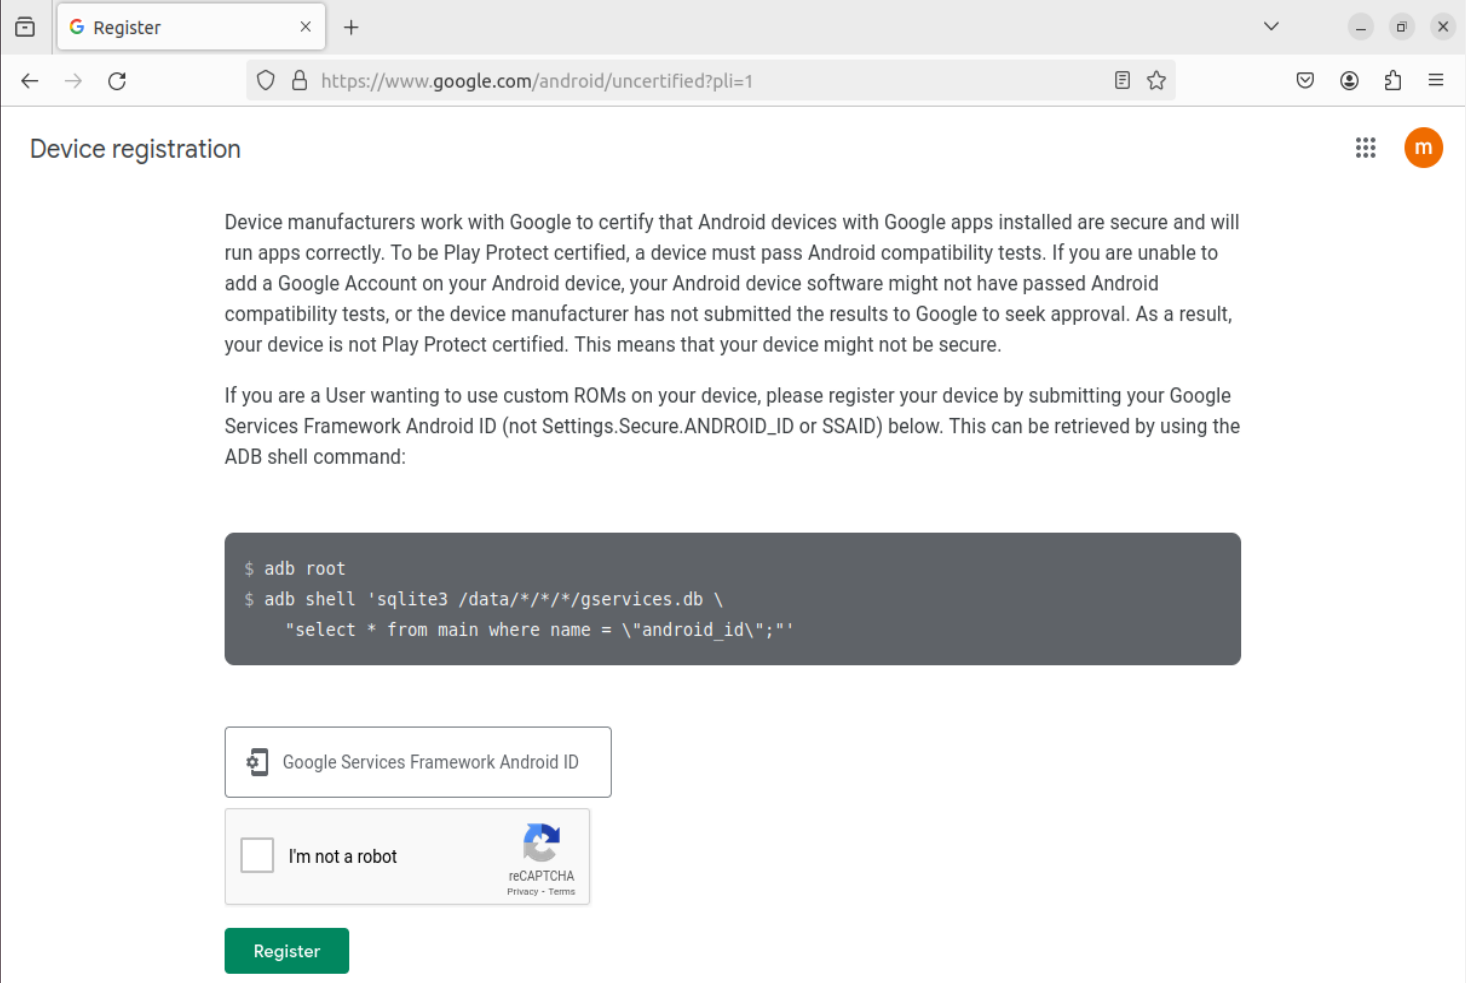
ANDROID_RUNTIME_ROOT=/apex/com.android.runtime ANDROID_DATA=/data ANDROID_TZDATA_ROOT=/apex/com.android.tzdata ANDROID_I18N_ROOT=/apex/com.android.i18n sqlite3 /data/data/com.google.android.gsf/databases/gservices.db "select * from main where name = \"android_id\";"
root@u222c112:~# add-apt-repository ppa:open5gs/latest
PPA publishes dbgsym, you may need to include 'main/debug' component
Repository: 'deb https://ppa.launchpadcontent.net/open5gs/latest/ubuntu/ jammy main'
Description:
Open5GS is a C-language Open Source implementation of 5G Core and EPC, i.e. the core network of NR/LTE network (Release-17)
More info: https://launchpad.net/~open5gs/+archive/ubuntu/latest
Adding repository.
Press [ENTER] to continue or Ctrl-c to cancel.
for service in open5gs-hssd open5gs-mmed open5gs-pcrfd open5gs-sgwcd open5gs-sgwud; do
  systemctl stop "$service"
  systemctl disable "$service"
done

reboot
root@u222c111:~/UERANSIM# make
rm -fr logs # Old version log files
mkdir -p build
rm -fr build/*
# cmake -DCMAKE_BUILD_TYPE=Debug -G "CodeBlocks - Unix Makefiles" . -B cmake-build-debug
cmake -DCMAKE_BUILD_TYPE=Release -G "CodeBlocks - Unix Makefiles" . -B cmake-build-release
CMake Deprecation Warning:
Support for "Extra Generators" like
CodeBlocks
is deprecated and will be removed from a future version of CMake. IDEs may
use the cmake-file-api(7) to view CMake-generated project build trees.
-- The C compiler identification is GNU 11.4.0-- The CXX compiler identification is GNU 11.4.0-- Detecting C compiler ABI info-- Detecting C compiler ABI info - done-- Check for working C compiler: /usr/bin/cc - skipped-- Detecting C compile features-- Detecting C compile features - done-- Detecting CXX compiler ABI info-- Detecting CXX compiler ABI info - done-- Check for working CXX compiler: /usr/bin/c++ - skipped-- Detecting CXX compile features-- Detecting CXX compile features - done-- Configuring done (0.3s)-- Generating done (0.1s)-- Build files have been written to: /root/UERANSIM/cmake-build-release
# cmake --build cmake-build-debug --target all
cmake --build cmake-build-release --target all
gmake[1]: Entering directory '/root/UERANSIM/cmake-build-release'
gmake[2]: Entering directory '/root/UERANSIM/cmake-build-release'
gmake[3]: Entering directory '/root/UERANSIM/cmake-build-release'
gmake[3]: Leaving directory '/root/UERANSIM/cmake-build-release'
gmake[3]: Entering directory '/root/UERANSIM/cmake-build-release'
[ 0%] Building C object src/asn/asn1c/CMakeFiles/asn-asn1c.dir/ANY.c.o
[ 0%] Building C object src/asn/asn1c/CMakeFiles/asn-asn1c.dir/BIT_STRING.c.o
[ 0%] Building C object src/asn/asn1c/CMakeFiles/asn-asn1c.dir/BOOLEAN.c.o
[ 0%] Building C object src/asn/asn1c/CMakeFiles/asn-asn1c.dir/INTEGER.c.o
=== s n i p ===
[100%] Building CXX object CMakeFiles/nr-cli.dir/src/cli.cpp.o
[100%] Linking CXX executable nr-cli
gmake[3]: Leaving directory '/root/UERANSIM/cmake-build-release'
[100%] Built target nr-cli
gmake[2]: Leaving directory '/root/UERANSIM/cmake-build-release'
gmake[1]: Leaving directory '/root/UERANSIM/cmake-build-release'
cp cmake-build-release/nr-gnb build/
cp cmake-build-release/nr-ue build/
cp cmake-build-release/nr-cli build/
cp cmake-build-release/libdevbnd.so build/
cp tools/nr-binder build/
UERANSIM successfully built.
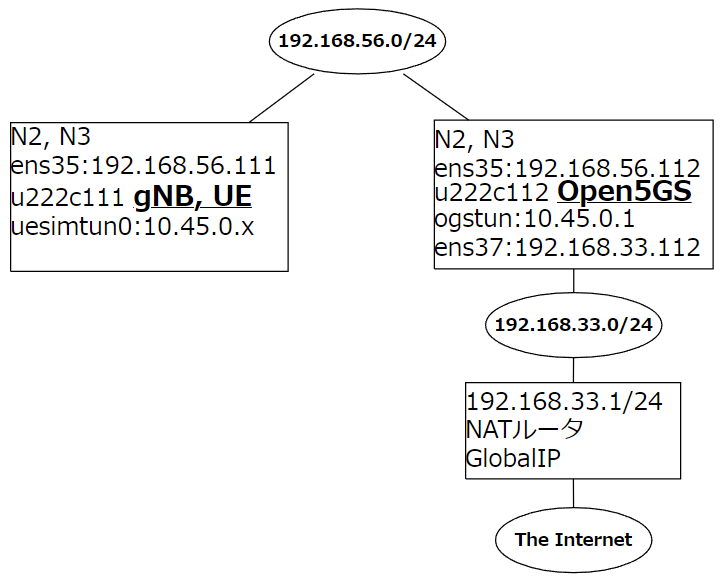
vi /root/UERANSIM/config/open5gs-gnb.yaml

linkIp: 192.168.56.111   # gNB's local IP address for Radio Link Simulation (Usually same with local IP)
ngapIp: 192.168.56.111   # gNB's local IP address for N2 Interface (Usually same with local IP)
gtpIp: 192.168.56.111    # gNB's local IP address for N3 Interface (Usually same with local IP)

# List of AMF address information
amfConfigs:
  - address: 192.168.56.112
    port: 38412
vi /root/UERANSIM/config/open5gs-ue.yaml

# List of gNB IP addresses for Radio Link Simulation
gnbSearchList:
  - 192.168.56.111
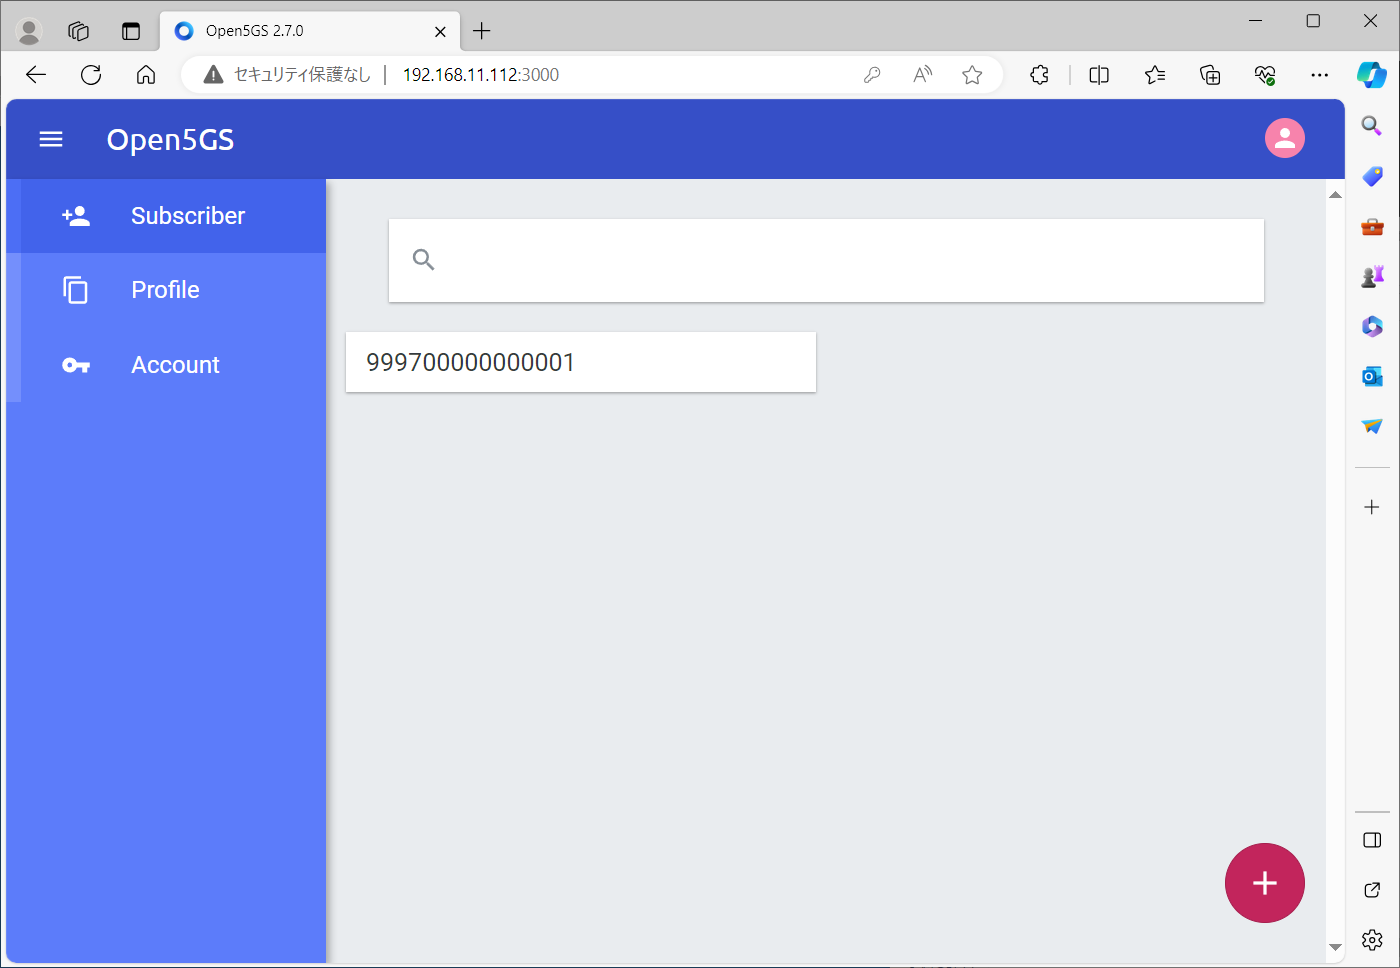
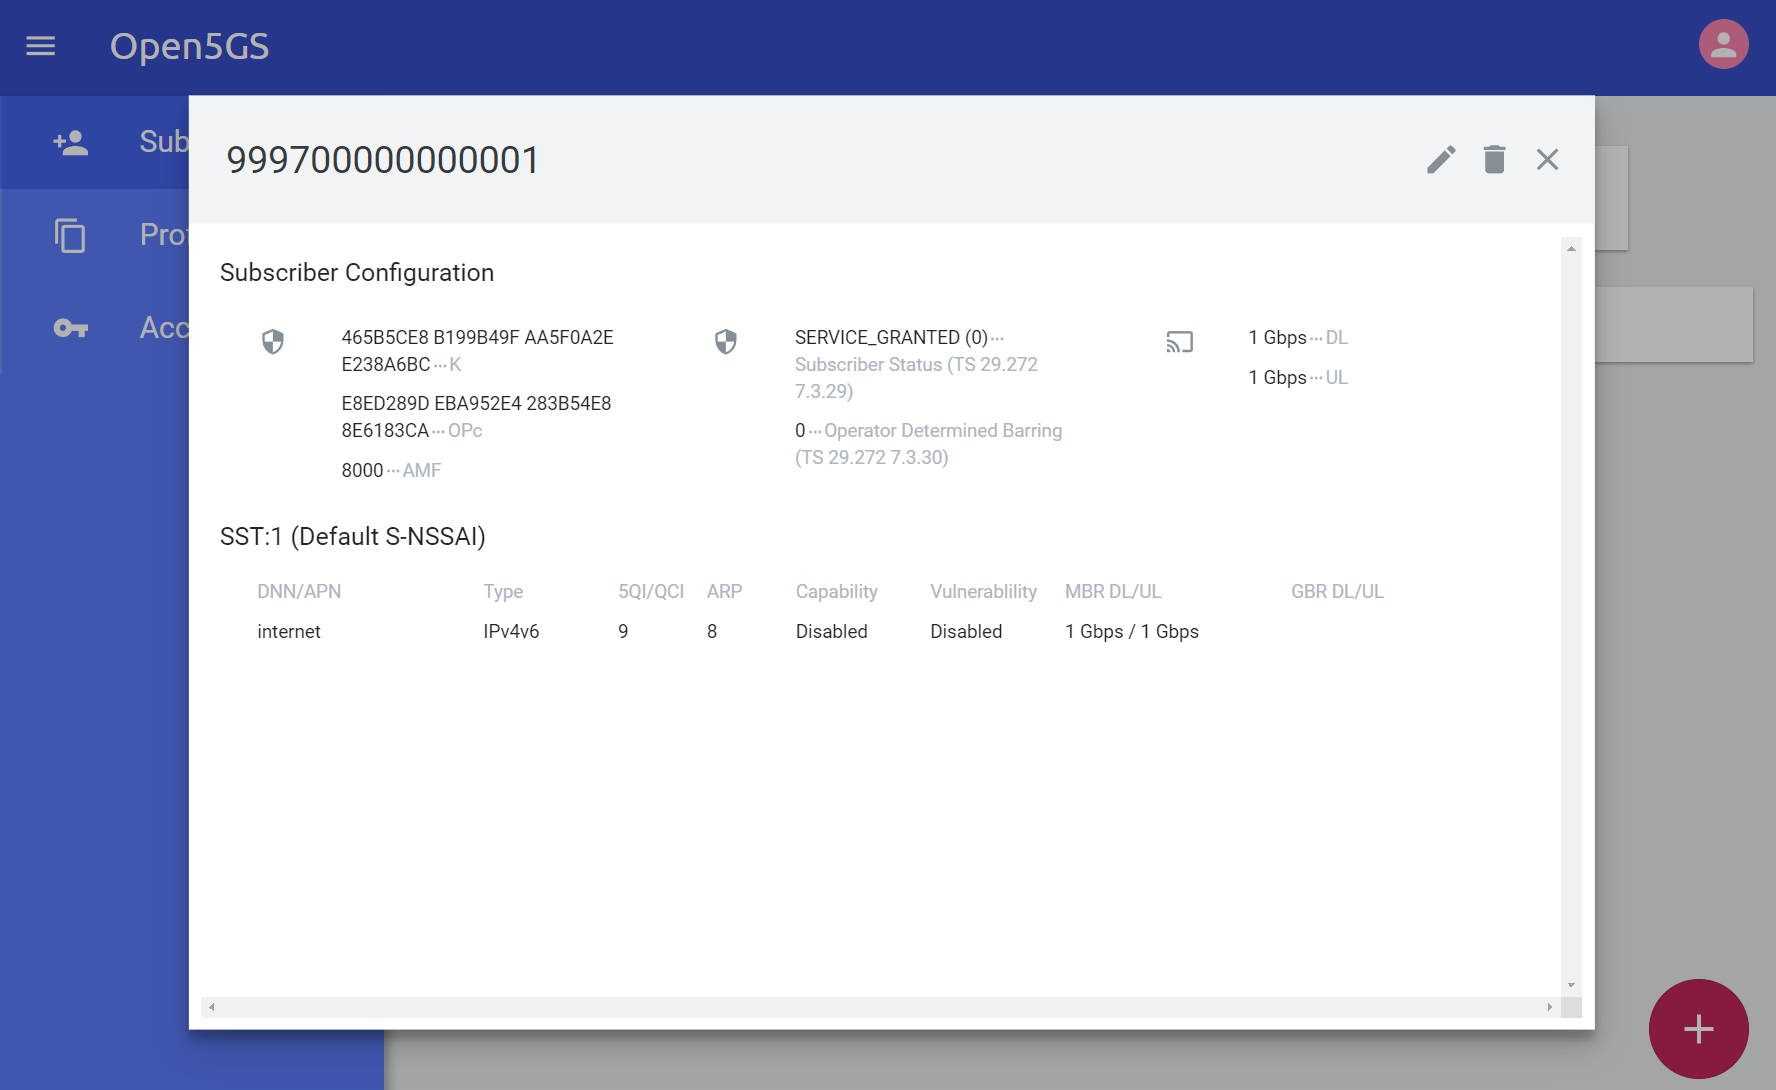
補足1
IMSIやK値、OPcなどは既に設定済みです。
Open5GS Web Consoleの値と一致しているかを確認してもよいと思います。
open5gs-ue.yamlでの出力例
cat /root/UERANSIM/config/open5gs-ue.yaml

root@u222c111:~/UERANSIM# cat /root/UERANSIM/config/open5gs-ue.yaml
# IMSI number of the UE. IMSI = [MCC|MNC|MSISDN] (In total 15 digits)
supi: 'imsi-999700000000001'
# Mobile Country Code value of HPLMN
mcc: '999'
# Mobile Network Code value of HPLMN (2 or 3 digits)
mnc: '70'
# SUCI Protection Scheme : 0 for Null-scheme, 1 for Profile A and 2 for Profile B
protectionScheme: 0
# Home Network Public Key for protecting with SUCI Profile A
homeNetworkPublicKey: '5a8d38864820197c3394b92613b20b91633cbd897119273bf8e4a6f4eec0a65
0'
# Home Network Public Key ID for protecting with SUCI Profile A
homeNetworkPublicKeyId: 1
# Routing Indicator
routingIndicator: '0000'

# Permanent subscription key
key: '465B5CE8B199B49FAA5F0A2EE238A6BC'
# Operator code (OP or OPC) of the UE
op: 'E8ED289DEBA952E4283B54E88E6183CA'
# This value specifies the OP type and it can be either 'OP' or 'OPC'
opType: 'OPC'
# Authentication Management Field (AMF) value
amf: '8000'
# IMEI number of the device. It is used if no SUPI is provided
imei: '356938035643803'
# IMEISV number of the device. It is used if no SUPI and IMEI is provided
imeiSv: '4370816125816151'
vyos@vyos14c114# run show configuration commands
set interfaces ethernet eth0 address '192.168.11.114/24'
set interfaces ethernet eth0 hw-id '00:0c:29:c6:ea:14'
set interfaces ethernet eth1 address '192.168.56.1/24'
set interfaces ethernet eth1 hw-id '00:0c:29:c6:ea:1e'
set interfaces ethernet eth2 address '192.168.57.1/24'
set interfaces ethernet eth2 hw-id '00:0c:29:c6:ea:28'
set interfaces ethernet eth3 address '192.168.58.1/24'
set interfaces ethernet eth3 hw-id '00:0c:29:c6:ea:32'

vyos@vyos14c114# run sho ip route
Codes: K - kernel route, C - connected, S - static, R - RIP,
       O - OSPF, I - IS-IS, B - BGP, E - EIGRP, N - NHRP,
       T - Table, v - VNC, V - VNC-Direct, A - Babel, F - PBR,
       f - OpenFabric,
       > - selected route, * - FIB route, q - queued, r - rejected, b - backup
       t - trapped, o - offload failure

C>* 192.168.11.0/24 is directly connected, eth0, 00:43:13
C>* 192.168.56.0/24 is directly connected, eth1, 00:40:52
C>* 192.168.57.0/24 is directly connected, eth2, 00:40:52
C>* 192.168.58.0/24 is directly connected, eth3, 00:40:52
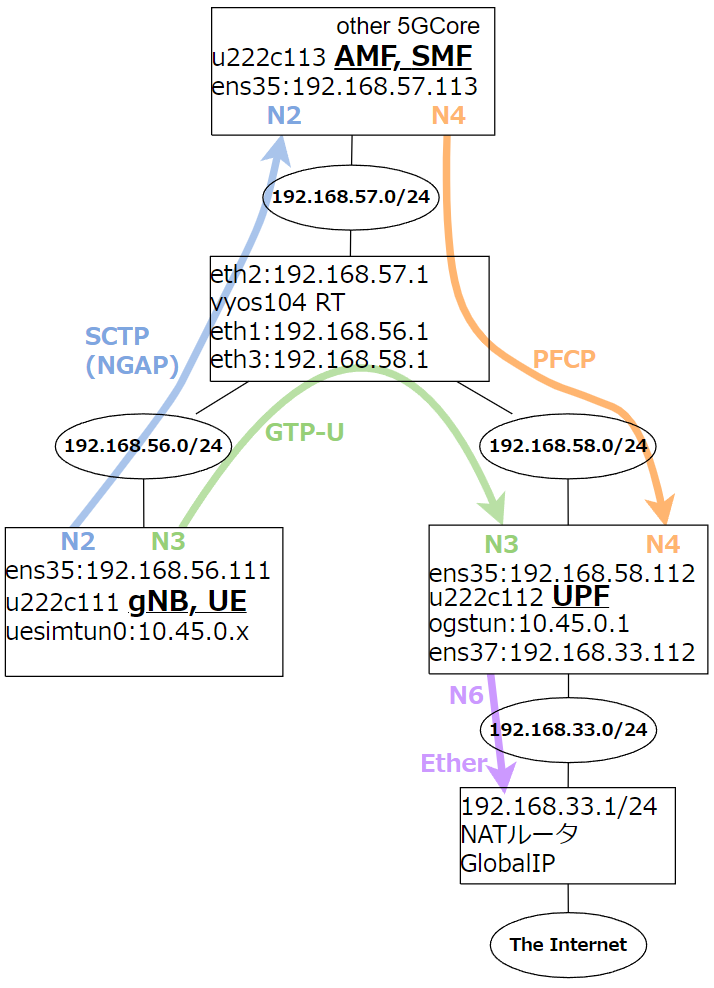
6-1.u222c112:UPFの設定
6-1-1.u222c112:UPFのNW設定
NW周りの設定を変更します。
root@u222c112:~# cat /etc/netplan/00-installer-config.yaml
# This is the network config written by 'subiquity'
network:
  ethernets:
    ens33:
      addresses:
      - 192.168.11.112/24
    ens35:
      addresses:
      - 192.168.58.112/24
      routes:
      - to: 192.168.56.0/22
        via: 192.168.58.1
    ens37:
      addresses:
      - 192.168.33.112/24
      routes:
      - to: 0.0.0.0/0
        via: 192.168.33.1
  version: 2
設定変更&反映後、以下のようになっていればOKです。
root@u222c112:~# route -n
Kernel IP routing table
Destination     Gateway         Genmask         Flags Metric Ref    Use Iface
0.0.0.0         192.168.33.1    0.0.0.0         UG    0      0        0 ens37
192.168.11.0    0.0.0.0         255.255.255.0   U     0      0        0 ens33
192.168.33.0    0.0.0.0         255.255.255.0   U     0      0        0 ens37
192.168.56.0    192.168.58.1    255.255.252.0   UG    0      0        0 ens35
192.168.58.0    0.0.0.0         255.255.255.0   U     0      0        0 ens35
6-1-2.u222c112:UPFのサービス設定
UPF上で不要なサービスを停止&無効化します。
for service in open5gs-amfd open5gs-ausfd open5gs-bsfd open5gs-nrfd open5gs-nssfd open5gs-pcfd open5gs-scpd open5gs-smfd open5gs-udmd open5gs-udrd open5gs-webui; do
  systemctl stop "$service"
  systemctl disable "$service"
done
vi /etc/open5gs/upf.yaml

upf:
  pfcp:
    server:
      - address: 192.168.58.112
    client:
#      smf:     #  UPF PFCP Client try to associate SMF PFCP Server
#        - address: 127.0.0.4
  gtpu:
    server:
      - address: 192.168.58.112
設定が完了したら、一旦再起動をしておきます。
6-2.u222c113:AMFの設定変更
6-2-1.u222c113:AMFのNW設定
NW周りの設定を変更します。
root@u222c113:~# cat /etc/netplan/00-installer-config.yaml
# This is the network config written by 'subiquity'
network:
  ethernets:
    ens33:
      addresses:
      - 192.168.11.113/24
    ens35:
      addresses:
      - 192.168.57.113/24
      routes:
      - to: 192.168.56.0/22
        via: 192.168.57.1
  version: 2
設定変更&反映後、以下のようになっていればOKです。
root@u222c113:~# route -n
Kernel IP routing table
Destination     Gateway         Genmask         Flags Metric Ref    Use Iface
192.168.11.0    0.0.0.0         255.255.255.0   U     0      0        0 ens33
192.168.56.0    192.168.57.1    255.255.252.0   UG    0      0        0 ens35
192.168.57.0    0.0.0.0         255.255.255.0   U     0      0        0 ens35
root@u222c111:~# cat /etc/netplan/00-installer-config.yaml
# This is the network config written by 'subiquity'
network:
  ethernets:
    ens33:
      addresses:
      - 192.168.11.111/24
    ens35:
      addresses:
      - 192.168.56.111/24
      routes:
      - to: 192.168.56.0/22
        via: 192.168.56.1
  version: 2
cd /root/tmp/tcpreplay-4.4.4/
./configure
make
make install
./configureの出力例
root@u222c96:~/tmp/tcpreplay-4.4.4# ./configure
checking whether to enable maintainer-specific portions of Makefiles... yes
checking if malloc debugging is wanted... no
checking build system type... x86_64-pc-linux-gnu
checking host system type... x86_64-pc-linux-gnu
checking target system type... x86_64-pc-linux-gnu
### snip ###
config.status: creating src/common/Makefile
config.status: creating src/defines.h
config.status: creating test/Makefile
config.status: creating test/config
config.status: creating scripts/Makefile
config.status: creating src/config.h
config.status: executing depfiles commands
config.status: executing libtool commands
##########################################################################
TCPREPLAY Suite Configuration Results (4.4.4)
##########################################################################
libpcap: /usr (1.10.1)
PF_RING libpcap no
libdnet: no
autogen: (unknown - man pages will not be built)
Use libopts tearoff: yes
64bit counter support: yes
tcpdump binary path: /usr/bin/tcpdump
fragroute support: no
tcpbridge support: yes
tcpliveplay support: yes
Supported Packet Injection Methods (*):
Linux TX_RING: no
Linux PF_PACKET: yes
BSD BPF: no
libdnet: no
pcap_inject: yes
pcap_sendpacket: yes **
pcap_netmap no
Linux/BSD netmap: no
Tuntap device support: yes
* In order of preference; see configure --help to override** Required for tcpbridge
makeの出力例
root@u222c96:~/tmp/tcpreplay-4.4.4# make
Making all in scripts
make[1]: Entering directory '/root/tmp/tcpreplay-4.4.4/scripts'
make[1]: Nothing to be done for 'all'.
make[1]: Leaving directory '/root/tmp/tcpreplay-4.4.4/scripts'
Making all in lib
make[1]: Entering directory '/root/tmp/tcpreplay-4.4.4/lib'
  CC       strlcat.o
  CC       strlcpy.o
  AR       libstrl.a

### snip ###

  CCLD     tcpbridge
  CC       tcpliveplay-tcpliveplay_opts.o
  CC       tcpliveplay-tcpliveplay.o
  CCLD     tcpliveplay
make[3]: Leaving directory '/root/tmp/tcpreplay-4.4.4/src'
make[2]: Leaving directory '/root/tmp/tcpreplay-4.4.4/src'
make[1]: Leaving directory '/root/tmp/tcpreplay-4.4.4/src'
make[1]: Entering directory '/root/tmp/tcpreplay-4.4.4'
make[1]: Nothing to be done for 'all-am'.
make[1]: Leaving directory '/root/tmp/tcpreplay-4.4.4'
make installの出力例
root@u222c96:~/tmp/tcpreplay-4.4.4# make install
Making install in scripts
make[1]: Entering directory '/root/tmp/tcpreplay-4.4.4/scripts'
make[2]: Entering directory '/root/tmp/tcpreplay-4.4.4/scripts'
make[2]: Nothing to be done for 'install-exec-am'.
make[2]: Nothing to be done for 'install-data-am'.
make[2]: Leaving directory '/root/tmp/tcpreplay-4.4.4/scripts'
make[1]: Leaving directory '/root/tmp/tcpreplay-4.4.4/scripts'
Making install in lib
make[1]: Entering directory '/root/tmp/tcpreplay-4.4.4/lib'

### snip ###

libtool: install: /usr/bin/install -c tcprewrite /usr/local/bin/tcprewrite
libtool: install: /usr/bin/install -c tcpreplay-edit /usr/local/bin/tcpreplay-edit
libtool: install: /usr/bin/install -c tcpcapinfo /usr/local/bin/tcpcapinfo
libtool: install: /usr/bin/install -c tcpbridge /usr/local/bin/tcpbridge
libtool: install: /usr/bin/install -c tcpliveplay /usr/local/bin/tcpliveplay
 /usr/bin/mkdir -p '/usr/local/share/man/man1'
 /usr/bin/install -c -m 644 tcpreplay.1 tcpprep.1 tcprewrite.1 tcpreplay-edit.1 tcpcapinfo.1 tcpbridge.1 tcpliveplay.1 '/usr/local/share/man/man1'
make[4]: Leaving directory '/root/tmp/tcpreplay-4.4.4/src'
make[3]: Leaving directory '/root/tmp/tcpreplay-4.4.4/src'
make[2]: Leaving directory '/root/tmp/tcpreplay-4.4.4/src'
make[1]: Leaving directory '/root/tmp/tcpreplay-4.4.4/src'
make[1]: Entering directory '/root/tmp/tcpreplay-4.4.4'
make[2]: Entering directory '/root/tmp/tcpreplay-4.4.4'
make[2]: Nothing to be done for 'install-exec-am'.
make[2]: Nothing to be done for 'install-data-am'.
make[2]: Leaving directory '/root/tmp/tcpreplay-4.4.4'
make[1]: Leaving directory '/root/tmp/tcpreplay-4.4.4'
sed -i -e "/intf1/s/eth0/ens34/g" /root/tmp/tcpreplay-4.4.4/test/config
sed -i -e "/intf2/s/eth0/ens35/g" /root/tmp/tcpreplay-4.4.4/test/config
sed -i -e "/nic1/s/eth0/ens34/g" /root/tmp/tcpreplay-4.4.4/test/Makefile
sed -i -e "/nic2/s/eth0/ens35/g" /root/tmp/tcpreplay-4.4.4/test/Makefile
改めて、make testコマンドを実行します。
cd /root/tmp/tcpreplay-4.4.4/
make test
<出力例>
root@u222c96:~/tmp/tcpreplay-4.4.4# make test
echo Making test in ./test
Making test in ./test
cd ./test && make test
make[1]: Entering directory '/root/tmp/tcpreplay-4.4.4/test'
NOTICE: Tests must be run as root
Sending traffic on 'ens34' and 'ens35'
[tcpprep] Auto/Router mode test:                OK
[tcpprep] Auto/Bridge mode test:                OK
[tcpprep] Auto/Client mode test:                OK
[tcpprep] Auto/Server mode test:                OK
[tcpprep] Auto/First mode test:                 OK
[tcpprep] CIDR mode test:                       OK
[tcpprep] Regex mode test:                      OK
[tcpprep] Port mode test:                       OK
[tcpprep] MAC mode test:                        OK
[tcpprep] Comment mode test:                    OK
[tcpprep] Print info mode test:                 OK
[tcpprep] Print comment mode test:              OK
[tcpprep] Config mode test:                     OK
[tcpprep] MAC reverse mode test:                OK
[tcpprep] CIDR reverse mode test:               OK
[tcpprep] Regex reverse mode test:              OK
[tcpprep] exclude packets test:                 OK
[tcpprep] include packets test:                 OK
[tcpprep] include source test:                  OK
[tcpprep] include destination test:             OK
[tcpreplay] Basic test:                         OK
[tcpreplay] Cache test:                         OK
[tcpreplay] Packets/sec test:                   OK
[tcpreplay] Mbps test:                          OK
[tcpreplay] Topspeed test:                      OK
[tcpreplay] Config file/VLAN add test:          OK
[tcpreplay] Multiplier test:                    OK
[tcpreplay] Packets/sec Multiplier test:        OK
[tcpreplay] Precache test:                      OK
[tcpreplay] Statistics test:                    OK
[tcpreplay] Dual file test:                     OK
[tcpreplay] Maximum sleep test:                 OK
[tcprewrite] Portmap test:                      OK
[tcprewrite] Portmap range test:                OK
[tcprewrite] Endpoint test:                     OK
[tcprewrite] Pseudo NAT test:                   OK
[tcprewrite] Truncate test:                     OK
[tcprewrite] Pad test:                          OK
[tcprewrite] Seed IP test:                      OK
[tcprewrite] Src/Dst MAC test:                  OK
[tcprewrite] Layer2 test:                       OK
[tcprewrite] Config/VLAN Add test:              OK
[tcprewrite] Skip bcast test:                   OK
[tcprewrite] DLT User test:                     OK
[tcprewrite] DLT Cisco HDLC test:               OK
[tcprewrite] VLAN 802.1ad test:                 OK
[tcprewrite] VLAN Delete test:                  OK
[tcprewrite] Remove EFCS:                       OK
[tcprewrite] Force TTL:                         OK
[tcprewrite] Increase TTL:                      OK
[tcprewrite] Reduce TTL:                        OK
[tcprewrite] TOS test:                          OK
[tcprewrite] MTU Truncate test:                 OK
[tcprewrite] Substitute Src/Dst MAC test:       OK
[tcprewrite] Seeded MAC test:                   OK
[tcprewrite] Seeded Keep MAC test:              OK
[tcprewrite] L7 fuzzing test:                   OK
[tcprewrite] TCP sequence test:                 OK
[tcprewrite] Fix checksum test:                 OK
[tcprewrite] Fix length and pad test:           OK
[tcprewrite] Fix length and truncate test:      OK
[tcprewrite] Fix length and delete test:        OK
make[1]: Leaving directory '/root/tmp/tcpreplay-4.4.4/test'
vi /etc/ssl/openssl.cnf
==== snip ====
[ CA_default ]

dir             = /etc/ssl/demoCA      # Where everything is kept  ./demoCAから絶対Pathに変更
certs           = $dir/certs            # Where the issued certs are kept

==== snip ====
[ req_distinguished_name ]
countryName                     = Country Name (2 letter code)
countryName_default             = JP
countryName_min                 = 2
countryName_max                 = 2

stateOrProvinceName             = State or Province Name (full name)
stateOrProvinceName_default     = Tokyo

localityName                    = Locality Name (eg, city)
localityName_default            = Chiyoda-ku

0.organizationName              = Organization Name (eg, company)
0.organizationName_default      = f5.si

# we can do this but it is not needed normally :-)
#1.organizationName             = Second Organization Name (eg, company)
#1.organizationName_default     = World Wide Web Pty Ltd

organizationalUnitName          = Organizational Unit Name (eg, section)
#organizationalUnitName_default =

commonName                      = Common Name (e.g. server FQDN or YOUR name)
commonName_max                  = 64
==== snip ====
root@u222c96:/etc/ssl# /usr/lib/ssl/misc/CA.pl -newca
CA certificate filename (or enter to create) <ー空Enter
Making CA certificate ...
openssl req -new -keyout ./demoCA/private/cakey.pem -out ./demoCA/careq.pem
..+......+....+..+.......+.....+.......+.....+....+.....+.+......+........+....+...+.................+.+..+...+....+...+.....+++++++++++++++++++++++++++++++++++++++++++++++++++++++++++++++++*.....+...+..+++++++++++++++++++++++++++++++++++++++++++++++++++++++++++++++++*..+.+.....+...+.+..+...+......+.........+....+...................................+..........+......+..+.......+............+......+.................+.......+...+......+.....+.....................+......+.......+.....+......+....+..+...+............+.+++++++++++++++++++++++++++++++++++++++++++++++++++++++++++++++++
..+.+..............+.+...+++++++++++++++++++++++++++++++++++++++++++++++++++++++++++++++++*.....+.+...+.....+.+.....+....+..+.........+..........+++++++++++++++++++++++++++++++++++++++++++++++++++++++++++++++++*.....+.....+......+...+....+......+..+.........+...+.+......+......+++++++++++++++++++++++++++++++++++++++++++++++++++++++++++++++++
Enter PEM pass phrase: <ーパスフレーズを入力
Verifying - Enter PEM pass phrase: <ーパスフレーズを入力-----
You are about to be asked to enter information that will be incorporated
into your certificate request.
What you are about to enter is what is called a Distinguished Name or a DN.
There are quite a few fields but you can leave some blank
For some fields there will be a default value,
If you enter '.', the field will be left blank.
-----
Country Name (2 letter code) [JP]: <ー空Enter
State or Province Name (full name) [Tokyo]: <ー空Enter
Locality Name (eg, city) [Chiyoda-ku]: <ー空Enter
Organization Name (eg, company) [f5.si]: <ー空Enter
Organizational Unit Name (eg, section) : <ー空Enter
Common Name (e.g. server FQDN or YOUR name) :CA.f5.si <ーCAのCommon Nameを手入力。任意の名前でOK
Email Address : <ー空Enter
Please enter the following 'extra' attributes
to be sent with your certificate request
A challenge password : <ー空Enter
An optional company name []: <ー空Enter==> 0
openssl ca -create_serial -out ./demoCA/cacert.pem -days 1095 -batch -keyfile ./demoCA/private/cakey.pem -selfsign -extensions v3_ca -infiles ./demoCA/careq.pem
Using configuration from /usr/lib/ssl/openssl.cnf
Enter pass phrase for ./demoCA/private/cakey.pem: <ー最初に入力した(cakeyの)パスフレーズを再度入力
Check that the request matches the signature
Signature ok
Certificate Details:
Serial Number:
6e:fa:be:0b:64:8b:ea:4c:c2:ee:c2:7b:62:b3:64:5f:52:40:59:2b
Validity
Not Before: Nov 23 00:12:36 2023 GMT
Not After : Nov 22 00:12:36 2026 GMT
Subject:
countryName = JP
stateOrProvinceName = Tokyo
organizationName = f5.si
commonName = CA.f5.si
X509v3 extensions:
X509v3 Subject Key Identifier:
3B:BE:09:A3:AF:51:5A:6A:D5:3F:DD:C1:D2:60:4A:88:E9:F8:79:BF
X509v3 Authority Key Identifier:
3B:BE:09:A3:AF:51:5A:6A:D5:3F:DD:C1:D2:60:4A:88:E9:F8:79:BF
X509v3 Basic Constraints: critical
CA:TRUE
Certificate is to be certified until Nov 22 00:12:36 2026 GMT (1095 days)
Write out database with 1 new entries
Data Base Updated
==> 0
CA certificate is in ./demoCA/cacert.pem
root@u222c96:/etc/ssl/demoCA# cd /etc/ssl/demoCA
root@u222c96:/etc/ssl/demoCA# openssl genrsa -out idp.key 2048
root@u222c96:/etc/ssl/demoCA# openssl req -utf8 -new -key idp.key -out idp.csr
You are about to be asked to enter information that will be incorporated
into your certificate request.
What you are about to enter is what is called a Distinguished Name or a DN.
There are quite a few fields but you can leave some blank
For some fields there will be a default value,
If you enter '.', the field will be left blank.
-----
Country Name (2 letter code) [JP]: <ー空Enter
State or Province Name (full name) [Tokyo]: <ー空Enter
Locality Name (eg, city) [Chiyoda-ku]: <ー空Enter
Organization Name (eg, company) [f5.si]: <ー空Enter
Organizational Unit Name (eg, section) : <ー空Enter
Common Name (e.g. server FQDN or YOUR name) :idp.f5.si <ーidp.f5.siと入力
Email Address :

Please enter the following 'extra' attributes
to be sent with your certificate request
A challenge password : <ー空Enter
An optional company name []: <ー空Enter

root@u222c96:/etc/ssl/demoCA# openssl ca -in idp.csr -out idp.pem -extfile subjectnames.txt
Using configuration from /usr/lib/ssl/openssl.cnf
Enter pass phrase for /etc/ssl/demoCA/private/cakey.pem: <ーcakeyのパスフレーズを再度入力
Check that the request matches the signature
Signature ok
Certificate Details:
        Serial Number:
            6e:fa:be:0b:64:8b:ea:4c:c2:ee:c2:7b:62:b3:64:5f:52:40:59:2c
        Validity
            Not Before: Nov 23 06:24:02 2023 GMT
            Not After : Nov 22 06:24:02 2024 GMT
        Subject:
            countryName               = JP
            stateOrProvinceName       = Tokyo
            organizationName          = f5.si
            commonName                = idp.f5.si
        X509v3 extensions:
            X509v3 Subject Alternative Name:
                DNS:idp.f5.si
Certificate is to be certified until Nov 22 06:24:02 2024 GMT (365 days)
Sign the certificate? [y/n]:y <ーyを入力しEnter


1 out of 1 certificate requests certified, commit? [y/n]y <ーyを入力しEnter
Write out database with 1 new entries
Data Base Updated
root@u222c96:~/tmp/wso2is-6.1.0/bin# ./wso2server.sh
JAVA_HOME environment variable is set to /usr/lib/jvm/java-11-openjdk-amd64
CARBON_HOME environment variable is set to /root/tmp/wso2is-6.1.0
Using Java memory options: -Xms256m -Xmx1024m
[2023-12-03 09:51:53,243] INFO {org.ops4j.pax.logging.spi.support.EventAdminConfigurationNotifier} - Sending Event Admin notification (configuration successful) to org/ops4j/pax/logging/Configuration
[2023-12-03 09:51:53,416] INFO {org.wso2.carbon.core.internal.CarbonCoreActivator} - Starting WSO2 Carbon...
[2023-12-03 09:51:53,417] INFO {org.wso2.carbon.core.internal.CarbonCoreActivator} - Operating System : Linux 5.15.0-72-generic, amd64
[2023-12-03 09:51:53,418] INFO {org.wso2.carbon.core.internal.CarbonCoreActivator} - Java Home : /usr/lib/jvm/java-11-openjdk-amd64
[2023-12-03 09:51:53,418] INFO {org.wso2.carbon.core.internal.CarbonCoreActivator} - Java Version : 11.0.21
[2023-12-03 09:51:53,418] INFO {org.wso2.carbon.core.internal.CarbonCoreActivator} - JavaVM : OpenJDK 64-Bit Server VM 11.0.21+9-post-Ubuntu-0ubuntu122.04,Ubuntu
[2023-12-03 09:51:53,419] INFO {org.wso2.carbon.core.internal.CarbonCoreActivator} - Carbon Home : /root/tmp/wso2is-6.1.0
[2023-12-03 09:51:53,419] INFO {org.wso2.carbon.core.internal.CarbonCoreActivator} - Java Temp Dir : /root/tmp/wso2is-6.1.0/tmp
[2023-12-03 09:51:53,419] INFO {org.wso2.carbon.core.internal.CarbonCoreActivator} - User : root, en-US, Asia/Tokyo
[2023-12-03 09:51:53,624] INFO {org.wso2.carbon.event.output.adapter.kafka.internal.ds.KafkaEventAdapterServiceDS} - Successfully deployed the Kafka output event adaptor service
[2023-12-03 09:51:53,841] INFO {org.wso2.carbon.identity.hash.provider.pbkdf2.internal.PBKDF2HashServiceComponent} - PBKDF2 bundle activated successfully.
--- snip ---
[2023-12-03 09:52:12,408] INFO {openjpa.Runtime} - Starting OpenJPA 2.2.0-wso2v1
[2023-12-03 09:52:12,465] INFO {openjpa.jdbc.JDBC} - Using dictionary class "org.apache.openjpa.jdbc.sql.H2Dictionary".
[2023-12-03 09:52:12,712] INFO {org.wso2.carbon.core.transports.http.HttpTransportListener} - HTTP port : 9763
[2023-12-03 09:52:12,713] INFO {org.wso2.carbon.core.transports.http.HttpsTransportListener} - HTTPS port : 9443
[2023-12-03 09:52:12,799] WARN {org.apache.tomcat.util.net.SSLUtilBase} - The trusted certificate with alias [secomscrootca1] and DN [OU=Security Communication RootCA1, O=SECOM Trust.net, C=JP] is not valid due to [NotAfter: Sat Sep 30 13:20:49 JST 2023]. Certificates signed by this trusted certificate WILL be accepted
[2023-12-03 09:52:12,809] INFO {org.apache.tomcat.util.net.NioEndpoint.certificate} - Connector [https-jsse-nio-9443], TLS virtual host [_default_], certificate type [UNDEFINED] configured from [/root/tmp/wso2is-6.1.0/repository/resources/security/idp-f5-si.jks] using alias [idp.f5.si] and with trust store [/root/tmp/wso2is-6.1.0/repository/resources/security/client-truststore.jks]
[2023-12-03 09:52:12,838] INFO {org.wso2.carbon.bpel.core.ode.integration.BPELSchedulerInitializer} - Starting BPS Scheduler
[2023-12-03 09:52:12,849] INFO {openjpa.Runtime} - Starting OpenJPA 2.2.0-wso2v1
[2023-12-03 09:52:12,850] INFO {openjpa.jdbc.JDBC} - Using dictionary class "org.apache.openjpa.jdbc.sql.H2Dictionary" (H2 2.1.210 (2022-01-17) ,H2 JDBC Driver 2.1.210 (2022-01-17)).
[2023-12-03 09:52:12,893] INFO {org.wso2.carbon.core.internal.StartupFinalizerServiceComponent} - Server : WSO2 Identity Server-6.1.0
[2023-12-03 09:52:12,895] INFO {org.wso2.carbon.core.internal.StartupFinalizerServiceComponent} - WSO2 Carbon started in 23 sec
[2023-12-03 09:52:13,197] INFO {org.apache.jasper.servlet.TldScanner} - At least one JAR was scanned for TLDs yet contained no TLDs. Enable debug logging for this logger for a complete list of JARs that were scanned but no TLDs were found in them. Skipping unneeded JARs during scanning can improve startup time and JSP compilation time.
[2023-12-03 09:52:13,216] INFO {org.wso2.carbon.ui.internal.CarbonUIServiceComponent} - Mgt Console URL : https://idp.f5.si:9443/carbon/
[2023-12-03 09:52:13,250] INFO {org.wso2.identity.apps.common.internal.AppsCommonServiceComponent} - My Account URL : https://idp.f5.si:9443/myaccount
[2023-12-03 09:52:13,251] INFO {org.wso2.identity.apps.common.internal.AppsCommonServiceComponent} - Console URL : https://idp.f5.si:9443/console
[2023-12-03 09:52:13,252] [] INFO {org.wso2.identity.apps.common.internal.AppsCommonServiceComponent} - Identity apps common service component activated successfully.
[2023-12-03 16:06:46,651] [7569af63-31c8-45db-ade5-1ca3100a299f]  WARN {org.wso2.carbon.user.core.ldap.UniqueIDActiveDirectoryUserStoreManager} - Connection to the Active Directory is not secure. Password involved operations such as update credentials and adduser operations will fail
[2023-12-03 16:06:46,661] [7569af63-31c8-45db-ade5-1ca3100a299f]  INFO {org.wso2.carbon.user.core.ldap.UniqueIDReadWriteLDAPUserStoreManager} - LDAP connection created successfully in read-write mode
vi /etc/ssl/openssl.cnf
==== snip ====
[ CA_default ]

dir             = /etc/ssl/demoCA      # Where everything is kept  ./demoCAから絶対Pathに変更
certs           = $dir/certs            # Where the issued certs are kept

==== snip ====
[ req_distinguished_name ]
countryName                     = Country Name (2 letter code)
countryName_default             = JP
countryName_min                 = 2
countryName_max                 = 2

stateOrProvinceName             = State or Province Name (full name)
stateOrProvinceName_default     = Tokyo

localityName                    = Locality Name (eg, city)
localityName_default            = Chiyoda-ku

0.organizationName              = Organization Name (eg, company)
0.organizationName_default      = f5.si

# we can do this but it is not needed normally :-)
#1.organizationName             = Second Organization Name (eg, company)
#1.organizationName_default     = World Wide Web Pty Ltd

organizationalUnitName          = Organizational Unit Name (eg, section)
#organizationalUnitName_default =

commonName                      = Common Name (e.g. server FQDN or YOUR name)
commonName_max                  = 64
==== snip ====
root@u222c96:/etc/ssl# /usr/lib/ssl/misc/CA.pl -newca
CA certificate filename (or enter to create) <ー空Enter
Making CA certificate ...
openssl req -new -keyout ./demoCA/private/cakey.pem -out ./demoCA/careq.pem
..+......+....+..+.......+.....+.......+.....+....+.....+.+......+........+....+...+.................+.+..+...+....+...+.....+++++++++++++++++++++++++++++++++++++++++++++++++++++++++++++++++*.....+...+..+++++++++++++++++++++++++++++++++++++++++++++++++++++++++++++++++*..+.+.....+...+.+..+...+......+.........+....+...................................+..........+......+..+.......+............+......+.................+.......+...+......+.....+.....................+......+.......+.....+......+....+..+...+............+.+++++++++++++++++++++++++++++++++++++++++++++++++++++++++++++++++
..+.+..............+.+...+++++++++++++++++++++++++++++++++++++++++++++++++++++++++++++++++*.....+.+...+.....+.+.....+....+..+.........+..........+++++++++++++++++++++++++++++++++++++++++++++++++++++++++++++++++*.....+.....+......+...+....+......+..+.........+...+.+......+......+++++++++++++++++++++++++++++++++++++++++++++++++++++++++++++++++
Enter PEM pass phrase: <ーパスフレーズを入力
Verifying - Enter PEM pass phrase: <ーパスフレーズを入力-----
You are about to be asked to enter information that will be incorporated
into your certificate request.
What you are about to enter is what is called a Distinguished Name or a DN.
There are quite a few fields but you can leave some blank
For some fields there will be a default value,
If you enter '.', the field will be left blank.
-----
Country Name (2 letter code) [JP]: <ー空Enter
State or Province Name (full name) [Tokyo]: <ー空Enter
Locality Name (eg, city) [Chiyoda-ku]: <ー空Enter
Organization Name (eg, company) [f5.si]: <ー空Enter
Organizational Unit Name (eg, section) : <ー空Enter
Common Name (e.g. server FQDN or YOUR name) :CA.f5.si <ーCAのCommon Nameを手入力。任意の名前でOK
Email Address : <ー空Enter
Please enter the following 'extra' attributes
to be sent with your certificate request
A challenge password : <ー空Enter
An optional company name []: <ー空Enter==> 0
openssl ca -create_serial -out ./demoCA/cacert.pem -days 1095 -batch -keyfile ./demoCA/private/cakey.pem -selfsign -extensions v3_ca -infiles ./demoCA/careq.pem
Using configuration from /usr/lib/ssl/openssl.cnf
Enter pass phrase for ./demoCA/private/cakey.pem: <ー最初に入力した(cakeyの)パスフレーズを再度入力
Check that the request matches the signature
Signature ok
Certificate Details:
Serial Number:
6e:fa:be:0b:64:8b:ea:4c:c2:ee:c2:7b:62:b3:64:5f:52:40:59:2b
Validity
Not Before: Nov 23 00:12:36 2023 GMT
Not After : Nov 22 00:12:36 2026 GMT
Subject:
countryName = JP
stateOrProvinceName = Tokyo
organizationName = f5.si
commonName = CA.f5.si
X509v3 extensions:
X509v3 Subject Key Identifier:
3B:BE:09:A3:AF:51:5A:6A:D5:3F:DD:C1:D2:60:4A:88:E9:F8:79:BF
X509v3 Authority Key Identifier:
3B:BE:09:A3:AF:51:5A:6A:D5:3F:DD:C1:D2:60:4A:88:E9:F8:79:BF
X509v3 Basic Constraints: critical
CA:TRUE
Certificate is to be certified until Nov 22 00:12:36 2026 GMT (1095 days)
Write out database with 1 new entries
Data Base Updated
==> 0
CA certificate is in ./demoCA/cacert.pem
root@u222c96:/etc/ssl/demoCA# cd /etc/ssl/demoCA
root@u222c96:/etc/ssl/demoCA# openssl genrsa -out idp.key 2048
root@u222c96:/etc/ssl/demoCA# openssl req -utf8 -new -key idp.key -out idp.csr
You are about to be asked to enter information that will be incorporated
into your certificate request.
What you are about to enter is what is called a Distinguished Name or a DN.
There are quite a few fields but you can leave some blank
For some fields there will be a default value,
If you enter '.', the field will be left blank.
-----
Country Name (2 letter code) [JP]: <ー空Enter
State or Province Name (full name) [Tokyo]: <ー空Enter
Locality Name (eg, city) [Chiyoda-ku]: <ー空Enter
Organization Name (eg, company) [f5.si]: <ー空Enter
Organizational Unit Name (eg, section) : <ー空Enter
Common Name (e.g. server FQDN or YOUR name) :idp.f5.si <ーidp.f5.siと入力
Email Address :

Please enter the following 'extra' attributes
to be sent with your certificate request
A challenge password : <ー空Enter
An optional company name []: <ー空Enter

root@u222c96:/etc/ssl/demoCA# openssl ca -in idp.csr -out idp.pem -extfile subjectnames.txt
Using configuration from /usr/lib/ssl/openssl.cnf
Enter pass phrase for /etc/ssl/demoCA/private/cakey.pem: <ーcakeyのパスフレーズを再度入力
Check that the request matches the signature
Signature ok
Certificate Details:
        Serial Number:
            6e:fa:be:0b:64:8b:ea:4c:c2:ee:c2:7b:62:b3:64:5f:52:40:59:2c
        Validity
            Not Before: Nov 23 06:24:02 2023 GMT
            Not After : Nov 22 06:24:02 2024 GMT
        Subject:
            countryName               = JP
            stateOrProvinceName       = Tokyo
            organizationName          = f5.si
            commonName                = idp.f5.si
        X509v3 extensions:
            X509v3 Subject Alternative Name:
                DNS:idp.f5.si
Certificate is to be certified until Nov 22 06:24:02 2024 GMT (365 days)
Sign the certificate? [y/n]:y <ーyを入力しEnter


1 out of 1 certificate requests certified, commit? [y/n]y <ーyを入力しEnter
Write out database with 1 new entries
Data Base Updated
cd /root/tmp/keycloak-22.0.5/bin/
./kc.sh start-dev
<出力例>
root@u222c93:~/tmp/keycloak-22.0.5/bin# ./kc.sh start-dev
Updating the configuration and installing your custom providers, if any. Please wait.
2023-11-23 16:14:12,828 INFO  [io.quarkus.deployment.QuarkusAugmentor] (main) Quarkus augmentation completed in 5769ms
2023-11-23 16:14:14,012 INFO  [org.keycloak.quarkus.runtime.hostname.DefaultHostnameProvider] (main) Hostname settings: Base URL: , Hostname: , Strict HTTPS: false, Path: , Strict BackChannel: false, Admin URL: , Admin: , Port: -1, Proxied: false
2023-11-23 16:14:14,961 WARN  [io.quarkus.agroal.runtime.DataSources] (main) Datasource  enables XA but transaction recovery is not enabled. Please enable transaction recovery by setting quarkus.transaction-manager.enable-recovery=true, otherwise data may be lost if the application is terminated abruptly
2023-11-23 16:14:15,348 WARN  [org.infinispan.PERSISTENCE] (keycloak-cache-init) ISPN000554: jboss-marshalling is deprecated and planned for removal
2023-11-23 16:14:15,421 WARN  [org.infinispan.CONFIG] (keycloak-cache-init) ISPN000569: Unable to persist Infinispan internal caches as no global state enabled
2023-11-23 16:14:15,499 INFO  [org.infinispan.CONTAINER] (keycloak-cache-init) ISPN000556: Starting user marshaller 'org.infinispan.jboss.marshalling.core.JBossUserMarshaller'
2023-11-23 16:14:16,050 INFO  [org.keycloak.connections.infinispan.DefaultInfinispanConnectionProviderFactory] (main) Node name: node_127375, Site name: null
2023-11-23 16:14:16,055 INFO  [org.keycloak.broker.provider.AbstractIdentityProviderMapper] (main) Registering class org.keycloak.broker.provider.mappersync.ConfigSyncEventListener
2023-11-23 16:14:18,460 INFO  [org.keycloak.quarkus.runtime.storage.legacy.liquibase.QuarkusJpaUpdaterProvider] (main) Initializing database schema. Using changelog META-INF/jpa-changelog-master.xml

UPDATE SUMMARY
Run:                        115
Previously run:               0
Filtered out:                 0
-------------------------------
Total change sets:          115

2023-11-23 16:14:21,812 INFO  [org.keycloak.services] (main) KC-SERVICES0050: Initializing master realm
2023-11-23 16:14:23,400 INFO  [io.quarkus] (main) Keycloak 22.0.5 on JVM (powered by Quarkus 3.2.7.Final) started in 10.483s. Listening on: http://0.0.0.0:8080
2023-11-23 16:14:23,401 INFO  [io.quarkus] (main) Profile dev activated.
2023-11-23 16:14:23,401 INFO  [io.quarkus] (main) Installed features: [agroal, cdi, hibernate-orm, jdbc-h2, jdbc-mariadb, jdbc-mssql, jdbc-mysql, jdbc-oracle, jdbc-postgresql, keycloak, logging-gelf, micrometer, narayana-jta, reactive-routes, resteasy, resteasy-jackson, smallrye-context-propagation, smallrye-health, vertx]
2023-11-23 16:14:23,521 INFO  [org.keycloak.services] (main) KC-SERVICES0009: Added user 'admin' to realm 'master'
2023-11-23 16:14:23,522 WARN  [org.keycloak.quarkus.runtime.KeycloakMain] (main) Running the server in development mode. DO NOT use this configuration in production.
vi /root/tmp/keycloak-22.0.5/conf/keycloak.conf

=====snip=====
# The file path to a server certificate or certificate chain in PEM format.
#https-certificate-file=${kc.home.dir}conf/server.crt.pem
https-certificate-file=/root/tmp/keycloak-22.0.5/conf/idp.pem

# The file path to a private key in PEM format.
#https-certificate-key-file=${kc.home.dir}conf/server.key.pem
https-certificate-key-file=/root/tmp/keycloak-22.0.5/conf/idp.key

=====snip=====

# Hostname for the Keycloak server.
#hostname=myhostname
hostname=idp.f5.si
root@u222c93:~/tmp/keycloak-22.0.5/bin# ./kc.sh start-dev
2023-11-23 16:56:54,173 INFO  [org.keycloak.quarkus.runtime.hostname.DefaultHostnameProvider] (main) Hostname settings: Base URL: , Hostname: idp.f5.si, Strict HTTPS: false, Path: , Strict BackChannel: false, Admin URL: , Admin: , Port: -1, Proxied: false
2023-11-23 16:56:55,317 WARN  [io.quarkus.agroal.runtime.DataSources] (main) Datasource  enables XA but transaction recovery is not enabled. Please enable transaction recovery by setting quarkus.transaction-manager.enable-recovery=true, otherwise data may be lost if the application is terminated abruptly
2023-11-23 16:56:55,654 WARN  [org.infinispan.PERSISTENCE] (keycloak-cache-init) ISPN000554: jboss-marshalling is deprecated and planned for removal
2023-11-23 16:56:55,705 WARN  [org.infinispan.CONFIG] (keycloak-cache-init) ISPN000569: Unable to persist Infinispan internal caches as no global state enabled
2023-11-23 16:56:55,749 INFO  [org.infinispan.CONTAINER] (keycloak-cache-init) ISPN000556: Starting user marshaller 'org.infinispan.jboss.marshalling.core.JBossUserMarshaller'
2023-11-23 16:56:56,584 INFO  [org.keycloak.connections.infinispan.DefaultInfinispanConnectionProviderFactory] (main) Node name: node_752132, Site name: null
2023-11-23 16:56:56,589 INFO  [org.keycloak.broker.provider.AbstractIdentityProviderMapper] (main) Registering class org.keycloak.broker.provider.mappersync.ConfigSyncEventListener
2023-11-23 16:56:57,637 INFO  [io.quarkus] (main) Keycloak 22.0.5 on JVM (powered by Quarkus 3.2.7.Final) started in 4.471s. Listening on: http://0.0.0.0:8080 and https://0.0.0.0:8443
2023-11-23 16:56:57,637 INFO  [io.quarkus] (main) Profile dev activated.
2023-11-23 16:56:57,637 INFO  [io.quarkus] (main) Installed features: [agroal, cdi, hibernate-orm, jdbc-h2, jdbc-mariadb, jdbc-mssql, jdbc-mysql, jdbc-oracle, jdbc-postgresql, keycloak, logging-gelf, micrometer, narayana-jta, reactive-routes, resteasy, resteasy-jackson, smallrye-context-propagation, smallrye-health, vertx]
2023-11-23 16:56:57,641 WARN  [org.keycloak.quarkus.runtime.KeycloakMain] (main) Running the server in development mode. DO NOT use this configuration in production.
ip -br addr show vrf vrf10
ip vrf show
ip route show table 10
ip vrf exec vrf10 ping 192.168.30.254
<出力例>
[root@c85g192 ~]# ip -br addr show vrf vrf10
ens32            UP             192.168.30.192/24 fe80::8cf6:2ee3:5eb0:8817/64

[root@c85g192 ~]# ip vrf show
Name              Table
-----------------------
vrf10               10

[root@c85g192 ~]# ip route show table 10
default via 192.168.30.254 dev ens32 proto static metric 101
broadcast 192.168.30.0 dev ens32 proto kernel scope link src 192.168.30.192
192.168.30.0/24 dev ens32 proto kernel scope link src 192.168.30.192 metric 101
local 192.168.30.192 dev ens32 proto kernel scope host src 192.168.30.192
broadcast 192.168.30.255 dev ens32 proto kernel scope link src 192.168.30.192

[root@c85g192 ~]# ip vrf exec vrf10 ping 192.168.30.254
PING 192.168.30.254 (192.168.30.254) 56(84) bytes of data.
64 bytes from 192.168.30.254: icmp_seq=1 ttl=64 time=1.41 ms
64 bytes from 192.168.30.254: icmp_seq=2 ttl=64 time=1.87 ms
64 bytes from 192.168.30.254: icmp_seq=3 ttl=64 time=1.89 ms
^C
--- 192.168.30.254 ping statistics ---
3 packets transmitted, 3 received, 0% packet loss, time 2006ms
rtt min/avg/max/mdev = 1.409/1.721/1.888/0.223 ms