How to set up vDPA with vhost_vdpa for VMs
This article describes how to configure vDPA (virtio data path acceleration) on CentOS8. *1
vDPA is a framework that combines the performance of SR-IOV with the flexibility of VirtIO.
It is a promising technology for cloud-native NWs, and has been officially merged with Linux Kernel 5.7.0.
For more information on vDPA, please refer to The official Red Hat blog.
In this article, we will describe how to set up communication between VMs (virtual machines) using the vhost_vdpa module.
2021/06/01 Update
Added on how to start VM using libvirtd.
The following is a list of related articles.
1.Overview
1-1.Environment
IA server                        : ProLiant DL360p Gen8 or DL360 Gen9
System ROM                       : P71 01/22/2018
NIC                              : Mellanox ConnectX-6 Dx (MCX623106AS-CDAT)
OS                               : CentOS8.3(2011)
Kernel                           : 5.11.11-1.el8.elrepo.x86_64
Installed Environment Groups     :
  @^graphical-server-environment
  @container-management
  @development
  @virtualization-client
  @virtualization-hypervisor
  @virtualization-tools
Mellanox OFED                    : v5.2-2.2.0.0
qemu-kvm                         : v6.0.0-rc1
DPDK                             : v21.02
ovs                              : v2.14.1
libvirtd                         : v7.4.0-rc2 2021/06/01update
1-2.Overall flow
Advance preparation
Kernel update
Building qemu
Building dpdk
Change to SR-IOV switchdev mode
Configure ovs-dpdk and VM
Operation check
1-3.overall structure
Loop connection using a DAC(Direct Attached Cable). *2
fig.1
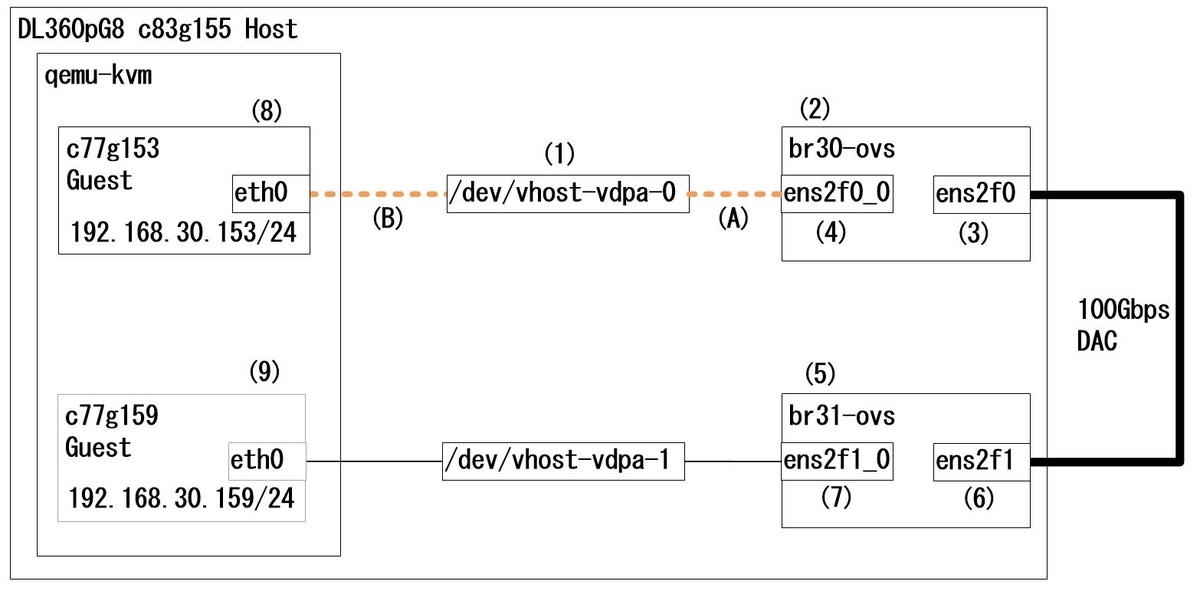
fig.1 is a simplified description and omits the internal architecture. For this reason, please imagine the following configuration in reality.
fig.2
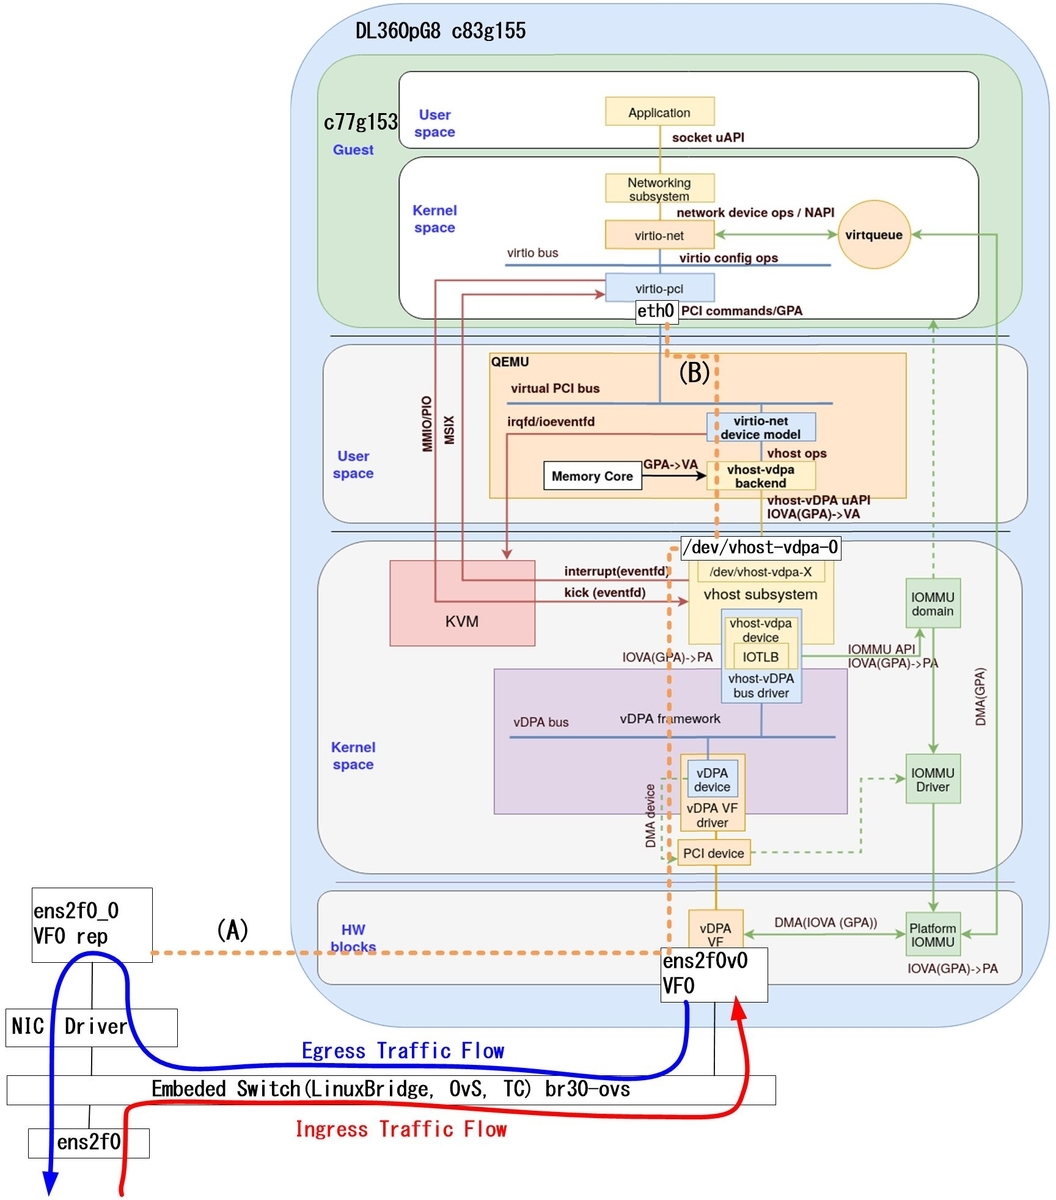
Quoted from Red Hat's Blog
vDPA kernel framework part 3: usage for VMs and containers
The orange dotted lines (A) and (B) correspond to fig.1 and fig.2, respectively.
Furthermore, in fig.2, the actual traffic flow is described in blue and red letters. *3
In fig.2, PF and VF of SR-IOV are written respectively, and "VF rep" is written in addition to them.
It should be noted that the bsf (Bus, Slot, Function) numbers of PF and VF rep are the same.
| PF | VF0 | VF0 rep |
| ens2f0 | ens2f0v0 | ens2f0_0 |
| 07:00.0 | 07:00.2 | 07:00.0 |
rep=representor is an interface specific to swtichdev mode in SR-IOV, and is created by enabling swtichdev mode.
In contrast to swtichdev mode, the conventional SR-IOV VF is called legacy mode and must be explicitly separated from it.
In addition, switchdev mode is a mandatory requirement for ConnectX-6 Dx to enable the vDPA HW offload.
2.Advance preparation
Although not specifically mentioned, SELinux disabling, FW disabling, and NTP time synchronization settings are done in advance.
2-1.Enabling HugePage and IOMMU
sed -i -e "/GRUB_CMDLINE_LINUX=/s/\"$/ default_hugepagesz=1G hugepagesz=1G hugepages=16\"/g" /etc/default/grub
sed -i -e "/GRUB_CMDLINE_LINUX=/s/\"$/ intel_iommu=on iommu=pt pci=realloc\"/g" /etc/default/grub
grub2-mkconfig -o /etc/grub2.cfg
Next, implement the mount settings for HugePage. It will be mounted automatically the next time the OS boots.
vi /etc/fstab

nodev  /dev/hugepages hugetlbfs pagesize=1GB    0 0
2-2.SR-IOV VF settings
Configure the SR-IOV VF settings; you can increase the number of VFs, but for the sake of simplicity, we have set the number of VFs to "1". In addition, setting the MAC address is mandatory. *4
vi /etc/rc.local

echo 1 > /sys/class/net/ens2f0/device/sriov_numvfs
echo 1 > /sys/class/net/ens2f1/device/sriov_numvfs
sleep 1
ip link set ens2f0 vf 0 mac 00:11:22:33:44:00
ip link set ens2f1 vf 0 mac 00:11:22:33:44:10
sleep 1
exit 0

chmod +x /etc/rc.d/rc.local
2-3.Install the Mellanox driver (OFED)
You can download the iso file from the Mellanox website.Mellanox Download Site
Please save the downloaded iso file to /root/tmp/.
The following command will install the Mellanox driver, but it will also install ovs v2.14.1 at the same time.
dnf -y install tcl tk unbound && \
mount -t iso9660 -o loop /root/tmp/MLNX_OFED_LINUX-5.2-2.2.0.0-rhel8.3-x86_64.iso /mnt && \
/mnt/mlnxofedinstall --upstream-libs --dpdk --ovs-dpdk --with-mft --with-mstflint
After the installation is complete, reboot.
reboot
After the reboot is complete, check the HugePage.
cat /proc/meminfo | grep Huge
grep hugetlbfs /proc/mounts

[root@c83g155 ~]# cat /proc/meminfo | grep Huge
AnonHugePages:    452608 kB
ShmemHugePages:        0 kB
FileHugePages:         0 kB
HugePages_Total:      16
HugePages_Free:       16
HugePages_Rsvd:        0
HugePages_Surp:        0
Hugepagesize:    1048576 kB
Hugetlb:        16777216 kB

[root@c83g155 ~]# grep hugetlbfs /proc/mounts
nodev /dev/hugepages hugetlbfs rw,relatime,pagesize=1024M 0 0
3.Kernel update
As of April 8, 2021, the vDPA-related modules are updated at a high frequency, so install the latest Kernel.
3-1.Installing elrepo
rpm --import https://www.elrepo.org/RPM-GPG-KEY-elrepo.org
dnf -y install https://www.elrepo.org/elrepo-release-8.el8.elrepo.noarch.rpm
3-2.Installation of Kernel
dnf list installed | grep kernel
dnf -y --enablerepo=elrepo-kernel install kernel-ml kernel-ml-devel
dnf list installed | grep kernel
reboot
Check the currently installed Kernel.
Install kernel-ml and kernel-ml-devel *5
Check the installed Kernel.
Reboot
3-3.Install Kernel headers, etc.
uname -r
dnf -y swap --enablerepo=elrepo-kernel kernel-headers -- kernel-ml-headers && \
dnf -y remove kernel-tools kernel-tools-libs && \
dnf -y --enablerepo=elrepo-kernel install kernel-ml-tools kernel-ml-tools-libs
dnf list installed | grep kernel
Check the currently running Kernel Version.
Install kernel-headers.
Remove the existing kernel-tools kernel-tools-libs
Install kernel-tools kernel-tools-libs
Check the installed Kernel.
If you get the following output, you are good to go.
[root@c83g155 ~]# dnf list installed | grep kernel
kernel.x86_64                                      4.18.0-240.el8                                @anaconda
kernel-core.x86_64                                 4.18.0-240.el8                                @anaconda
kernel-devel.x86_64                                4.18.0-240.el8                                @anaconda
kernel-ml.x86_64                                   5.11.11-1.el8.elrepo                          @elrepo-kernel
kernel-ml-core.x86_64                              5.11.11-1.el8.elrepo                          @elrepo-kernel
kernel-ml-devel.x86_64                             5.11.11-1.el8.elrepo                          @elrepo-kernel
kernel-ml-headers.x86_64                           5.11.11-1.el8.elrepo                          @elrepo-kernel
kernel-ml-modules.x86_64                           5.11.11-1.el8.elrepo                          @elrepo-kernel
kernel-ml-tools.x86_64                             5.11.11-1.el8.elrepo                          @elrepo-kernel
kernel-ml-tools-libs.x86_64                        5.11.11-1.el8.elrepo                          @elrepo-kernel
kernel-modules.x86_64                              4.18.0-240.el8                                @anaconda
kmod-kernel-mft-mlnx.x86_64                        4.16.1-1.rhel8u3                              @System
kmod-mlnx-ofa_kernel.x86_64                        5.2-OFED.5.2.2.2.0.1.rhel8u3                  @System
mlnx-ofa_kernel.x86_64                             5.2-OFED.5.2.2.2.0.1.rhel8u3                  @System
mlnx-ofa_kernel-devel.x86_64                       5.2-OFED.5.2.2.2.0.1.rhel8u3                  @System
4.Building qemu and libvirtd 2021/06/01update
4-1.Enabling various repositories
sed -i -e 's/enabled=0/enabled=1/g' /etc/yum.repos.d/CentOS-Linux-PowerTools.repo && \
dnf -y install https://pkgs.dyn.su/el8/base/x86_64/raven-release-1.0-1.el8.noarch.rpm && \
sed -i -e 's/enabled=0/enabled=1/g' /etc/yum.repos.d/raven.repo
4-2.Install the necessary packages
In addition to qemu and libvirtd, we have also installed the packages that are required for the dpdk build.
dnf -y install cmake gcc libnl3-devel libudev-devel make numactl numactl-devel \
pkgconfig valgrind-devel pandoc libibverbs libmlx5 libmnl-devel meson ninja-build \
glibc-utils glib2 glib2-devel pixman pixman-devel zlib zlib-devel rpcgen python3-docutils \
gnutls gnutls-devel libxml2-devel yajl-devel libtirpc-devel libudev-devel libpciaccess-devel \
usbredir-devel spice-server-devel && \
wget https://cbs.centos.org/kojifiles/packages/pyelftools/0.26/1.el8/noarch/python3-pyelftools-0.26-1.el8.noarch.rpm && \
dnf -y localinstall python3-pyelftools-0.26-1.el8.noarch.rpm && \
dnf -y install https://rpmfind.net/linux/centos/8-stream/PowerTools/x86_64/os/Packages/meson-0.55.3-3.el8.noarch.rpm
4-3.Building qemu
cd /usr/src && \
git clone https://github.com/qemu/qemu.git && \
cd qemu/ && \
git checkout v6.0.0-rc1 && \
mkdir build && \
cd build/ && \
../configure --enable-vhost-vdpa --target-list=x86_64-softmmu && \
make -j && \
make install
Checking Version after Installation
/usr/local/bin/qemu-system-x86_64 --version

[root@c83g155 ~]# /usr/local/bin/qemu-system-x86_64 --version
QEMU emulator version 5.2.91 (v6.0.0-rc1)
Copyright (c) 2003-2021 Fabrice Bellard and the QEMU Project developers
4-4.Building libvirtd
cd /usr/src && \
git clone https://github.com/libvirt/libvirt.git && \
cd libvirt/ && \
git checkout v7.4.0-rc2 && \
meson build && \
ninja -C build && \
ninja -C build install
Checking Version after Installation
libvirtd -V

[root@c83g155 ~]# libvirtd -V
libvirtd (libvirt) 7.4.0
4-5.Change qemu execution path
mv /usr/libexec/qemu-kvm /usr/libexec/qemu-kvm.org
ln -s /usr/local/bin/qemu-system-x86_64 /usr/libexec/qemu-kvm
4-6.Change the user to run qemu
vi /etc/libvirt/qemu.conf

user = "root"  #comment out
group = "root"  #comment out
4-7.Change libvirt-sock settings
Add blue text
vi /etc/rc.local

echo 1 > /sys/class/net/ens2f0/device/sriov_numvfs
echo 1 > /sys/class/net/ens2f1/device/sriov_numvfs
sleep 1
ip link set ens2f0 vf 0 mac 00:11:22:33:44:00
ip link set ens2f1 vf 0 mac 00:11:22:33:44:10
sleep 1
mkdir /var/run/libvirt
ln -s /var/local/run/libvirt/libvirt-sock /var/run/libvirt/libvirt-sock
sleep 1
exit 0
5.Building dpdk
5-1.Building dpdk
cd /usr/src/ && \
git clone git://dpdk.org/dpdk && \
cd dpdk && \
git checkout v21.02 && \
meson -Dexamples=all build && \
ninja -C build && \
ninja -C build install
5-2.Links to dpdk-related libraries
Create a new file with vi and include the path of lib.
vi /etc/ld.so.conf.d/libdpdk.conf

/usr/src/dpdk/build/lib
After running ldconfig, make sure the libs are linked.
ldconfig
ldconfig -p |grep dpdk
It is OK if it is pointed as follows.
[root@c83g155 dpdk]# ldconfig -p |grep dpdk
        librte_vhost.so.21 (libc6,x86-64) => /usr/src/dpdk/build/lib/librte_vhost.so.21
        librte_vhost.so (libc6,x86-64) => /usr/src/dpdk/build/lib/librte_vhost.so
        librte_timer.so.21 (libc6,x86-64) => /usr/src/dpdk/build/lib/librte_timer.so.21
============ s n i p ============
Now, reboot once again.
reboot
6.Change to SR-IOV switchdev mode
6-1.Check the current operation mode.
lshw -businfo -c network
devlink dev eswitch show pci/0000:07:00.0
devlink dev eswitch show pci/0000:07:00.1
Check the bsf (bus, slot, function) number of the PCI device.
Check the status of 07:00.0 (ens2f0)
Check the status of 07:00.1 (ens2f1)
The output will look like the following
[root@c83g155 ~]# lshw -businfo -c network
Bus info          Device      Class          Description
========================================================
pci@0000:04:00.0  ens1f0      network        82599ES 10-Gigabit SFI/SFP+ Network Connection
pci@0000:04:00.1  ens1f1      network        82599ES 10-Gigabit SFI/SFP+ Network Connection
pci@0000:03:00.0  eno1        network        NetXtreme BCM5719 Gigabit Ethernet PCIe
pci@0000:03:00.1  eno2        network        NetXtreme BCM5719 Gigabit Ethernet PCIe
pci@0000:03:00.2  eno3        network        NetXtreme BCM5719 Gigabit Ethernet PCIe
pci@0000:03:00.3  eno4        network        NetXtreme BCM5719 Gigabit Ethernet PCIe
pci@0000:07:00.0  ens2f0      network        MT2892 Family [ConnectX-6 Dx]
pci@0000:07:00.1  ens2f1      network        MT2892 Family [ConnectX-6 Dx]
pci@0000:07:00.2  ens2f0v0    network        ConnectX Family mlx5Gen Virtual Function
pci@0000:07:01.2  ens2f1v0    network        ConnectX Family mlx5Gen Virtual Function

[root@c83g155 ~]# devlink dev eswitch show pci/0000:07:00.0
pci/0000:07:00.0: mode legacy inline-mode none encap disable

[root@c83g155 ~]# devlink dev eswitch show pci/0000:07:00.1
pci/0000:07:00.1: mode legacy inline-mode none encap disable
6-2.Changing the operating mode
Note that the bsf numbers are slightly different.*6
echo 0000:07:00.2 > /sys/bus/pci/drivers/mlx5_core/unbind && \
echo 0000:07:01.2 > /sys/bus/pci/drivers/mlx5_core/unbind && \
devlink dev eswitch set pci/0000:07:00.0 mode switchdev && \
devlink dev eswitch set pci/0000:07:00.1 mode switchdev && \
echo 0000:07:00.2 > /sys/bus/pci/drivers/mlx5_core/bind && \
echo 0000:07:01.2 > /sys/bus/pci/drivers/mlx5_core/bind
Unbind the mlx5_core driver for VF.
| 07:00.2 | ens2f0v0 |
| 07:01.2 | ens2f1v0 |
Change the PF operation mode to switchdev.
| 07:00.0 | ens2f0 |
| 07:00.1 | ens2f1 |
Rebind the mlx5_core driver of VF.
| 07:00.2 | ens2f0v0 |
| 07:01.2 | ens2f1v0 |
6-3.Check the operation mode after the change.
devlink dev eswitch show pci/0000:07:00.0
devlink dev eswitch show pci/0000:07:00.1
Changed to switchdev mode.
[root@c83g155 ~]# devlink dev eswitch show pci/0000:07:00.0
pci/0000:07:00.0: mode switchdev inline-mode none encap enable

[root@c83g155 ~]# devlink dev eswitch show pci/0000:07:00.1
pci/0000:07:00.1: mode switchdev inline-mode none encap enable
VF Representer has been added.
[root@c83g155 ~]# lshw -businfo -c network                                                                                   Bus info          Device      Class          Description
========================================================
pci@0000:04:00.0  ens1f0      network        82599ES 10-Gigabit SFI/SFP+ Network Connection
pci@0000:04:00.1  ens1f1      network        82599ES 10-Gigabit SFI/SFP+ Network Connection
pci@0000:03:00.0  eno1        network        NetXtreme BCM5719 Gigabit Ethernet PCIe
pci@0000:03:00.1  eno2        network        NetXtreme BCM5719 Gigabit Ethernet PCIe
pci@0000:03:00.2  eno3        network        NetXtreme BCM5719 Gigabit Ethernet PCIe
pci@0000:03:00.3  eno4        network        NetXtreme BCM5719 Gigabit Ethernet PCIe
pci@0000:07:00.0  ens2f0      network        MT2892 Family [ConnectX-6 Dx]
pci@0000:07:00.1  ens2f1      network        MT2892 Family [ConnectX-6 Dx]
pci@0000:07:00.2  ens2f0v0    network        ConnectX Family mlx5Gen Virtual Function
pci@0000:07:01.2  ens2f1v0    network        ConnectX Family mlx5Gen Virtual Function
pci@0000:07:00.0  ens2f0_0    network        Ethernet interface
pci@0000:07:00.1  ens2f1_0    network        Ethernet interface
In addition, make sure that the HW offload function of the NIC is enabled.
ethtool -k ens2f0 |grep tc
ethtool -k ens2f1 |grep tc

[root@c83g155 ~]# ethtool -k ens2f0 |grep tc
tcp-segmentation-offload: on
        tx-tcp-segmentation: on
        tx-tcp-ecn-segmentation: off [fixed]
        tx-tcp-mangleid-segmentation: off
        tx-tcp6-segmentation: on
hw-tc-offload: on

[root@c83g155 ~]# ethtool -k ens2f1 |grep tc
tcp-segmentation-offload: on
        tx-tcp-segmentation: on
        tx-tcp-ecn-segmentation: off [fixed]
        tx-tcp-mangleid-segmentation: off
        tx-tcp6-segmentation: on
hw-tc-offload: on
7.Configure ovs-dpdk and VM
7-1.Overall Flow - Overview -
Configure the settings in the order (1)-(9) described in fig.1 below.
fig.1
- Enable vhost_vdpa module: (1)
- Initial configuration of ovs
- Configuration of br30-ovs: (2)(3)(4)
- Configuration of br31-ovs: (5)(6)(7)
- Configure and start virtual machine c77g153: (8) 2021/06/01update
- Configure and start virtual machine c77g159: (9) 2021/06/01update
7-2.Overall flow - Commands only -
We will throw in the following commands.
Detailed explanations will follow, but if you don't need the explanations, just execute the commands.
1.Enable vhost_vdpa module
(1)
modprobe vhost_vdpa

2.Initial configuration of ovs
systemctl start openvswitch
ovs-vsctl set Open_vSwitch . other_config:dpdk-init=true
ovs-vsctl set Open_vSwitch . other_config:hw-offload=true other_config:tc-policy=none
ovs-vsctl set Open_vSwitch . other_config:dpdk-socket-mem=1024,1024
ovs-vsctl set Open_vSwitch . other_config:vhost-iommu-support=true
ovs-vsctl set Open_vSwitch . other_config:dpdk-extra=" \
-w 0000:07:00.0,representor=[0],dv_flow_en=1,dv_esw_en=1,dv_xmeta_en=0 \
-w 0000:07:00.1,representor=[0],dv_flow_en=1,dv_esw_en=1,dv_xmeta_en=0"
systemctl restart openvswitch

3.Configuration of br30-ovs
(2)
ovs-vsctl add-br br30-ovs -- set bridge br30-ovs datapath_type=netdev
(3)
ovs-vsctl add-port br30-ovs ens2f0 -- set Interface ens2f0 type=dpdk options:dpdk-devargs=0000:07:00.0
(4)
ovs-vsctl add-port br30-ovs ens2f0_0 -- set Interface ens2f0_0 type=dpdk options:dpdk-devargs=0000:07:00.0,representor=[0]

4.Configuration of br31-ovs
(5)
ovs-vsctl add-br br31-ovs -- set bridge br31-ovs datapath_type=netdev
(6)
ovs-vsctl add-port br31-ovs ens2f1 -- set Interface ens2f1 type=dpdk options:dpdk-devargs=0000:07:00.1
(7)
ovs-vsctl add-port br31-ovs ens2f1_0 -- set Interface ens2f1_0 type=dpdk options:dpdk-devargs=0000:07:00.1,representor=[0]

A.For qemu
5.Configure and start virtual machine c77g153
(8)
qemu-system-x86_64 \
 -enable-kvm \
 -cpu host \
 -m 8G \
 -hda /var/lib/libvirt/images/c77g1532.qcow2 \
 -netdev type=vhost-vdpa,vhostdev=/dev/vhost-vdpa-0,id=vhost-vdpa0 \
 -device virtio-net-pci,netdev=vhost-vdpa0,page-per-vq=on,iommu_platform=on,disable-legacy=on \
 -nographic \
 2>&1 | tee vm153.log

6.Configure and start virtual machine c77g159
(9)
qemu-system-x86_64 \
 -enable-kvm \
 -cpu host \
 -m 8G \
 -hda /var/lib/libvirt/images/c77g1592.qcow2 \
 -netdev type=vhost-vdpa,vhostdev=/dev/vhost-vdpa-1,id=vhost-vdpa1 \
 -device virtio-net-pci,netdev=vhost-vdpa1,page-per-vq=on,iommu_platform=on,disable-legacy=on \
 -nographic \
 2>&1 | tee vm159.log

B.For libvirtd 2021/06/01update
5.Configure and start virtual machine c77g153
(8)
virsh edit c77g153
  <interface type='vdpa'>
    <source dev='/dev/vhost-vdpa-0'/>
  </interface>

6.Configure and start virtual machine c77g159
(9)
virsh edit c77g159
  <interface type='vdpa'>
    <source dev='/dev/vhost-vdpa-1'/>
  </interface>
7-3.Enable vhost_vdpa module:(1)
We will check the changes before and after executing the modprobe vhost_vdpa command.
Before running modprobe vhost_vdpa
lsmod |grep vd
ls -Fal /dev
ls -Fal /sys/bus/vdpa/drivers/vhost_vdpa

[root@c83g155 ~]# lsmod |grep vd
mlx5_vdpa              45056  0
vhost_iotlb            16384  2 vhost,mlx5_vdpa
vdpa                   16384  1 mlx5_vdpa
mlx5_core            1216512  2 mlx5_vdpa,mlx5_ib

[root@c83g155 ~]# ls -Fal /dev
total 0
drwxr-xr-x  22 root root          3660 Apr  8 00:02 ./
dr-xr-xr-x. 17 root root           244 Apr  7 20:30 ../
crw-r--r--   1 root root       10, 235 Apr  7 23:28 autofs
drwxr-xr-x   2 root root           160 Apr  7 23:28 block/
drwxr-xr-x   2 root root           100 Apr  7 23:28 bsg/
============ s n i p ============
drwxr-xr-x   2 root root            60 Apr  7 23:28 vfio/
crw-------   1 root root       10, 127 Apr  7 23:28 vga_arbiter
crw-------   1 root root       10, 137 Apr  7 23:28 vhci
crw-------   1 root root       10, 238 Apr  7 23:28 vhost-net
crw-------   1 root root       10, 241 Apr  7 23:28 vhost-vsock

[root@c83g155 ~]# ls -Fal /sys/bus/vdpa/drivers/vhost_vdpa
ls: cannot access '/sys/bus/vdpa/drivers/vhost_vdpa': No such file or directory
After running modprobe vhost_vdpa
modprobe vhost_vdpa
lsmod |grep vd
ls -Fal /dev
ls -Fal /sys/bus/vdpa/drivers/vhost_vdpa

[root@c83g155 ~]# lsmod |grep vd
vhost_vdpa             24576  0
vhost                  57344  1 vhost_vdpa
mlx5_vdpa              45056  0
vhost_iotlb            16384  3 vhost_vdpa,vhost,mlx5_vdpa
vdpa                   16384  2 vhost_vdpa,mlx5_vdpa
irqbypass              16384  2 vhost_vdpa,kvm
mlx5_core            1216512  2 mlx5_vdpa,mlx5_ib

[root@c83g155 ~]# ls -Fal /dev
total 0
drwxr-xr-x  22 root root          3660 Apr  8 00:02 ./
dr-xr-xr-x. 17 root root           244 Apr  7 20:30 ../
crw-r--r--   1 root root       10, 235 Apr  7 23:28 autofs
drwxr-xr-x   2 root root           160 Apr  7 23:28 block/
drwxr-xr-x   2 root root           100 Apr  7 23:28 bsg/
============ s n i p ============
drwxr-xr-x   2 root root            60 Apr  7 23:28 vfio/
crw-------   1 root root       10, 127 Apr  7 23:28 vga_arbiter
crw-------   1 root root       10, 137 Apr  7 23:28 vhci
crw-------   1 root root       10, 238 Apr  7 23:28 vhost-net
crw-------   1 root root      240,   0 Apr  8 00:06 vhost-vdpa-0
crw-------   1 root root      240,   1 Apr  8 00:06 vhost-vdpa-1
crw-------   1 root root       10, 241 Apr  7 23:28 vhost-vsock

[root@c83g155 ~]# ls -Fal /sys/bus/vdpa/drivers/vhost_vdpa
total 0
drwxr-xr-x 2 root root    0 Apr  8 00:06 ./
drwxr-xr-x 3 root root    0 Apr  7 23:49 ../
--w------- 1 root root 4096 Apr  8 00:07 bind
lrwxrwxrwx 1 root root    0 Apr  8 00:07 module -> ../../../../module/vhost_vdpa/
--w------- 1 root root 4096 Apr  8 00:06 uevent
--w------- 1 root root 4096 Apr  8 00:07 unbind
lrwxrwxrwx 1 root root    0 Apr  8 00:07 vdpa0 -> ../../../../devices/pci0000:00/0000:00:03.0/0000:07:00.2/vdpa0/
lrwxrwxrwx 1 root root    0 Apr  8 00:07 vdpa1 -> ../../../../devices/pci0000:00/0000:00:03.0/0000:07:01.2/vdpa1/
From the above output results, we can confirm the following
- /dev/vhost-vdpa-0 and /dev/vhost-vdpa-1 are recognized as vhost_vdpa devices
- 0000:07:00.2/vdpa0 and 0000:07:01.2/vdpa1 are controlled by the vhost_vdpa driver
7-4.Initial configuration of ovs
Since ovs has already been installed, start the service from systemctl.*7
systemctl start openvswitch
ovs-vsctl set Open_vSwitch . other_config:dpdk-init=true
ovs-vsctl set Open_vSwitch . other_config:hw-offload=true other_config:tc-policy=none
ovs-vsctl set Open_vSwitch . other_config:dpdk-socket-mem=1024,1024
ovs-vsctl set Open_vSwitch . other_config:vhost-iommu-support=true
ovs-vsctl set Open_vSwitch . other_config:dpdk-extra=" \
-w 0000:07:00.0,representor=[0],dv_flow_en=1,dv_esw_en=1,dv_xmeta_en=0 \
-w 0000:07:00.1,representor=[0],dv_flow_en=1,dv_esw_en=1,dv_xmeta_en=0"
systemctl restart openvswitch
Start the ovs service
Initialize dpdk
HW offload and tc-policy configuration
Memory allocation
IOMMU configuration for vhost
Configure representer
Restart the ovs service (to reflect the above settings)
Use the following command to check the settings.
ovs-vsctl get Open_vSwitch . other_config

[root@c83g155 ~]# ovs-vsctl get Open_vSwitch . other_config
{dpdk-extra=" -w 0000:07:00.0,representor=[0],dv_flow_en=1,dv_esw_en=1,dv_xmeta_en=0 -w 0000:07:00.1,representor=[0],dv_flow_en=1,dv_esw_en=1,dv_xmeta_en=0", dpdk-init="true", dpdk-socket-mem="1024,1024", hw-offload="true", tc-policy=none, vhost-iommu-support="true"}
Note 1:
Here is a supplementary explanation of other_config:dpdk-extra.
There is the following correspondence between the output results of "lshw -businfo -c network" and the commands configured in "other_config:dpdk-extra".
| 0000:07:00.0 ens2f0_0 | -w 0000:07:00.0,representor=[0] |
| 0000:07:00.1 ens2f1_0 | -w 0000:07:00.1,representor=[0] |
Note 2:
Here is a supplementary explanation of other_config:tc-policy.
The following options can be set for tc-policy.
| none | adds a TC rule to both the software and the hardware (default) |
| skip_sw | adds a TC rule only to the hardware |
| skip_hw | adds a TC rule only to the software |
Note 3:
If you want to remove the configuration, execute the command as follows.
"dpdk-extra" is the key, so specify any key you want to delete, such as "dpdk-init" or "hw-offload".
ovs-vsctl remove Open_vSwitch . other_config dpdk-extra
7-5.Configuration of br30-ovs : (2)(3)(4)
Create the first bridge.
(2)
ovs-vsctl add-br br30-ovs -- set bridge br30-ovs datapath_type=netdev
(3)
ovs-vsctl add-port br30-ovs ens2f0 -- set Interface ens2f0 type=dpdk options:dpdk-devargs=0000:07:00.0
(4)
ovs-vsctl add-port br30-ovs ens2f0_0 -- set Interface ens2f0_0 type=dpdk options:dpdk-devargs=0000:07:00.0,representor=[0]
(2) Create a bridge
(3) Create the uplink (specify PF and set the interface for the external NW)
(4) Create downlink (specify VF Representer and set up the interface for VM)
Check the settings with the following command.
[root@c83g155 ~]# ovs-vsctl show
59a34ea2-ca80-48b9-8b14-a656c79bc451
    Bridge br30-ovs
        datapath_type: netdev
        Port br30-ovs
            Interface br30-ovs
                type: internal
        Port ens2f0_0
            Interface ens2f0_0
                type: dpdk
                options: {dpdk-devargs="0000:07:00.0,representor=[0]"}
        Port ens2f0
            Interface ens2f0
                type: dpdk
                options: {dpdk-devargs="0000:07:00.0"}
    ovs_version: "2.14.1"
7-6.Configuration of br31-ovs : (5)(6)(7)
Create the second bridge.
(5)
ovs-vsctl add-br br31-ovs -- set bridge br31-ovs datapath_type=netdev
(6)
ovs-vsctl add-port br31-ovs ens2f1 -- set Interface ens2f1 type=dpdk options:dpdk-devargs=0000:07:00.1
(7)
ovs-vsctl add-port br31-ovs ens2f1_0 -- set Interface ens2f1_0 type=dpdk options:dpdk-devargs=0000:07:00.1,representor=[0]
Same as (2), (3), and (4).
Check the settings with the following command. The blue text is the part that has been added.
[root@c83g155 ~]# ovs-vsctl show
59a34ea2-ca80-48b9-8b14-a656c79bc451
    Bridge br31-ovs
        datapath_type: netdev
        Port ens2f1_0
            Interface ens2f1_0
                type: dpdk
                options: {dpdk-devargs="0000:07:00.1,representor=[0]"}
        Port ens2f1
            Interface ens2f1
                type: dpdk
                options: {dpdk-devargs="0000:07:00.1"}
        Port br31-ovs
            Interface br31-ovs
                type: internal
    Bridge br30-ovs
        datapath_type: netdev
        Port br30-ovs
            Interface br30-ovs
                type: internal
        Port ens2f0_0
            Interface ens2f0_0
                type: dpdk
                options: {dpdk-devargs="0000:07:00.0,representor=[0]"}
        Port ens2f0
            Interface ens2f0
                type: dpdk
                options: {dpdk-devargs="0000:07:00.0"}
    ovs_version: "2.14.1"
A. For qemu
7-7.Configure and start virtual machine c77g153 : (8)
Please upload the qcow2 file to "/var/lib/libvirt/images/".
In this article, the qcow2 file with CentOS7.7 installed was prepared beforehand.
(8)
qemu-system-x86_64 \
 -enable-kvm \
 -cpu host \
 -m 8G \
 -hda /var/lib/libvirt/images/c77g1532.qcow2 \
 -netdev type=vhost-vdpa,vhostdev=/dev/vhost-vdpa-0,id=vhost-vdpa0 \
 -device virtio-net-pci,netdev=vhost-vdpa0,page-per-vq=on,iommu_platform=on,disable-legacy=on \
 -nographic \
 2>&1 | tee vm153.log
| type=vhost-vdpa | In order to be able to specify vhost-vdpa as type, qemu built from source. |
| vhostdev=/dev/vhost-vdpa-0 | The vdpa device generated by the modprobe vhost_vdpa command is specified. |
| page-per-vq=on | This setting is required to use virtqueue. |
| iommu_platform=on | We haven't checked the details, but it seems to be a mandatory setting since it is used for virtqueue communication with Platform IOMMU from fig.2. |
7-8.Configure and start virtual machine c77g159 : (9)
Other than the qcow2 file and vdpa device, it is the same as 7-7.
(9)
qemu-system-x86_64 \
 -enable-kvm \
 -cpu host \
 -m 8G \
 -hda /var/lib/libvirt/images/c77g1592.qcow2 \
 -netdev type=vhost-vdpa,vhostdev=/dev/vhost-vdpa-1,id=vhost-vdpa1 \
 -device virtio-net-pci,netdev=vhost-vdpa1,page-per-vq=on,iommu_platform=on,disable-legacy=on \
 -nographic \
 2>&1 | tee vm159.log
B. For libvirtd 2021/06/01update
7-7.Configure and start virtual machine c77g153 : (8)
Please upload the qcow2 file to "/var/lib/libvirt/images/".
In this article, the qcow2 file with CentOS7.7 installed was prepared beforehand.
Additionally, once you have created a virtual machine with virt-manager, you will edit it with the "virsh edit" commands.
Login to the host OS via VNC or other means, and start virt-manager.
When creating a new virtual machine, delete the following [1]-[5] devices.*8
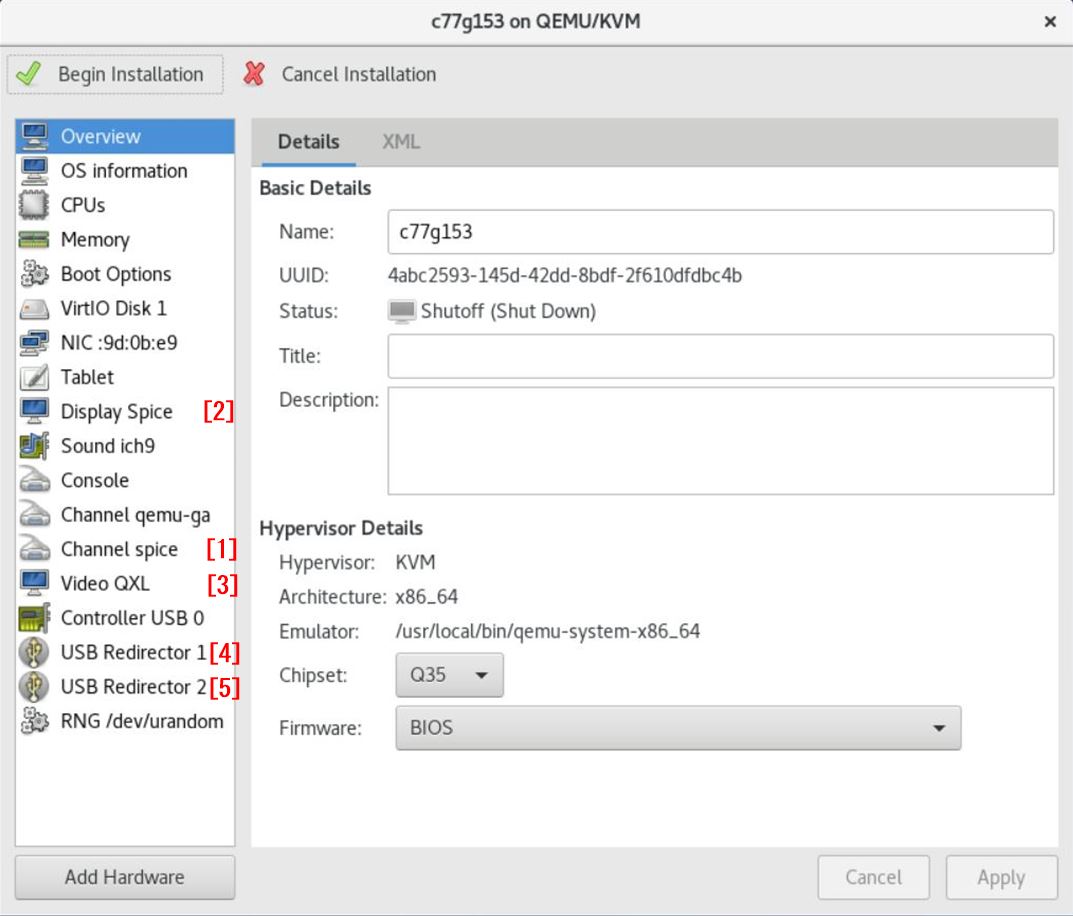
After booting the VM, shutdown it once.
After shutdown, the device configuration should look like the following.
The NICs listed here are not used in vDPA, but they will allow you to ssh to them, so if you need to, assign a management IP to them.
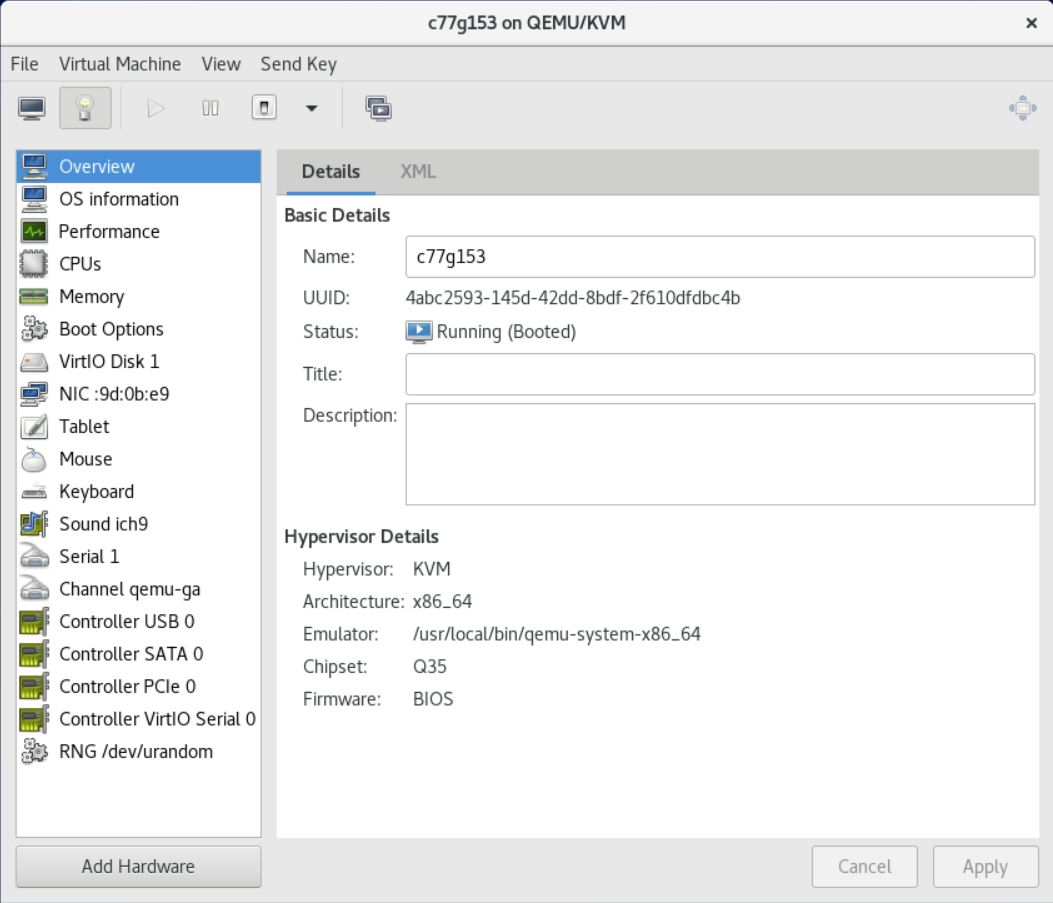
After shutdown, use the virsh edit command to perform the following settings.
(8)
virsh edit c77g153

<devices>
============ s n i p ============
  <interface type='vdpa'>
    <source dev='/dev/vhost-vdpa-0'/>
  </interface>
7-8.Configure and start virtual machine c77g159 : (9)
Same as 7-7, except /dev/vhost-vdpa-1.
(9)
virsh edit c77g159

<devices>
============ s n i p ============
  <interface type='vdpa'>
    <source dev='/dev/vhost-vdpa-1'/>
  </interface>
8.Operation check
Although the VMs (c77g153 and c77g159) have already been started as a result of executing the commands (8) and (9), please shut them down once to confirm normal operation.
8-1.advance preparation
Prepare five consoles on hostOS c83g155.
| ConsoleA | tail -f /var/log/messages | To refer to the logs that should be checked at VM startup |
| ConsoleB | watch ovs-ofctl -O OpenFlow14 dump-ports br30-ovs | To check the packet count on c77g153 |
| ConsoleC | watch ovs-ofctl -O OpenFlow14 dump-ports br31-ovs | To check the packet count on c77g159 |
| ConsoleD | Execute the command in (8) | For the console of virtual machine c77g153 |
| ConsoleE | Execute the command in (9) | For the console of virtual machine c77g159 |
For libvirtd 2021/06/01update
| ConsoleD | virsh start c77g153; virsh console c77g153 | For the console of virtual machine c77g153 |
| ConsoleE | virsh start c77g159; virsh console c77g159 | For the console of virtual machine c77g159 |
8-2.Booting the VM
Before starting the VM, please execute the above commands on ConsoleA, B, and C.
Then, execute the command in (8) to start c77g153.
Wait for a few seconds, then execute command (9) to start c77g159.
Send a ping from c77g153 or c77g159.
As an example, follow fig.1 and execute ping 192.168.30.159 -f from c77g153.
fig.1
The following is the output result. The points of interest are in red.
ConsoleA
Apr  8 10:38:21 c83g155 dbus-daemon[2076]: [session uid=0 pid=2076] Activating via systemd: service name='org.freedesktop.Tracker1.Miner.Extract' unit='tracker-extract.service' requested by ':1.72' (uid=0 pid=2706 comm="/usr/libexec/tracker-miner-fs ")
Apr  8 10:38:21 c83g155 systemd[1919]: Starting Tracker metadata extractor...
Apr  8 10:38:21 c83g155 kernel: mlx5_core 0000:07:00.2: mlx5_vdpa_set_status:1786:(pid 5077): performing device reset
Apr  8 10:38:21 c83g155 kvm[5088]: 1 guest now active
Apr  8 10:38:21 c83g155 dbus-daemon[2076]: [session uid=0 pid=2076] Successfully activated service 'org.freedesktop.Tracker1.Miner.Extract'
Apr  8 10:38:21 c83g155 systemd[1919]: Started Tracker metadata extractor.
Apr  8 10:38:46 c83g155 kernel: mlx5_core 0000:07:00.2: mlx5_vdpa_handle_set_map:473:(pid 5086): memory map update
Apr  8 10:38:51 c83g155 ovs-vswitchd[4998]: ovs|00001|dpif_netdev(revalidator17)|ERR|internal error parsing flow key skb_priority(0),skb_mark(0),ct_state(0),ct_zone(0),ct_mark(0),ct_label(0),recirc_id(0),dp_hash(0),in_port(6),packet_type(ns=0,id=0),eth(src=00:11:22:33:44:00,dst=01:00:5e:00:00:16),eth_type(0x0800),ipv4(src=192.168.30.153,dst=224.0.0.22,proto=2,tos=0xc0,ttl=1,frag=no)
Apr  8 10:38:51 c83g155 ovs-vswitchd[4998]: ovs|00002|dpif_netdev(revalidator17)|ERR|internal error parsing flow key skb_priority(0),skb_mark(0),ct_state(0),ct_zone(0),ct_mark(0),ct_label(0),recirc_id(0),dp_hash(0),in_port(3),packet_type(ns=0,id=0),eth(src=00:11:22:33:44:00,dst=01:00:5e:00:00:16),eth_type(0x0800),ipv4(src=192.168.30.153,dst=224.0.0.22,proto=2,tos=0xc0,ttl=1,frag=no)
Apr  8 10:39:08 c83g155 systemd[1919]: tracker-extract.service: Succeeded.

Apr  8 10:41:52 c83g155 dbus-daemon[2076]: [session uid=0 pid=2076] Activating via systemd: service name='org.freedesktop.Tracker1.Miner.Extract' unit='tracker-extract.service' requested by ':1.72' (uid=0 pid=2706 comm="/usr/libexec/tracker-miner-fs ")
Apr  8 10:41:52 c83g155 systemd[1919]: Starting Tracker metadata extractor...
Apr  8 10:41:52 c83g155 kernel: mlx5_core 0000:07:01.2: mlx5_vdpa_set_status:1786:(pid 5370): performing device reset
Apr  8 10:41:52 c83g155 kvm[5380]: 2 guests now active
Apr  8 10:41:52 c83g155 dbus-daemon[2076]: [session uid=0 pid=2076] Successfully activated service 'org.freedesktop.Tracker1.Miner.Extract'
Apr  8 10:41:52 c83g155 systemd[1919]: Started Tracker metadata extractor.
Apr  8 10:42:16 c83g155 kernel: mlx5_core 0000:07:01.2: mlx5_vdpa_handle_set_map:473:(pid 5381): memory map update
Apr  8 10:42:21 c83g155 ovs-vswitchd[4998]: ovs|00005|dpif_netdev(revalidator17)|ERR|internal error parsing flow key skb_priority(0),skb_mark(0),ct_state(0),ct_zone(0),ct_mark(0),ct_label(0),recirc_id(0),dp_hash(0),in_port(2),packet_type(ns=0,id=0),eth(src=00:11:22:33:44:10,dst=01:00:5e:00:00:16),eth_type(0x0800),ipv4(src=192.168.30.159,dst=224.0.0.22,proto=2,tos=0xc0,ttl=1,frag=no)
Apr  8 10:42:21 c83g155 ovs-vswitchd[4998]: ovs|00006|dpif_netdev(revalidator17)|ERR|internal error parsing flow key skb_priority(0),skb_mark(0),ct_state(0),ct_zone(0),ct_mark(0),ct_label(0),recirc_id(0),dp_hash(0),in_port(4),packet_type(ns=0,id=0),eth(src=00:11:22:33:44:10,dst=01:00:5e:00:00:16),eth_type(0x0800),ipv4(src=192.168.30.159,dst=224.0.0.22,proto=2,tos=0xc0,ttl=1,frag=no)
Apr  8 10:42:40 c83g155 systemd[1919]: tracker-extract.service: Succeeded.
ConsoleB
[root@c83g155 ~]# ovs-ofctl -O OpenFlow14 dump-ports br30-ovs
OFPST_PORT reply (OF1.4) (xid=0x2): 3 ports
  port  ens2f0: rx pkts=85847, bytes=8414161, drop=0, errs=0, frame=?, over=?, crc=?
           tx pkts=85847, bytes=8414028, drop=0, errs=0, coll=?
           duration=423.079s
           rx rfc2819 broadcast_packets=2,
           tx rfc2819 multicast_packets=54, broadcast_packets=1,
           CUSTOM Statistics
                      ovs_tx_failure_drops=0, ovs_tx_mtu_exceeded_drops=0, ovs_tx_qos_drops=0,
                      ovs_rx_qos_drops=0, ovs_tx_invalid_hwol_drops=0, rx_missed_errors=0,
                      rx_errors=0, tx_errors=0, rx_mbuf_allocation_errors=0,
                      rx_q0_errors=0, rx_wqe_errors=0, rx_phy_crc_errors=0,
                      rx_phy_in_range_len_errors=0, rx_phy_symbol_errors=0, tx_phy_errors=0,
                      tx_pp_missed_interrupt_errors=0, tx_pp_rearm_queue_errors=0, tx_pp_clock_queue_errors=0,
                      tx_pp_timestamp_past_errors=0, tx_pp_timestamp_future_errors=0,
  port LOCAL: rx pkts=0, bytes=0, drop=0, errs=0, frame=0, over=0, crc=0
           tx pkts=0, bytes=0, drop=55, errs=0, coll=0
           duration=423.075s
  port  "ens2f0_0": rx pkts=85847, bytes=8414028, drop=0, errs=0, frame=?, over=?, crc=?
           tx pkts=85847, bytes=8414161, drop=0, errs=0, coll=?
           duration=422.848s
           CUSTOM Statistics
                      ovs_tx_failure_drops=0, ovs_tx_mtu_exceeded_drops=0, ovs_tx_qos_drops=0,
                      ovs_rx_qos_drops=0, ovs_tx_invalid_hwol_drops=0, rx_missed_errors=0,
                      rx_errors=0, tx_errors=0, rx_mbuf_allocation_errors=0,
                      rx_q0_errors=0, tx_pp_missed_interrupt_errors=0, tx_pp_rearm_queue_errors=0,
                      tx_pp_clock_queue_errors=0, tx_pp_timestamp_past_errors=0, tx_pp_timestamp_future_errors=0,
ConsoleC
[root@c83g155 ~]# ovs-ofctl -O OpenFlow14 dump-ports br31-ovs
OFPST_PORT reply (OF1.4) (xid=0x2): 3 ports
  port  ens2f1: rx pkts=85847, bytes=8414104, drop=0, errs=0, frame=?, over=?, crc=?
           tx pkts=85847, bytes=8414085, drop=0, errs=0, coll=?
           duration=450.620s
           rx rfc2819 broadcast_packets=2,
           tx rfc2819 multicast_packets=54, broadcast_packets=1,
           CUSTOM Statistics
                      ovs_tx_failure_drops=0, ovs_tx_mtu_exceeded_drops=0, ovs_tx_qos_drops=0,
                      ovs_rx_qos_drops=0, ovs_tx_invalid_hwol_drops=0, rx_missed_errors=0,
                      rx_errors=0, tx_errors=0, rx_mbuf_allocation_errors=0,
                      rx_q0_errors=0, rx_wqe_errors=0, rx_phy_crc_errors=0,
                      rx_phy_in_range_len_errors=0, rx_phy_symbol_errors=0, tx_phy_errors=0,
                      tx_pp_missed_interrupt_errors=0, tx_pp_rearm_queue_errors=0, tx_pp_clock_queue_errors=0,
                      tx_pp_timestamp_past_errors=0, tx_pp_timestamp_future_errors=0,
  port LOCAL: rx pkts=0, bytes=0, drop=0, errs=0, frame=0, over=0, crc=0
           tx pkts=0, bytes=0, drop=55, errs=0, coll=0
           duration=451.970s
  port  "ens2f1_0": rx pkts=85847, bytes=8414085, drop=0, errs=0, frame=?, over=?, crc=?
           tx pkts=85847, bytes=8414104, drop=0, errs=0, coll=?
           duration=450.915s
           CUSTOM Statistics
                      ovs_tx_failure_drops=0, ovs_tx_mtu_exceeded_drops=0, ovs_tx_qos_drops=0,
                      ovs_rx_qos_drops=0, ovs_tx_invalid_hwol_drops=0, rx_missed_errors=0,
                      rx_errors=0, tx_errors=0, rx_mbuf_allocation_errors=0,
                      rx_q0_errors=0, tx_pp_missed_interrupt_errors=0, tx_pp_rearm_queue_errors=0,
                      tx_pp_clock_queue_errors=0, tx_pp_timestamp_past_errors=0, tx_pp_timestamp_future_errors=0,
ConsoleD
[root@c77g153 ~]# ping 192.168.30.159 -f
PING 192.168.30.159 (192.168.30.159) 56(84) bytes of data.

--- 192.168.30.159 ping statistics ---
85742 packets transmitted, 85742 received, 0% packet loss, time 20040ms
rtt min/avg/max/mdev = 0.093/0.111/7.100/0.055 ms, ipg/ewma 0.233/0.144 ms
Note:
| performing device reset | mlx5_vdpa is initialized by mlx5_core. |
| memory map update | IOMMU memory mapping and update of mlx5_vdpa is being performed by mlx5_core. Note that this is the most important message because we can never communicate with it unless this log is output. |
| internal error parsing flow key | The ovs is giving multicast-related errors, but there is nothing wrong with it. Don't worry about it. |
| ens2f0 "ens2f0_0" | You can see that the tx/rx packet count and byte count for each port are increasing. |
That's all.
9.Finally
We referred to the following website.
https://www.redhat.com/en/blog?search=vdpa
https://docs.mellanox.com/pages/viewpage.action?pageId=43718786
https://community.mellanox.com/s/article/Basic-Debug-utilities-with-OVS-DPDK-offload-ASAP-Direct
https://static.sched.com/hosted_files/dpdkuserspace2020/ab/vDPA%20-%20DPDK%20Userspace%202020.pdf
https://netdevconf.info/1.2/slides/oct6/04_gerlitz_efraim_introduction_to_switchdev_sriov_offloads.pdf
https://www.mail-archive.com/dev@dpdk.org/msg175938.html
https://www.spinics.net/lists/netdev/msg693858.html
http://yunazuno.hatenablog.com/entry/2018/07/08/215118
https://ameblo.jp/makototgc/entry-12579674054.html
https://www.jianshu.com/p/091b60ea72dc
In the next article, we will describe "How to set up vDPA with virtio_vdpa for VMs".
In addition, as an extra chapter, We plan to describe how to procure NICs, how to configure other than ovs-dpdk, and what issues we are facing.
| No | vm(qemu)/k8s | k8s Pod/VMI | vDPA Framework | vDPA Type | SR-IOV mode | Related Articles |
| 1 | vm | - | kernel | vhost | lagacy | Not started |
| 2 | vm | - | kernel | vhost | switchdev | How to set up vDPA with vhost_vdpa for VMs - Metonymical DeflectionThis article |
| 3 | vm | - | kernel | virtio | lagacy | Not started |
| 4 | vm | - | kernel | virtio | switchdev | Not started |
| 5 | vm | - | dpdk | vhost | lagacy | Not started |
| 6 | vm | - | dpdk | vhost | switchdev | Not started |
| 7 | vm | - | dpdk | virtio | lagacy | Not started |
| 8 | vm | - | dpdk | virtio | switchdev | How to set up vDPA with virtio_vdpa for VMs - Metonymical Deflection |
| 9 | k8s | pod | kernel | vhost | lagacy | How to set up vDPA with vhost_vdpa for Kubernetes - Metonymical Deflection |
| 10 | k8s | pod | kernel | vhost | switchdev | How to set up vDPA with vhost_vdpa for Kubernetes + Accelerated Bridge CNI - Metonymical Deflection |
| 11 | k8s | pod | kernel | virtio | lagacy | Not started |
| 12 | k8s | pod | kernel | virtio | switchdev | Not started |
| 13 | k8s | pod | dpdk | client | lagacy | Not started |
| 14 | k8s | pod | dpdk | client | switchdev | Not started |
| 15 | k8s | pod | dpdk | server | lagacy | Not started |
| 16 | k8s | pod | dpdk | server | switchdev | Not started |
Other related articles
How to set up vDPA - appendix - - Metonymical Deflection
*1:After checking various documents, I found that the "v" in vDPA has three different meanings: virtual, vhost, and virtio, but they all seem to be the same. In this article, I have followed Introduction to vDPA kernel framework and used virtio.
*2:A loop connection is used in case a 100Gbps switch or a server with 100GNICs is not available. However, since we believe it is important that packets generated by the VM are physically sent to the outside, we use the configuration shown in fig.1.
*3:This is a description of what I understand. If the content is incorrect, please point it out.
*4:We have confirmed that if the MAC address is not settings, the VM will not recognize the VF after VM startup.
*5:core and modules will be installed at the same time
*6:The "0000" in front of the bsf number is called the Domain number. As far as I know, I have never seen a value other than "0000", so I don't think you need to worry too much about it.
*7:It has already been installed in 2-3.
*8:This is because related packages such as spice were not installed when qemu was built, and the virtual machine could not be started without removing these devices. Since this is not directly related to vDPA, we will not discuss how to deal with these issues.