baidu dperfの設定方法について記載します。
GitHub - baidu/dperf: dperf is a DPDK based 100Gbps network performance and load testing software.
dperfはDPDKをベースとした高性能なHTTP負荷試験ツールです。
特に、TPut(through put)、CPS(Connection per seconds)、CC(Concurrent Connection)の負荷試験に適しています。
本記事では、CentOS7/8のインストール方法や設定方法について記載します。
また、Mellanox製NICを使用した場合とそれ以外のNIC*1を使用した場合の差異についても補足説明を記載します。
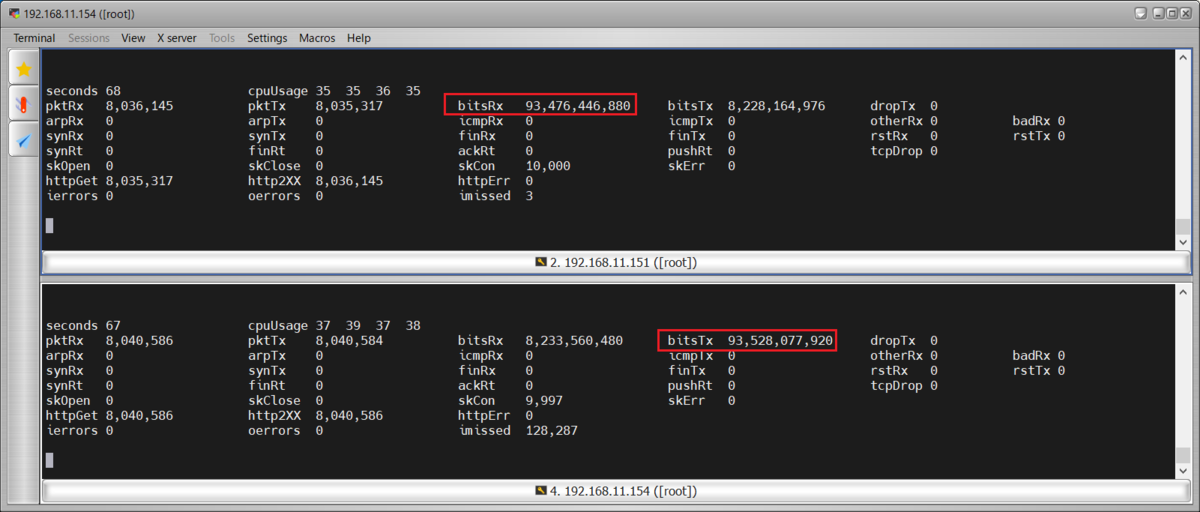
私の環境では以下の負荷を発生させることができましたので、最後に設定例を記載します。
TPut:93Gbps
CPS:5M
CC:300M
1.概要
1-1.環境
IA server                        : ProLiant DL360p Gen8
System ROM                       : P71 01/22/2018
NIC                              : Mellanox ConnectX-6 Dx (MCX623106AS-CDAT)

OS                               : CentOS7.9(2009)
Kernel                           : 3.10.0-1160.el7.x86_64
Installed Environment Groups     :
  @^graphical-server-environment
  @base
  @core
  @development
  @virtualization-client
  @virtualization-hypervisor
  @virtualization-tools
DPDK                             :19.11.10

OS                               : CentOS8.5(2111)
Kernel                           : 4.18.0-348.el8.x86_64
Installed Environment Groups     :
  @^graphical-server-environment
  @development
  @virtualization-client
  @virtualization-hypervisor
  @virtualization-tools
DPDK                             :20.11.4
1-2.全体構成

100GbpsのL2SWが無いため、2台のサーバを直接接続し、1台をdperf Client、もう1台をdperf Serverとして構成しています。
また、仮想環境でも構築可能です。*2
2.事前準備
2-1.Hugepages設定
hugepageの容量は最低8GBとして、適時増加させてください。
vi /etc/default/grub

nopku transparent_hugepage=never default_hugepagesz=1G hugepagesz=1G hugepages=8

grub2-mkconfig -o /etc/grub2.cfg
vi /etc/fstab

nodev  /dev/hugepages    hugetlbfs pagesize=1GB    0 0
2-2.uio_pci_generic設定(Mellanox製NIC以外の場合)
echo "uio_pci_generic" > /etc/modules-load.d/uio_pci_generic.conf
2-3.OFEDインストール(Mellanox製NICの場合)
#CentOS7.9
yum -y install tcl tk unbound
mount -t iso9660 -o loop /root/tmp/MLNX_OFED_LINUX-5.5-1.0.3.2-rhel7.9-x86_64.iso /mnt/
/mnt/mlnxofedinstall --upstream-libs --dpdk --with-mft --with-mstflint

#CentOS8.5
dnf -y install tcl tk unbound tcsh gcc-gfortran && \
mount -t iso9660 -o loop /root/tmp/MLNX_OFED_LINUX-5.5-1.0.3.2-rhel8.5-x86_64.iso /mnt && \
/mnt/mlnxofedinstall --upstream-libs --dpdk --with-mft --with-mstflint
3.インストール方法1:CentOS7.9 + DPDK19.11.10
3-1.DPDKのビルド
yum -y install numactl-devel libpcap-devel
mkdir dpdk
cd /root/dpdk/
wget http://fast.dpdk.org/rel/dpdk-19.11.10.tar.xz
tar xf dpdk-19.11.10.tar.xz
cd /root/dpdk/dpdk-stable-19.11.10

#Mellanox製NICでは以下の設定が必須
sed -i -e "s/CONFIG_RTE_LIBRTE_MLX5_PMD=n/CONFIG_RTE_LIBRTE_MLX5_PMD=y/g" /root/dpdk/dpdk-stable-19.11.10/config/common_base
sed -i -e "s/CONFIG_RTE_LIBRTE_MLX5_DEBUG=n/CONFIG_RTE_LIBRTE_MLX5_DEBUG=y/g" /root/dpdk/dpdk-stable-19.11.10/config/common_base

export TARGET=x86_64-native-linuxapp-gcc
make install T=$TARGET -j4
3-2.dperfのビルド
cd /root/dpdk
wget https://github.com/baidu/dperf/archive/refs/heads/main.zip

unzip main.zip
cd dperf-main/
export TARGET=x86_64-native-linuxapp-gcc
make -j4 RTE_SDK=/root/dpdk/dpdk-stable-19.11.10 RTE_TARGET=$TARGET
4.インストール方法2:CentOS8.5 + DPDK20.11.4
4-1.事前準備*3
sed -i -e 's/enabled=0/enabled=1/g' /etc/yum.repos.d/CentOS-Linux-PowerTools.repo && \
dnf -y install numactl-devel meson ninja-build rdma-core && \
wget https://cbs.centos.org/kojifiles/packages/pyelftools/0.26/1.el8/noarch/python3-pyelftools-0.26-1.el8.noarch.rpm && \
dnf -y localinstall python3-pyelftools-0.26-1.el8.noarch.rpm
4-2.DPDKのビルド
mkdir dpdk
cd /root/dpdk/
wget https://fast.dpdk.org/rel/dpdk-20.11.4.tar.xz
tar xf dpdk-20.11.4.tar.xz
cd /root/dpdk/dpdk-stable-20.11.4

meson build --prefix=/root/dpdk/dpdk-stable-20.11.4/mydpdk -Denable_kmods=true && \
ninja -C build install
4-3.dperfのビルド
cd /root/dpdk
wget https://github.com/baidu/dperf/archive/refs/heads/main.zip

unzip main.zip
cd /root/dpdk/dperf-main/
export PKG_CONFIG_PATH=/root/dpdk/dpdk-stable-20.11.4/mydpdk/lib64/pkgconfig/
make
4-4.ldconfig設定
補足
dperf起動時に以下のエラーが出力された場合、ldconfigを実行してください。
[root@c85g151 dperf-main]# ./build/dperf -c test/http/client-cps.conf
./build/dperf: error while loading shared libraries: librte_ethdev.so.21: cannot open shared object file: No such file or directory
vi /etc/ld.so.conf.d/libdpdk.conf

/root/dpdk/dpdk-stable-20.11.4/mydpdk/lib64

ldconfig
ldconfig -p |grep dpdk
5.設定方法
5-1.dpdk-devbind設定
Mellanox製NIC以外では、dpdk-devbindが必要となります。
Mellanox製NICでは、dpdk-devbindは不要です。
bsf番号を確認の上、NICをdpdk PMDドライバにバインドしてください。*4
lspci
lshw -businfo -c network
/root/dpdk/dpdk-stable-20.11.4/usertools/dpdk-devbind.py -s
/root/dpdk/dpdk-stable-20.11.4/usertools/dpdk-devbind.py -b uio_pci_generic 0000:03:00.0
<出力例>
以下の出力例は、VMWare Work pro15上のCentOS8.5でdpdk-devbindを実行しています。
[root@c85g151 dperf-main]# lspci
00:00.0 Host bridge: Intel Corporation 440BX/ZX/DX - 82443BX/ZX/DX Host bridge (rev 01)
00:01.0 PCI bridge: Intel Corporation 440BX/ZX/DX - 82443BX/ZX/DX AGP bridge (rev 01)
02:01.0 Ethernet controller: Intel Corporation 82545EM Gigabit Ethernet Controller (Copper) (rev 01)
03:00.0 Ethernet controller: VMware VMXNET3 Ethernet Controller (rev 01)
0b:00.0 Ethernet controller: VMware VMXNET3 Ethernet Controller (rev 01)

[root@c85g151 dperf-main]# /root/dpdk/dpdk-stable-20.11.4/usertools/dpdk-devbind.py -s
Network devices using kernel driver
===================================
0000:02:01.0 '82545EM Gigabit Ethernet Controller (Copper) 100f' if=ens33 drv=e1000 unused=uio_pci_generic *Active*
0000:03:00.0 'VMXNET3 Ethernet Controller 07b0' if=ens192 drv=vmxnet3 unused=uio_pci_generic
0000:0b:00.0 'VMXNET3 Ethernet Controller 07b0' if=ens192 drv=vmxnet3 unused=uio_pci_generic

[root@c85g151 dperf-main]# /root/dpdk/dpdk-stable-20.11.4/usertools/dpdk-devbind.py -b uio_pci_generic 0000:03:00.0

[root@c85g151 dperf-main]# /root/dpdk/dpdk-stable-20.11.4/usertools/dpdk-devbind.py -s
Network devices using DPDK-compatible driver
============================================
0000:03:00.0 'VMXNET3 Ethernet Controller 07b0' drv=uio_pci_generic unused=vmxnet3

Network devices using kernel driver
===================================
0000:02:01.0 '82545EM Gigabit Ethernet Controller (Copper) 100f' if=ens33 drv=e1000 unused=uio_pci_generic *Active*
0000:0b:00.0 'VMXNET3 Ethernet Controller 07b0' if=ens192 drv=vmxnet3 unused=uio_pci_generic
5-2.dperfのclient設定
以下の設定はサンプルConfigから変更を加えています。
cd /root/dpdk/dperf-main
vi test/http/client-cps.conf

[root@c85g151 dperf-main]# vi test/http/client-cps.conf
mode                         client
tx_burst                     128
launch_num                   10
cpu                          0
payload_size                 1400
duration                     120s
cps                          400
cc                           2500
keepalive_request_interval   1ms
port         0000:00:08.0    100.64.12.155   100.64.12.156
client       16.0.0.1        100
server       48.0.0.1        1
listen       80              1
補足
設定時に気付いた点を記載します。
| mode | client/serverを選択します。 |
| tx_burst | 設定変更は不要です。 |
| launch_num | CPUコア数を増やした際にFloating point exceptionなどのエラーが出力された場合は、10, 6, 3, 1と値を下げてみてください。 |
| cpu | 0 1や0-4などの設定が可能です。CPU数はserverのIP数と一致させる必要があります。 |
| payload_size | 最小1Byte、最大1400Byteです。また、Client側で1400とした場合、HTTP GETリクエスト内に1400Byte分の文字列が挿入されます。 |
| duration | Defaultでslow_start:30秒の設定があるため、ClientはServerよりも30秒ほど大きい値を設定してください。 |
| cps | 90以下に設定するとエラーが出力される場合があります。このため、100以上に設定してください。 |
| cc | ccはConcurrent Connection(同時接続数)となります。加えて、TPut試験をしたい場合、この値を増加させてください。 |
| keepalive_request_interval | ccを100Mなど大きい値にする場合、30sや60sにすることでCPU負荷を下げることができます。また、TPut試験時は1msなど小さい値にしてください。 |
| port | 1カラム目:PCIeのDomain番号:bsf番号。2カラム目:自身のIPアドレス。3カラム目:GWのIPアドレス。(記載していませんが)4カラム目:GWのMACアドレス |
| client | 1カラム目:HTTP Clientの開始IPアドレス。2カラム目:IPアドレス数。最大254。 |
| server | 1カラム目:HTTP serverの開始IPアドレス。2カラム目:IPアドレス数。このIP数とCPUの数を一致させる必要があります。例えば、cpu 0 1 の場合、2コアのCPUがアサインされているため、serverのアドレス数も2に設定します。 |
| listen | 1カラム目:待受けポート番号。2カラム目:ポート番号数。例えば、この値が4の場合、TCP80, 81, 82, 83で待受けます。この数を増やすと、Hugepagesが使用されます。Hugepagesの容量が不足した場合には8GB以上を設定してください。 |
詳細は以下URLを参照してください。
dperf/configuration.md at main · baidu/dperf · GitHub
5-3.dperfのserver設定
以下の設定はサンプルConfigから変更を加えています。
cd /root/dpdk/dperf-main
vi test/http/server-cps.conf

[root@c85g154 dperf-main]# vi test/http/server-cps.conf
mode                        server
tx_burst                    128
cpu                         0
duration                    150s
payload_size                1400
keepalive                   1
port        0000:00:09.0    100.64.12.156   100.64.12.155
client      16.0.0.1        100
server      48.0.0.1        1
listen      80              1
補足
5-2以外の点について記載します。
| payload_size | HTTPのコンテンツサイズになります。TPut試験時はServerSide:1400、ClientSide:1と設定します。ClientSide:1400とした場合、GETリクエスト内に文字列が挿入されるため、上り下りの双方向で同程度のTPutが発生します。この影響により下り(ServerからClient方向)のTPutが上限に達しない事象を確認したため、ServerSide:1400、ClientSide:1としてください。 |
| keepalive | ccやTPut試験時には有効"1"にしてください。 |
詳細は以下URLを参照してください。
dperf/configuration.md at main · baidu/dperf · GitHub
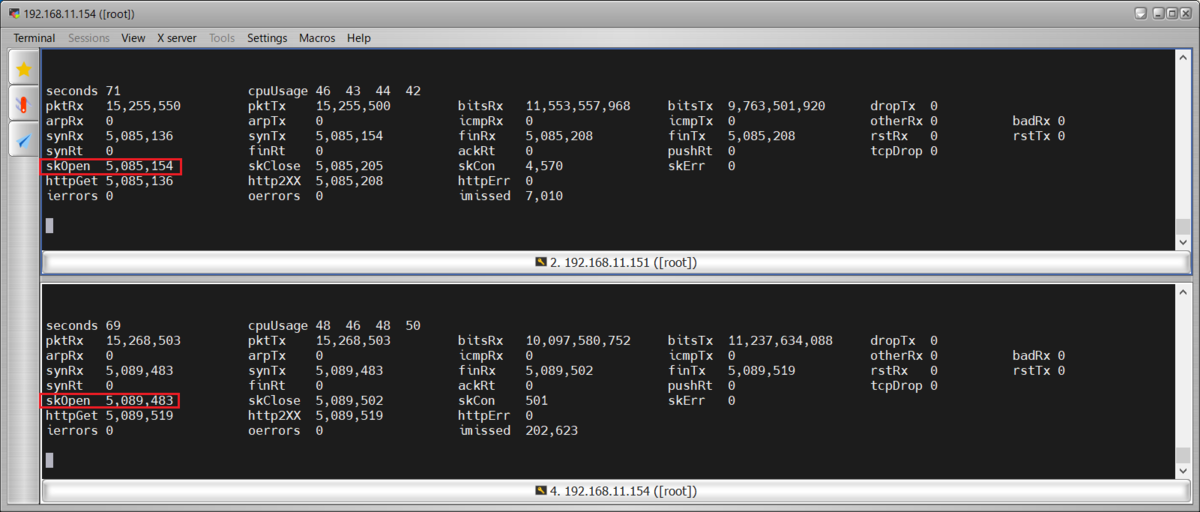
6.負荷試験
負荷を発生させる際は、Client SideとServer Sideにて、ほぼ同時にプログラムを実行してください。
補足
今回の構成では、互いのGWアドレスが自身のIPアドレスとなっているため、プログラムが同時に実行されない場合、arp解決ができずにbad gatewayと表示され、プログラムが停止してしまいます。
DUT*5がGWアドレスを保持している場合には問題ありません。
もしくは、Portの4カラム目にMACアドレスを設定してください。
6-1.Client Side
cd /root/dpdk/dperf-main
./build/dperf -c test/http/client-cps.conf
<出力例>
[root@c85g151 dperf-main]# ./build/dperf -c test/http/client-cps.conf
EAL: Detected 4 lcore(s)
EAL: Detected 1 NUMA nodes
EAL: Detected shared linkage of DPDK
EAL: Multi-process socket /var/run/dpdk/rte/mp_socket
EAL: Selected IOVA mode 'PA'
EAL: No available hugepages reported in hugepages-2048kB
EAL: Probing VFIO support...
EAL: Probe PCI driver: mlx5_pci (15b3:101e) device: 0000:05:00.0 (socket 0)
EAL: No legacy callbacks, legacy socket not created
socket allocation succeeded, size 0.01GB num 131070

seconds 0                  cpuUsage 0
pktRx   0                  pktTx    0                  bitsRx   0                  bitsTx  0                  dropTx  0
arpRx   0                  arpTx    0                  icmpRx   0                  icmpTx  0                  otherRx 0          badRx 0
synRx   0                  synTx    0                  finRx    0                  finTx   0                  rstRx   0          rstTx 0
synRt   0                  finRt    0                  ackRt    0                  pushRt  0                  tcpDrop 0
skOpen  0                  skClose  0                  skCon    0                  skErr   0
httpGet 0                  http2XX  0                  httpErr  0
ierrors 0                  oerrors  0                  imissed  0

seconds 1                  cpuUsage 0
pktRx   0                  pktTx    0                  bitsRx   0                  bitsTx  0                  dropTx  0
arpRx   0                  arpTx    0                  icmpRx   0                  icmpTx  0                  otherRx 0          badRx 0
synRx   0                  synTx    0                  finRx    0                  finTx   0                  rstRx   0          rstTx 0
synRt   0                  finRt    0                  ackRt    0                  pushRt  0                  tcpDrop 0
skOpen  0                  skClose  0                  skCon    0                  skErr   0
httpGet 0                  http2XX  0                  httpErr  0
ierrors 0                  oerrors  0                  imissed  0
6-2.Server Side
cd /root/dpdk/dperf-main
./build/dperf -c test/http/server-cps.conf
<出力例>
[root@c85g154 dperf-main]# ./build/dperf -c test/http/server-cps.conf
EAL: Detected 4 lcore(s)
EAL: Detected 1 NUMA nodes
EAL: Detected shared linkage of DPDK
EAL: Multi-process socket /var/run/dpdk/rte/mp_socket
EAL: Selected IOVA mode 'PA'
EAL: No available hugepages reported in hugepages-2048kB
EAL: Probing VFIO support...
EAL: Probe PCI driver: mlx5_pci (15b3:101e) device: 0000:05:00.0 (socket 0)
EAL: No legacy callbacks, legacy socket not created
socket allocation succeeded, size 0.78GB num 13107000

seconds 0                  cpuUsage 0
pktRx   0                  pktTx    0                  bitsRx   0                  bitsTx  0                  dropTx  0
arpRx   0                  arpTx    0                  icmpRx   0                  icmpTx  0                  otherRx 0          badRx 0
synRx   0                  synTx    0                  finRx    0                  finTx   0                  rstRx   0          rstTx 0
synRt   0                  finRt    0                  ackRt    0                  pushRt  0                  tcpDrop 0
skOpen  0                  skClose  0                  skCon    0                  skErr   0
httpGet 0                  http2XX  0                  httpErr  0
ierrors 0                  oerrors  0                  imissed  0

seconds 1                  cpuUsage 0
pktRx   0                  pktTx    0                  bitsRx   0                  bitsTx  0                  dropTx  0
arpRx   0                  arpTx    0                  icmpRx   0                  icmpTx  0                  otherRx 0          badRx 0
synRx   0                  synTx    0                  finRx    0                  finTx   0                  rstRx   0          rstTx 0
synRt   0                  finRt    0                  ackRt    0                  pushRt  0                  tcpDrop 0
skOpen  0                  skClose  0                  skCon    0                  skErr   0
httpGet 0                  http2XX  0                  httpErr  0
ierrors 0                  oerrors  0                  imissed  0
7.高負荷試験の設定例
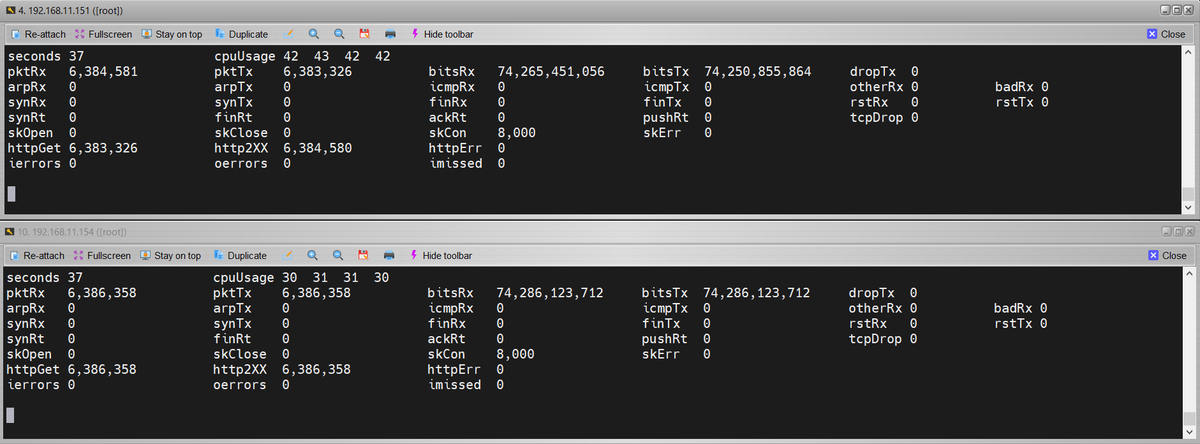
本構成にて以下の負荷を印加した際の設定例を記載します。
TPut:93Gbps
CPS:5M
CC:300M
2ポートNICを使用した場合の設定となっていますが、1ポートでも同等の性能が出ました。
(1ポートNICの設定方法は最後に記載します。)
7-1.TPut試験
Client Side
[root@c85g151 dperf-main]# cat test/http/client-cps.conf
mode                         client
tx_burst                     128
launch_num                   3
cpu                          0 1 2 3
payload_size                 1
duration                     120s
cps                          500
cc                           10000
keepalive_request_interval   1ms
port         0000:07:00.0    100.64.12.155   100.64.12.156
client       16.0.0.1        200
server       48.0.0.1        2
port         0000:07:00.1    100.64.13.155   100.64.13.156
client       16.0.1.1        200
server       48.0.1.1        2
listen       80              1
Server Side
[root@c85g154 dperf-main]# cat test/http/server-cps.conf
mode                        server
tx_burst                    128
cpu                         0 1 2 3
duration                    150s
payload_size                1400
keepalive                   1
port        0000:07:00.0    100.64.12.156   100.64.12.155
client      16.0.0.1        200
server      48.0.0.1        2
port        0000:07:00.1    100.64.13.156   100.64.13.155
client      16.0.1.1        200
server      48.0.1.1        2
listen      80              1
TPut:93Gbps
補足
ここで、clientのpayload_sizeを1400に設定した場合、クライアント側もサーバ側もbitsRXとbitsTXが両方とも74Gbpsとなりました。
7-2.CPS試験
Client Side
[root@c85g151 dperf-main]# cat test/http/client-cps.conf
mode                         client
tx_burst                     128
launch_num                   3
cpu                          0 1 2 3
payload_size                 1
duration                     120s
cps                          5.1m
port         0000:07:00.0    100.64.12.155   100.64.12.156
client       16.0.0.1        200
server       48.0.0.1        2
port         0000:07:00.1    100.64.13.155   100.64.13.156
client       16.0.1.1        200
server       48.0.1.1        2
listen       80              1
Server Side
[root@c85g154 dperf-main]# cat test/http/server-cps.conf
mode                        server
tx_burst                    128
cpu                         0 1 2 3
duration                    150s
payload_size                1
port        0000:07:00.0    100.64.12.156   100.64.12.155
client      16.0.0.1        200
server      48.0.0.1        2
port        0000:07:00.1    100.64.13.156   100.64.13.155
client      16.0.1.1        200
server      48.0.1.1        2
listen      80              1
CPS:5M
7-3.CC試験
Client Side
[root@c85g151 dperf-main]# cat test/http/client-cps.conf
mode                         client
tx_burst                     128
launch_num                   3
cpu                          0 1 2 3 4 5
payload_size                 1
duration                     1800s
cps                          1m
cc                           300m
keepalive_request_interval   60s
port         0000:07:00.0    100.64.12.155   100.64.12.156
client       16.0.0.1        200
server       48.0.0.1        3
port         0000:07:00.1    100.64.13.155   100.64.13.156
client       16.0.1.1        200
server       48.0.1.1        3
listen       80              4
Server Side
[root@c85g154 dperf-main]# cat test/http/server-cps.conf
mode                        server
tx_burst                    128
cpu                         0 1 2 3 4 5
duration                    1800s
payload_size                1
keepalive                   1
port        0000:07:00.0    100.64.12.156   100.64.12.155
client      16.0.0.1        200
server      48.0.0.1        3
port        0000:07:00.1    100.64.13.156   100.64.13.155
client      16.0.1.1        200
server      48.0.1.1        3
listen      80              4
CC:300M

7-4.1ポートNICでの設定例
例として、7-1.TPut試験の設定を1ポートNIC設定に変更します。
変更箇所は赤文字で記載し、削除箇所はグレーアウトしました。
Client Side
[root@c85g151 dperf-main]# cat test/http/client-cps.conf
mode                         client
tx_burst                     128
launch_num                   3
cpu                          0 1 2 3
payload_size                 1
duration                     120s
cps                          500
cc                           10000
keepalive_request_interval   1ms
port         0000:07:00.0    100.64.12.155   100.64.12.156
client       16.0.0.1        200
server       48.0.0.1        4
#port         0000:07:00.1    100.64.13.155   100.64.13.156
#client       16.0.1.1        200
#server       48.0.1.1        2
listen       80              1
Server Side
[root@c85g154 dperf-main]# cat test/http/server-cps.conf
mode                        server
tx_burst                    128
cpu                         0 1 2 3
duration                    150s
payload_size                1400
keepalive                   1
port        0000:07:00.0    100.64.12.156   100.64.12.155
client      16.0.0.1        200
server      48.0.0.1        4
#port        0000:07:00.1    100.64.13.156   100.64.13.155
#client      16.0.1.1        200
#server      48.0.1.1        2
listen      80              1
以上です。
8.最後に
以下のサイトを参考にさせて頂きました。
GitHub - baidu/dperf: dperf is a DPDK based 100Gbps network performance and load testing software.
dperfは最近発表されたばかりですが、簡単な設定で高負荷を発生させることができるため、今後注目される可能性が高い負荷ツールだと考えています。
Cisco TRexのASTFモードを使用した場合、CPS試験時にコネクション確立が不安定になったり、HTTP通信時にTPutが想定通りに上がらないなどの事象が発生していました。
しかし、dperfではTPut、CPS、CCの負荷を安定的に発生させることが可能でした。
このため、特にTCPやHTTP通信においてはdperfも併用していきたいと考えています。*6
なお、今回紹介した設定以外にも、socket_mem設定により同一サーバ内でClientとServerのプロセスを同時起動するなど、詳細な設定も可能なため、さらに色々と試してみたいと思います。