How to set up baidu dperf
This article describes how to configure the baidu dperf.
GitHub - baidu/dperf: dperf is a DPDK based 100Gbps network performance and load testing software.
The dperf is a high-performance HTTP load testing tool based on DPDK.
It is especially suitable for TPut (through put), CPS (Connection per seconds), and CC (Concurrent Connection) load tests.
This article describes how to install and configure it for CentOS7/8.
It also provides supplementary explanations on the differences between using Mellanox NICs and other NICs *1.
In our environment, we were able to generate the following loads, and I will provide an example configuration at the end.
TPut : 93Gbps
CPS : 5M
CC : 300M
1.Overview
1-1.Environment
IA server                        : ProLiant DL360p Gen8
System ROM                       : P71 01/22/2018
NIC                              : Mellanox ConnectX-6 Dx (MCX623106AS-CDAT)

OS                               : CentOS7.9(2009)
Kernel                           : 3.10.0-1160.el7.x86_64
Installed Environment Groups     :
  @^graphical-server-environment
  @base
  @core
  @development
  @virtualization-client
  @virtualization-hypervisor
  @virtualization-tools
DPDK                             :19.11.10

OS                               : CentOS8.5(2111)
Kernel                           : 4.18.0-348.el8.x86_64
Installed Environment Groups     :
  @^graphical-server-environment
  @development
  @virtualization-client
  @virtualization-hypervisor
  @virtualization-tools
DPDK                             :20.11.4
1-2.overall structure

Since there is no 100Gbps L2SW, two servers are directly connected, one is configured as dperf Client and the other as dperf Server.
It can also be built in a virtual environment. *2
1-3 .Overall flow
- Advance Preparation
- Installation Method 1 : CentOS7.9 + DPDK19.11.10
- Installation Method 2 : CentOS8.5 + DPDK20.11.4
- Configure dperf
- load test
- Setting example of high load test
2.Advance Preparation
2-1.Configure hugepages
The minimum size of the hugepages should be 8GB and should be increased in a timely manner.
vi /etc/default/grub

nopku transparent_hugepage=never default_hugepagesz=1G hugepagesz=1G hugepages=8

grub2-mkconfig -o /etc/grub2.cfg
vi /etc/fstab

nodev  /dev/hugepages    hugetlbfs pagesize=1GB    0 0
2-2.Configure uio_pci_generic(For other than Mellanox NICs)
echo "uio_pci_generic" > /etc/modules-load.d/uio_pci_generic.conf
2-3.Installing OFED(For Mellanox NICs)
#CentOS7.9
yum -y install tcl tk unbound
mount -t iso9660 -o loop /root/tmp/MLNX_OFED_LINUX-5.5-1.0.3.2-rhel7.9-x86_64.iso /mnt/
/mnt/mlnxofedinstall --upstream-libs --dpdk --with-mft --with-mstflint

#CentOS8.5
dnf -y install tcl tk unbound tcsh gcc-gfortran && \
mount -t iso9660 -o loop /root/tmp/MLNX_OFED_LINUX-5.5-1.0.3.2-rhel8.5-x86_64.iso /mnt && \
/mnt/mlnxofedinstall --upstream-libs --dpdk --with-mft --with-mstflint
3.Installation Method 1 : CentOS7.9 + DPDK19.11.10
3-1.Build the DPDK
yum -y install numactl-devel libpcap-devel
mkdir dpdk
cd /root/dpdk/
wget http://fast.dpdk.org/rel/dpdk-19.11.10.tar.xz
tar xf dpdk-19.11.10.tar.xz
cd /root/dpdk/dpdk-stable-19.11.10

#The following settings are required for Mellanox NICs
sed -i -e "s/CONFIG_RTE_LIBRTE_MLX5_PMD=n/CONFIG_RTE_LIBRTE_MLX5_PMD=y/g" /root/dpdk/dpdk-stable-19.11.10/config/common_base
sed -i -e "s/CONFIG_RTE_LIBRTE_MLX5_DEBUG=n/CONFIG_RTE_LIBRTE_MLX5_DEBUG=y/g" /root/dpdk/dpdk-stable-19.11.10/config/common_base

export TARGET=x86_64-native-linuxapp-gcc
make install T=$TARGET -j4
3-2.Build the dperf
cd /root/dpdk
wget https://github.com/baidu/dperf/archive/refs/heads/main.zip

unzip main.zip
cd dperf-main/
export TARGET=x86_64-native-linuxapp-gcc
make -j4 RTE_SDK=/root/dpdk/dpdk-stable-19.11.10 RTE_TARGET=$TARGET
4.Installation Method 2 : CentOS8.5 + DPDK20.11.4
4-1.advance preparation*3
sed -i -e 's/enabled=0/enabled=1/g' /etc/yum.repos.d/CentOS-Linux-PowerTools.repo && \
dnf -y install numactl-devel meson ninja-build rdma-core && \
wget https://cbs.centos.org/kojifiles/packages/pyelftools/0.26/1.el8/noarch/python3-pyelftools-0.26-1.el8.noarch.rpm && \
dnf -y localinstall python3-pyelftools-0.26-1.el8.noarch.rpm
4-2.Build the DPDK
mkdir dpdk
cd /root/dpdk/
wget https://fast.dpdk.org/rel/dpdk-20.11.4.tar.xz
tar xf dpdk-20.11.4.tar.xz
cd /root/dpdk/dpdk-stable-20.11.4

meson build --prefix=/root/dpdk/dpdk-stable-20.11.4/mydpdk -Denable_kmods=true && \
ninja -C build install
4-3.Build the dperf
cd /root/dpdk
wget https://github.com/baidu/dperf/archive/refs/heads/main.zip

unzip main.zip
cd /root/dpdk/dperf-main/
export PKG_CONFIG_PATH=/root/dpdk/dpdk-stable-20.11.4/mydpdk/lib64/pkgconfig/
make
4-4.Configure ldconfig
Note
If you receive the following error message when starting dperf, please run ldconfig.
[root@c85g151 dperf-main]# ./build/dperf -c test/http/client-cps.conf
./build/dperf: error while loading shared libraries: librte_ethdev.so.21: cannot open shared object file: No such file or directory
vi /etc/ld.so.conf.d/libdpdk.conf

/root/dpdk/dpdk-stable-20.11.4/mydpdk/lib64

ldconfig
ldconfig -p |grep dpdk
5.Configure dperf
5-1.Configure dpdk-devbind
For other than Mellanox NICs, dpdk-devbind is required.
For Mellanox NICs, dpdk-devbind is not required.
Please check the bsf number and bind the NIC to the dpdk PMD driver. *4
lspci
lshw -businfo -c network
/root/dpdk/dpdk-stable-20.11.4/usertools/dpdk-devbind.py -s
/root/dpdk/dpdk-stable-20.11.4/usertools/dpdk-devbind.py -b uio_pci_generic 0000:03:00.0
The following example output shows dpdk-devbind running on CentOS8.5 on VMWare Work pro15.
[root@c85g151 dperf-main]# lspci
00:00.0 Host bridge: Intel Corporation 440BX/ZX/DX - 82443BX/ZX/DX Host bridge (rev 01)
00:01.0 PCI bridge: Intel Corporation 440BX/ZX/DX - 82443BX/ZX/DX AGP bridge (rev 01)
02:01.0 Ethernet controller: Intel Corporation 82545EM Gigabit Ethernet Controller (Copper) (rev 01)
03:00.0 Ethernet controller: VMware VMXNET3 Ethernet Controller (rev 01)
0b:00.0 Ethernet controller: VMware VMXNET3 Ethernet Controller (rev 01)

[root@c85g151 dperf-main]# /root/dpdk/dpdk-stable-20.11.4/usertools/dpdk-devbind.py -s
Network devices using kernel driver
===================================
0000:02:01.0 '82545EM Gigabit Ethernet Controller (Copper) 100f' if=ens33 drv=e1000 unused=uio_pci_generic *Active*
0000:03:00.0 'VMXNET3 Ethernet Controller 07b0' if=ens192 drv=vmxnet3 unused=uio_pci_generic
0000:0b:00.0 'VMXNET3 Ethernet Controller 07b0' if=ens192 drv=vmxnet3 unused=uio_pci_generic

[root@c85g151 dperf-main]# /root/dpdk/dpdk-stable-20.11.4/usertools/dpdk-devbind.py -b uio_pci_generic 0000:03:00.0

[root@c85g151 dperf-main]# /root/dpdk/dpdk-stable-20.11.4/usertools/dpdk-devbind.py -s
Network devices using DPDK-compatible driver
============================================
0000:03:00.0 'VMXNET3 Ethernet Controller 07b0' drv=uio_pci_generic unused=vmxnet3

Network devices using kernel driver
===================================
0000:02:01.0 '82545EM Gigabit Ethernet Controller (Copper) 100f' if=ens33 drv=e1000 unused=uio_pci_generic *Active*
0000:0b:00.0 'VMXNET3 Ethernet Controller 07b0' if=ens192 drv=vmxnet3 unused=uio_pci_generic
5-2.dperf client settings
The following settings have been modified from the sample config.
cd /root/dpdk/dperf-main
vi test/http/client-cps.conf

[root@c85g151 dperf-main]# vi test/http/client-cps.conf
mode                         client
tx_burst                     128
launch_num                   10
cpu                          0
payload_size                 1400
duration                     120s
cps                          400
cc                           2500
keepalive_request_interval   1ms
port         0000:00:08.0    100.64.12.155   100.64.12.156
client       16.0.0.1        100
server       48.0.0.1        1
listen       80              1
Note
The following is a description of what we noticed during the setup.
| mode | Select client/server. |
| tx_burst | No need to change the settings. |
| launch_num | If you get "Floating point exception" or other errors when you increase the number of CPU cores, try decreasing the value to 10, 6, 3, or 1. |
| cpu | The number of CPUs must match the number of IPs in the server. |
| payload_size | The minimum is 1Byte and the maximum is 1400Byte. If 1400 is set on the Client side, a string of 1400Byte will be inserted in the HTTP GET request. |
| duration | Since the default setting is slow_start:30 seconds, the Client should be set to a value 30 seconds larger than the Server. |
| cps | If you set it to 90 or lower, an error may be output. For this reason, set the value to 100 or higher. |
| cc | CC is Concurrent Connection. In addition, if you want to do TPut testing, increase this value. |
| keepalive_request_interval | If you set cc to a large value such as 100m, you can reduce the CPU load by setting it to 30s or 60s. Also, for the TPut test, use a smaller value such as 1ms. |
| port | Column 1: PCIe Domain number: bsf number. column 2: own IP address. column 3: GW's IP address. column 4: GW's MAC address. |
| client | column 1: starting IP address of HTTP Client. column 2: number of IP addresses. Maximum number 254. |
| server | column 1: the starting IP address of the HTTP server. column 2: the number of IP addresses. This number of IPs must match the number of CPUs. For example, in the case of "cpu 0 1", the number of addresses of the server should also be set to 2, since a 2 core CPUs are assigned to the server. |
| listen | column 1: port number to wait for. column 2: number of port numbers. For example, if this value is 4, TCP 80, 81, 82, and 83 will be listened to. If you increase this number, the hugepages will be used. 8GB or more should be set if hugepages capacity is insufficient. |
For more details, please refer to the following URL
dperf/configuration.md at main · baidu/dperf · GitHub
5-3.dperf server settings
The following settings have been modified from the sample config.
cd /root/dpdk/dperf-main
vi test/http/server-cps.conf

[root@c85g154 dperf-main]# vi test/http/server-cps.conf
mode                        server
tx_burst                    128
cpu                         0
duration                    150s
payload_size                1400
keepalive                   1
port        0000:00:09.0    100.64.12.156   100.64.12.155
client      16.0.0.1        100
server      48.0.0.1        1
listen      80              1
Note
This section describes the points other than 5-2.
| payload_size | This is the HTTP content size. When testing TPut, we set ServerSide"1400" and ClientSide"1". when ClientSide"1400" is set, the same amount of TPut is generated in both directions (upstream and downstream) because a string is inserted in the GET request. Since we have confirmed that the downstream (from Server to Client) TPut does not reach the upper limit due to this effect, please set ServerSide"1400" and ClientSide"1". |
| keepalive | For cc and TPut testing, set this to "1". |
For more details, please refer to the following URL
dperf/configuration.md at main · baidu/dperf · GitHub
6.load test
To generate a load in the configuration described in this article, please run the program on the Client Side and Server Side almost simultaneously.
Note
In this case, the GW addresses are each other's own IP addresses, so if the programs are not run at the same time, arp resolution is not possible and the program will be displayed as bad gateway and will stop.
If the DUT*5 holds the GW address, there is no problem.
Or set the MAC address in the fourth column of Port.
6-1.Client Side
cd /root/dpdk/dperf-main
./build/dperf -c test/http/client-cps.conf
When you start dperf on the client side, you will see the following output.
[root@c85g151 dperf-main]# ./build/dperf -c test/http/client-cps.conf
EAL: Detected 4 lcore(s)
EAL: Detected 1 NUMA nodes
EAL: Detected shared linkage of DPDK
EAL: Multi-process socket /var/run/dpdk/rte/mp_socket
EAL: Selected IOVA mode 'PA'
EAL: No available hugepages reported in hugepages-2048kB
EAL: Probing VFIO support...
EAL: Probe PCI driver: mlx5_pci (15b3:101e) device: 0000:05:00.0 (socket 0)
EAL: No legacy callbacks, legacy socket not created
socket allocation succeeded, size 0.01GB num 131070

seconds 0                  cpuUsage 0
pktRx   0                  pktTx    0                  bitsRx   0                  bitsTx  0                  dropTx  0
arpRx   0                  arpTx    0                  icmpRx   0                  icmpTx  0                  otherRx 0          badRx 0
synRx   0                  synTx    0                  finRx    0                  finTx   0                  rstRx   0          rstTx 0
synRt   0                  finRt    0                  ackRt    0                  pushRt  0                  tcpDrop 0
skOpen  0                  skClose  0                  skCon    0                  skErr   0
httpGet 0                  http2XX  0                  httpErr  0
ierrors 0                  oerrors  0                  imissed  0

seconds 1                  cpuUsage 0
pktRx   0                  pktTx    0                  bitsRx   0                  bitsTx  0                  dropTx  0
arpRx   0                  arpTx    0                  icmpRx   0                  icmpTx  0                  otherRx 0          badRx 0
synRx   0                  synTx    0                  finRx    0                  finTx   0                  rstRx   0          rstTx 0
synRt   0                  finRt    0                  ackRt    0                  pushRt  0                  tcpDrop 0
skOpen  0                  skClose  0                  skCon    0                  skErr   0
httpGet 0                  http2XX  0                  httpErr  0
ierrors 0                  oerrors  0                  imissed  0
6-2.Server Side
cd /root/dpdk/dperf-main
./build/dperf -c test/http/server-cps.conf
When you start dperf on the server side, you will see the following output.
[root@c85g154 dperf-main]# ./build/dperf -c test/http/server-cps.conf
EAL: Detected 4 lcore(s)
EAL: Detected 1 NUMA nodes
EAL: Detected shared linkage of DPDK
EAL: Multi-process socket /var/run/dpdk/rte/mp_socket
EAL: Selected IOVA mode 'PA'
EAL: No available hugepages reported in hugepages-2048kB
EAL: Probing VFIO support...
EAL: Probe PCI driver: mlx5_pci (15b3:101e) device: 0000:05:00.0 (socket 0)
EAL: No legacy callbacks, legacy socket not created
socket allocation succeeded, size 0.78GB num 13107000

seconds 0                  cpuUsage 0
pktRx   0                  pktTx    0                  bitsRx   0                  bitsTx  0                  dropTx  0
arpRx   0                  arpTx    0                  icmpRx   0                  icmpTx  0                  otherRx 0          badRx 0
synRx   0                  synTx    0                  finRx    0                  finTx   0                  rstRx   0          rstTx 0
synRt   0                  finRt    0                  ackRt    0                  pushRt  0                  tcpDrop 0
skOpen  0                  skClose  0                  skCon    0                  skErr   0
httpGet 0                  http2XX  0                  httpErr  0
ierrors 0                  oerrors  0                  imissed  0

seconds 1                  cpuUsage 0
pktRx   0                  pktTx    0                  bitsRx   0                  bitsTx  0                  dropTx  0
arpRx   0                  arpTx    0                  icmpRx   0                  icmpTx  0                  otherRx 0          badRx 0
synRx   0                  synTx    0                  finRx    0                  finTx   0                  rstRx   0          rstTx 0
synRt   0                  finRt    0                  ackRt    0                  pushRt  0                  tcpDrop 0
skOpen  0                  skClose  0                  skCon    0                  skErr   0
httpGet 0                  http2XX  0                  httpErr  0
ierrors 0                  oerrors  0                  imissed  0
7.Setting example of high load test
The following is an example of the configuration when the following loads are applied in this configuration.
TPut : 93Gbps
CPS : 5M
CC : 300M
The configuration example shown here is based on the use of a 2-port NIC, but 1-port will provide the same performance.
(How to configure a 1-port NIC is described at the end of this section.)
7-1.TPut test
Client Side
[root@c85g151 dperf-main]# cat test/http/client-cps.conf
mode                         client
tx_burst                     128
launch_num                   3
cpu                          0 1 2 3
payload_size                 1
duration                     120s
cps                          500
cc                           10000
keepalive_request_interval   1ms
port         0000:07:00.0    100.64.12.155   100.64.12.156
client       16.0.0.1        200
server       48.0.0.1        2
port         0000:07:00.1    100.64.13.155   100.64.13.156
client       16.0.1.1        200
server       48.0.1.1        2
listen       80              1
Server Side
[root@c85g154 dperf-main]# cat test/http/server-cps.conf
mode                        server
tx_burst                    128
cpu                         0 1 2 3
duration                    150s
payload_size                1400
keepalive                   1
port        0000:07:00.0    100.64.12.156   100.64.12.155
client      16.0.0.1        200
server      48.0.0.1        2
port        0000:07:00.1    100.64.13.156   100.64.13.155
client      16.0.1.1        200
server      48.0.1.1        2
listen      80              1
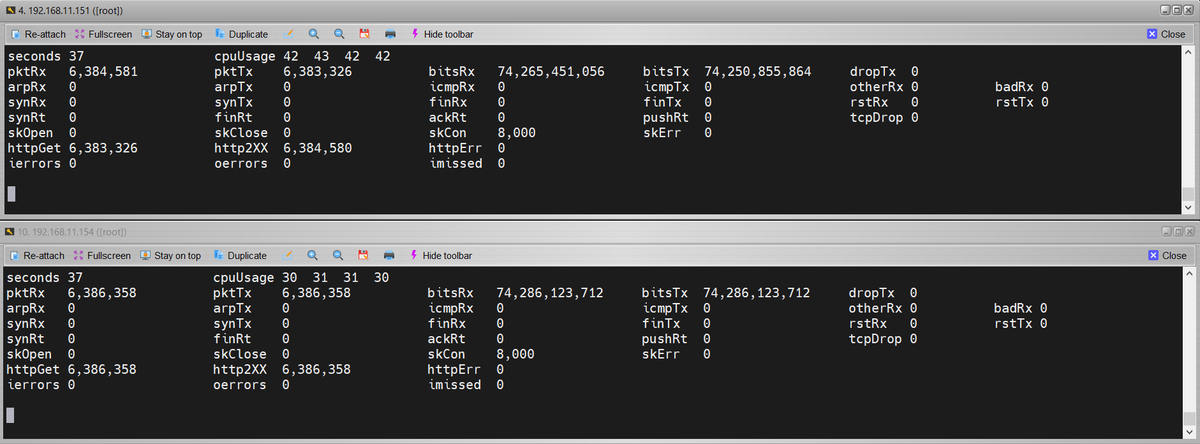
TPut:93Gbps
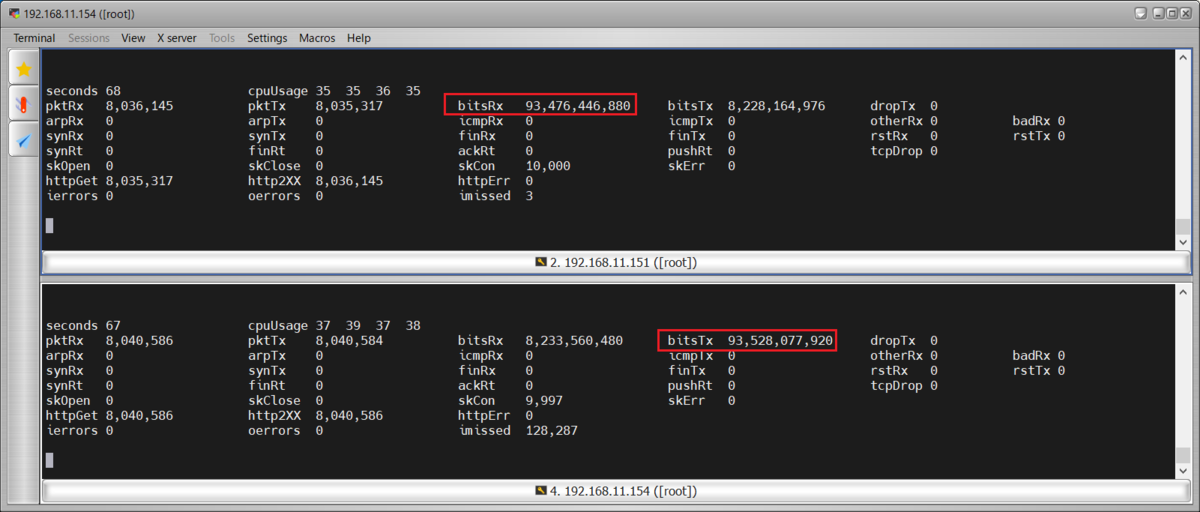
Note
When client's payload_size was set to 1400, both client side and server side bitsRX and bitsTX were 74Gbps.
7-2.CPS test
Client Side
[root@c85g151 dperf-main]# cat test/http/client-cps.conf
mode                         client
tx_burst                     128
launch_num                   3
cpu                          0 1 2 3
payload_size                 1
duration                     120s
cps                          5.1m
port         0000:07:00.0    100.64.12.155   100.64.12.156
client       16.0.0.1        200
server       48.0.0.1        2
port         0000:07:00.1    100.64.13.155   100.64.13.156
client       16.0.1.1        200
server       48.0.1.1        2
listen       80              1
Server Side
[root@c85g154 dperf-main]# cat test/http/server-cps.conf
mode                        server
tx_burst                    128
cpu                         0 1 2 3
duration                    150s
payload_size                1
port        0000:07:00.0    100.64.12.156   100.64.12.155
client      16.0.0.1        200
server      48.0.0.1        2
port        0000:07:00.1    100.64.13.156   100.64.13.155
client      16.0.1.1        200
server      48.0.1.1        2
listen      80              1
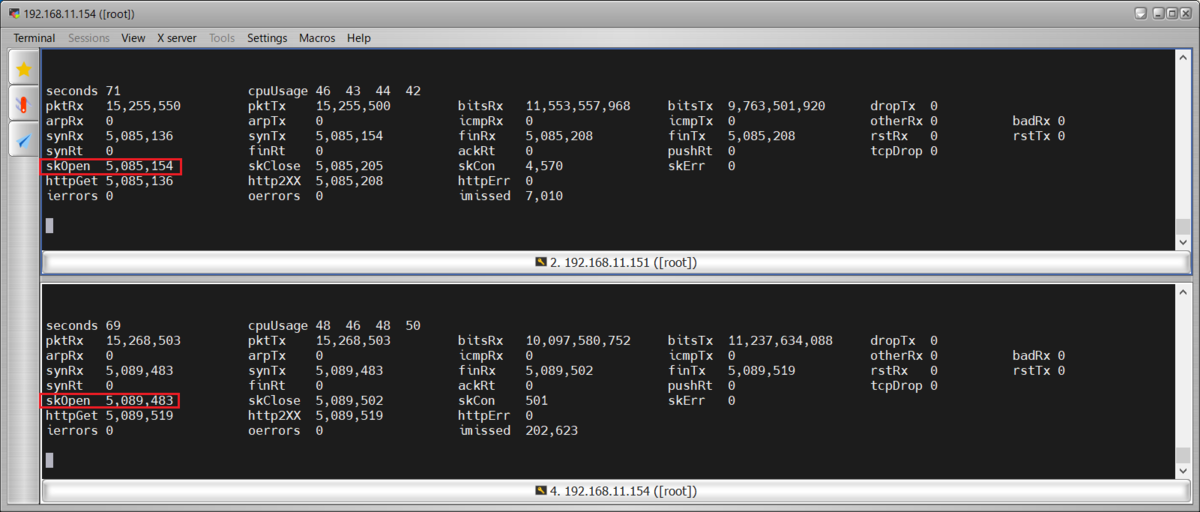
CPS:5M
7-3.CC test
Client Side
[root@c85g151 dperf-main]# cat test/http/client-cps.conf
mode                         client
tx_burst                     128
launch_num                   3
cpu                          0 1 2 3 4 5
payload_size                 1
duration                     1800s
cps                          1m
cc                           300m
keepalive_request_interval   60s
port         0000:07:00.0    100.64.12.155   100.64.12.156
client       16.0.0.1        200
server       48.0.0.1        3
port         0000:07:00.1    100.64.13.155   100.64.13.156
client       16.0.1.1        200
server       48.0.1.1        3
listen       80              4
Server Side
[root@c85g154 dperf-main]# cat test/http/server-cps.conf
mode                        server
tx_burst                    128
cpu                         0 1 2 3 4 5
duration                    1800s
payload_size                1
keepalive                   1
port        0000:07:00.0    100.64.12.156   100.64.12.155
client      16.0.0.1        200
server      48.0.0.1        3
port        0000:07:00.1    100.64.13.156   100.64.13.155
client      16.0.1.1        200
server      48.0.1.1        3
listen      80              4
CC:300M

7-4.Configuration example with a single port NIC
As an example, we will change the setting of the 7-1.TPut test to a 1-port NIC setting.
The changed part is written in red letters, and the deleted part is grayed out.
Client Side
[root@c85g151 dperf-main]# cat test/http/client-cps.conf
mode                         client
tx_burst                     128
launch_num                   3
cpu                          0 1 2 3
payload_size                 1
duration                     120s
cps                          500
cc                           10000
keepalive_request_interval   1ms
port         0000:07:00.0    100.64.12.155   100.64.12.156
client       16.0.0.1        200
server       48.0.0.1        4
#port         0000:07:00.1    100.64.13.155   100.64.13.156
#client       16.0.1.1        200
#server       48.0.1.1        2
listen       80              1
Server Side
[root@c85g154 dperf-main]# cat test/http/server-cps.conf
mode                        server
tx_burst                    128
cpu                         0 1 2 3
duration                    150s
payload_size                1400
keepalive                   1
port        0000:07:00.0    100.64.12.156   100.64.12.155
client      16.0.0.1        200
server      48.0.0.1        4
#port        0000:07:00.1    100.64.13.156   100.64.13.155
#client      16.0.1.1        200
#server      48.0.1.1        2
listen      80              1
8.Finally
We referred to the following website.
GitHub - baidu/dperf: dperf is a DPDK based 100Gbps network performance and load testing software.
Although dperf has only recently been announced, we believe that it is a load tool that is likely to attract attention in the future because it can generate high loads with simple settings.
When using the ASTF mode of Cisco TRex, connection establishment became unstable during CPS testing, and Tput did not rise as expected during HTTP communication.
With dperf, however, it was possible to generate stable loads for TPut, CPS, and CC.
For this reason, we would like to utilize dperf especially for TCP and HTTP communication. *6
In addition to the settings introduced in this article, detailed settings such as simultaneous launching of Client and Server processes in the same server using the socket_mem setting are also possible, so I would like to try more things.
*2:However, the expected performance may not be achieved, so if you want to generate a high load, we recommend a bare metal environment.
*3:Since CentOS8 is no longer supported, the repository settings have been changed from "mirror.centos.org" to "vault.centos.org".
*4:The bsf number is also required when configuring dperf, so please make sure you know which bsf number NIC you have bound.
*5:Abbreviation for Device Under Test. The device to be measured.
*6:TRex can read Pcap files, which is very useful for UDP communication(GTP-U packet etc.).