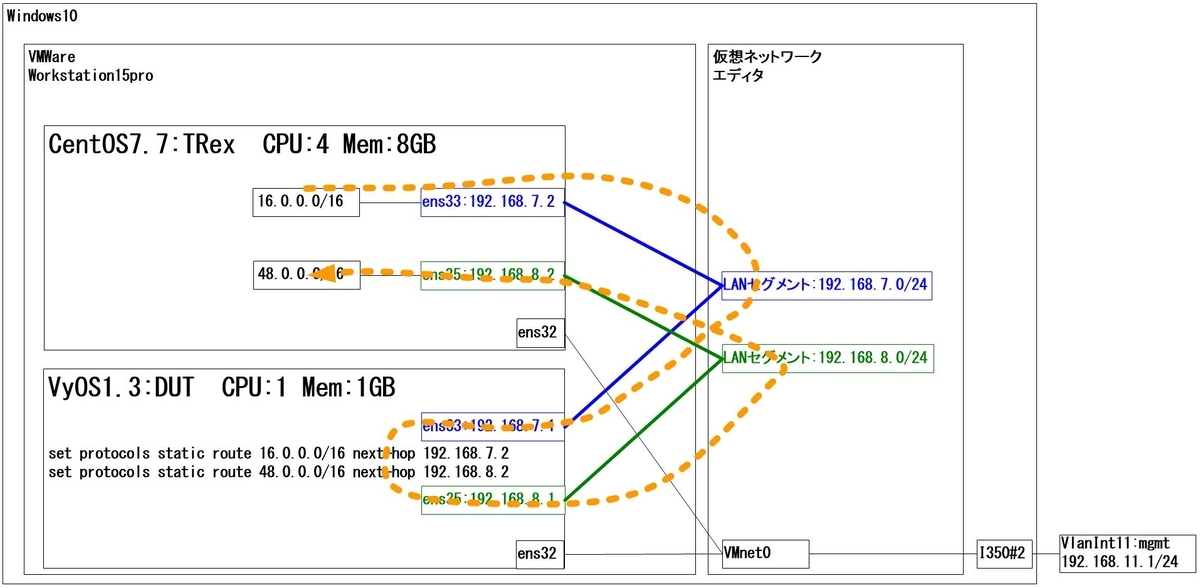
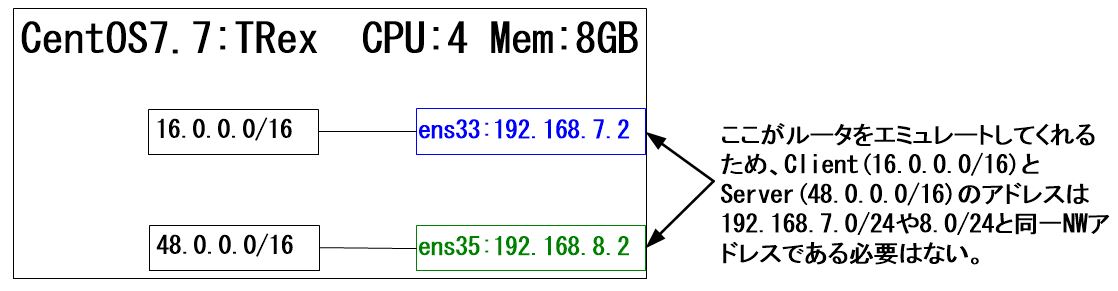
3.1ポートのみで負荷印加
これまでの例では、DUTに対して、ClientポートとServerポートの2ポートを利用して負荷印加していましたが、ここではClient用の1ポートのみを使用して負荷印加する方法を記載します。
3-1.1ポートのみ使用する場合の構成例

3-2.trex_cfg.yamlの設定
1ポートのみを使用する場合は以下のようにdummyポートの設定をします。
vi /etc/trex_cfg.yaml

[root@c77g231 ~]# vi /etc/trex_cfg.yaml
### Config file generated by dpdk_setup_ports.py ###

- version: 2
#  interfaces: ['02:01.0', '02:03.0']
  interfaces: ['02:01.0', 'dummy']
  memory:
     dp_flows: 4048576
  port_info:
      - ip: 192.168.7.2
        default_gw: 192.168.7.1
#      - ip: 192.168.8.2
#        default_gw: 192.168.8.1

  platform:
      master_thread_id: 0
      latency_thread_id: 1
      dual_if:
        - socket: 0
          threads: [2,3]
サーバアドレスを固定します。
前回記事で紹介したserver_addr と one_app_serverオプションを使用してもよいと思います。
vi ./cap2/dns.yaml

[root@c77g231 trex]# vi ./cap2/dns.yaml
- duration : 10.0
  generator :
          distribution : "seq"
          clients_start : "16.0.0.0"
          clients_end   : "16.0.255.255"
          servers_start : "192.168.8.2"
          servers_end   : "192.168.8.2"
          clients_per_gb : 201
          min_clients    : 101
          dual_port_mask : "0.0.0.0"
          tcp_aging      : 1
          udp_aging      : 1
  cap_info :
     - name: cap2/dns.pcap
       cps : 1.0
       ipg : 10000
       rtt : 10000
       w   : 1
そして、負荷印加。
./t-rex-64 -f ./cap2/dns.yaml -d 30 -m 1
恐らく、失敗すると思います。
なぜなら、Defaultで格納されているdns.pcapファイルには、クエリとレスポンスの2パケットが含まれているためです。

このため、Wire Editを使って不要なパケット(DNSレスポンス)を削除します。また、クエリがwww.cisco.comになっていますが、これも編集します。
3-4.Wire Editによるdns.pcapの編集
DNSレスポンスのパケットを削除します。

続いて、qnameを編集します。DNS: Queryのツリーを展開し、「QNAME[0]」の辺りをダブルクリックすると、画面下のEdit PDU画面が表示されます。

あとは直感的に操作できると思いますが、www, cisco, comなどを直接クリックして編集してください。
なお、レイヤ2-4はTRexが環境に合わせて設定してくれるため、アプリ層のみ編集すればOKです。(IPアドレスやL4Port番号を編集する必要はありません。)
再び、負荷を印加すれば一方的にDNSクエリのみを投げてくれます。
./t-rex-64 -f ./cap2/dns.yaml -d 30 -m 1
今回の構成ではDNSサーバを準備していますので、DNSサーバがレスポンスを返してくれます。
3-5.異なる2つのDNSクエリを送信する場合
上記方法の場合、TRexは1つのDNSクエリだけ繰り返し送信しますが、キャッシュヒット率を確認したいケースなどでは、キャッシュにヒットするパケットとキャッシュにヒットしないパケットの2つのDNSクエリを送信する必要が出てきたりします。
そんなときの設定方法を記載します。
vi ./cap2/dns.yaml

[root@c77g231 trex]# vi ./cap2/dns.yaml
- duration : 10.0
  generator :
          distribution : "seq"
          clients_start : "16.0.0.0"
          clients_end   : "16.0.255.255"
          servers_start : "192.168.8.2"
          servers_end   : "192.168.8.2"
          clients_per_gb : 201
          min_clients    : 101
          dual_port_mask : "0.0.0.0"
          tcp_aging      : 1
          udp_aging      : 1
  cap_info :
     - name: cap2/dns.pcap
       cps : 1.0
       ipg : 10000
       rtt : 10000
       w   : 1
     - name: cap2/dns2.pcap
       cps : 9.0
       ipg : 10000
       rtt : 10000
       w   : 1
ここでは例として、dns2.pcapと記載しましたが、先に説明したWire Editを用いて、pcapファイルのqnameを編集することにより、
| cap2/dns.pcap |
CPS1 |
キャッシュにヒットしないパケット |
| cap2/dns2.pcap |
CPS9 |
キャッシュにヒットするパケット |
といった形で負荷を印加することが可能です。
ヒットする/しないはTTLなどで調整してください。
4.任意のプロトコルをHEXで書いて負荷印加
上記の方法はいずれもSTFモードにより設定してきました。
しかし、「-c 14」オプションにより複数CPUコアを利用して、より大きな負荷をかけたい場合、ASTFモードが必要になってきます。
また、「3-1.1ポートのみ使用する場合の構成例」に示した構成の場合、DNSサーバ側が負荷に耐え切れなくなり、DNSサーバの数を増やそうとすると、今度はLBを間に噛ませる必要が出てくるなど、本来の目的とは異なるポイントも考慮する必要が出てきます。
このため、元々の構成に戻し、DUTに対して、TRexのClientとServerポートを接続します。

なお、「3-5.異なる2つのDNSクエリを送信する場合」に記載した方法をASTFモードで実施しようとすると失敗します。
ASTFモードではデフォルトで、一つのPcapファイルにつき、一つのサーバL4Portしか設定できないためです。
例えば、
http.pcapでL4Port80、dns.pcapでL4Port53 を同時に負荷印加
といった設定は比較的容易に設定できますが、
dns.pcapでL4Port53、dns2.pcapでL4Port53 を同時に負荷印加
としたい場合は、前述の通り失敗します。
このため、以下に紹介する方法で実現可能です。
4-1.http_simple.pyの設定 その1
ここでは例として、http_simple.pyをベースに編集していきます。
ますは、「http.pcapでL4Port80、dns.pcapでL4Port53」のパターン
vi astf/http_simple.py

[root@c77g232 trex]# vi astf/http_simple.py
from trex.astf.api import *

class Prof1():
    def __init__(self):
        pass

    def get_profile(self, **kwargs):
        # ip generator
        ip_gen_c = ASTFIPGenDist(ip_range=["16.0.0.0", "16.0.0.255"], distribution="seq")
        ip_gen_s = ASTFIPGenDist(ip_range=["48.0.0.0", "48.0.255.255"], distribution="seq")
        ip_gen = ASTFIPGen(glob=ASTFIPGenGlobal(ip_offset="0.0.0.0"),
                           dist_client=ip_gen_c,
                           dist_server=ip_gen_s)

        return ASTFProfile(default_ip_gen=ip_gen,
                        cap_list=[
                                ASTFCapInfo(file="../avl/delay_10_http_browsing_0.pcap",cps=1),
                                ASTFCapInfo(file="../cap2/dns.pcap",cps=1)
                        ])


def register():
    return Prof1()
赤文字箇所を追記しています。
httpのPcapファイルの後に「,」を入れて、dnsのPcapファイルを設定している点に注意してください。
ASTFCapInfo(file="../avl/delay_10_http_browsing_0.pcap",cps=1),
ASTFCapInfo(file="../cap2/dns.pcap",cps=1)
上記設定では特にL4DstPortを指定していませんが、Pcapファイルから自動的に読み取ってくれるため問題ありません。
4-2.http_simple.pyの設定 その2
次に「dns.pcapでL4Port53、dns2.pcapでL4Port53」のパターン
| cap2/dns.pcap |
CPS1 |
キャッシュにヒットしないパケット |
| cap2/dns2.pcap |
CPS9 |
キャッシュにヒットするパケット |
<失敗パターン>
vi astf/http_simple.py

[root@c77g232 trex]# vi astf/http_simple.py
from trex.astf.api import *

class Prof1():
    def __init__(self):
        pass

    def get_profile(self, **kwargs):
        # ip generator
        ip_gen_c = ASTFIPGenDist(ip_range=["16.0.0.0", "16.0.0.255"], distribution="seq")
        ip_gen_s = ASTFIPGenDist(ip_range=["48.0.0.0", "48.0.255.255"], distribution="seq")
        ip_gen = ASTFIPGen(glob=ASTFIPGenGlobal(ip_offset="0.0.0.0"),
                           dist_client=ip_gen_c,
                           dist_server=ip_gen_s)

        return ASTFProfile(default_ip_gen=ip_gen,
                        cap_list=[
                                ASTFCapInfo(file="../avl/dns.pcap",cps=1),
                                ASTFCapInfo(file="../avl/dns2.pcap",cps=9)
                        ])


def register():
    return Prof1()
上記のように「4-1.http_simple.pyの設定 その1」と同様に設定すると、負荷を印加した際にエラーが出て失敗します。
<成功パターン>
とても複雑になっていますが、まずは見てください。
これは「astf/shared_port.py」のサンプルファイルをベースにしています。
L2-L4部分はTRexに任せつつ、L4より上位層(DNSプロトコル)部分をHEXで書いています。*1
dns_2flow.pyとして、新規にファイルを作成します。
vi astf/dns_2flow.py

[root@c77g232 trex]# vi astf/dns_2flow.py

# Example for creating your program by specifying buffers to send, without relaying on pcap file
from trex.astf.api import *

# we can send either Python bytes type as below:
dns_req1 = b'\x69\xE6\x01\x20\x00\x01\x00\x00\x00\x00\x00\x01\x05\x68\x69\x74\x30\x30\x04\x74\x65\x73\x74\x03\x6C\x61\x62\x00\x00\x01\x00\x01\x00\x00\x29\x10\x00\x00\x00\x00\x00\x00\x00'
dns_req2 = b'\x85\xA2\x01\x20\x00\x01\x00\x00\x00\x00\x00\x01\x05\x68\x69\x74\x30\x31\x04\x74\x65\x73\x74\x03\x6C\x61\x62\x00\x00\x01\x00\x01\x00\x00\x29\x10\x00\x00\x00\x00\x00\x00\x00'
# or we can send Python string containing ascii chars, as below:
dns_res1 = b'\x69\xE6\x81\x80\x00\x01\x00\x01\x00\x00\x00\x01\x05\x68\x69\x74\x30\x30\x04\x74\x65\x73\x74\x03\x6C\x61\x62\x00\x00\x01\x00\x01\x05\x68\x69\x74\x30\x30\x04\x74\x65\x73\x74\x03\x6C\x61\x62\x00\x00\x01\x00\x01\x00\x00\x00\x00\x00\x04\xC0\xA8\x00\x64\x00\x00\x29\x10\x00\x00\x00\x00\x00\x00\x00'
dns_res2 = b'\x85\xA2\x81\x80\x00\x01\x00\x01\x00\x00\x00\x01\x05\x68\x69\x74\x30\x31\x04\x74\x65\x73\x74\x03\x6C\x61\x62\x00\x00\x01\x00\x01\x05\x68\x69\x74\x30\x31\x04\x74\x65\x73\x74\x03\x6C\x61\x62\x00\x00\x01\x00\x01\x00\x01\x51\x80\x00\x04\xC0\xA8\x00\x65\x00\x00\x29\x10\x00\x00\x00\x00\x00\x00\x00'

class Prof1():
    def __init__(self):
        pass  # tunables

    def _udp_client_prog(self, req, res):
        prog_c = ASTFProgram(stream=False)
        prog_c.send_msg(req)
        prog_c.recv_msg(1)
        return prog_c

    def _udp_server_prog(self, req, res):
        prog_s = ASTFProgram(stream=False)
        prog_s.recv_msg(1)
        prog_s.send_msg(res)
        return prog_s

    def create_profile(self, proto='all', temp='all'):
        # UDP client and server commands
        udp_prog_c1 = self._udp_client_prog(dns_req1, dns_res1)
        udp_prog_c2 = self._udp_client_prog(dns_req2, dns_res2)

        udp_prog_s1 = self._udp_server_prog(dns_req1, dns_res1)
        udp_prog_s2 = self._udp_server_prog(dns_req2, dns_res2)

        # ip generator
        ip_gen_c = ASTFIPGenDist(ip_range=["16.0.0.0", "16.0.0.255"], distribution="seq")
        ip_gen_s = ASTFIPGenDist(ip_range=["48.0.0.0", "48.0.255.255"], distribution="seq")
        ip_gen = ASTFIPGen(glob=ASTFIPGenGlobal(ip_offset="1.0.0.0"),
                           dist_client=ip_gen_c,
                           dist_server=ip_gen_s)

        # use default port 80
        assoc_by_l7 = ASTFAssociationRule(ip_start="48.0.0.0", ip_end="48.0.255.255", port=53,
                                          l7_map={"offset":[0,1,2,3]})

        templates = []
        # UDP templates
        udp_temp_c1 = ASTFTCPClientTemplate(program=udp_prog_c1, ip_gen=ip_gen, cps=1, port=53)
        udp_temp_s1 = ASTFTCPServerTemplate(program=udp_prog_s1, assoc=assoc_by_l7)
        udp_template1 = ASTFTemplate(client_template=udp_temp_c1, server_template=udp_temp_s1, tg_name='udp1')

        udp_temp_c2 = ASTFTCPClientTemplate(program=udp_prog_c2, ip_gen=ip_gen, cps=1, port=53)
        udp_temp_s2 = ASTFTCPServerTemplate(program=udp_prog_s2, assoc=assoc_by_l7)
        udp_template2 = ASTFTemplate(client_template=udp_temp_c2, server_template=udp_temp_s2, tg_name='udp2')

        if proto == 'all' or proto == 'udp':
                templates += [ udp_template1, udp_template2 ]

        # profile
        profile = ASTFProfile(default_ip_gen=ip_gen, templates=templates)
        return profile

    def get_profile(self, **kwargs):
        proto = kwargs.get('proto','all').lower()
        temp = kwargs.get('temp','all').lower()
        return self.create_profile(proto, temp)


def register():
    return Prof1()
実際に負荷を印加する際は以下のようにします。詳細は前回記事を参照してください。
ASTFにてインタラクティブモードで起動
[root@c77g232 trex]# ./t-rex-64 -i --astf
TRexコンソール上にログイン
./trex-console -s 192.168.11.232
TRexコンソール上で負荷印加を開始
trex>start -f astf/dns_2flow.py -d 30 -m 1
実際に流れたトラフィックのPcapファイルは、こちらになります。
4-3.astf/dns_2flow.pyの解説
DNSプロトコル部分
dns_req1とdns_res1の変数にHEXで書かれたプロトコル部分を、それぞれ格納しています。
dns_req1 = b'\x69\xE6\x01~一部省略~\x00\x00'
dns_res1 = b'\x69\xE6\x81~一部省略~\x00\x00'
Wire Editでqnameなど必要な箇所を編集後、以下のようにDNSプロトコル部分のHEXのみを「Copy Selected」にて、コピーしてテキストエディタなどに貼り付けます。*2

69 E6 01 20 00 01 00 00 00 00 00 01 05 68 69 74 30 30 04 74 65 73 74 03 6C 61 62 00 00 01 00 01 00 00 29 10 00 00 00 00 00 00 00
「 (スペース)」を「\x」で全て置換します。
\x69\xE6\x01\x20\x00\x01\x00\x00\x00\x00\x00\x01\x05\x68\x69\x74\x30\x30\x04\x74\x65\x73\x74\x03\x6C\x61\x62\x00\x00\x01\x00\x01\x00\x00\x29\x10\x00\x00\x00\x00\x00\x00\x00
「' '」(シングルコーテーション)で括られた青文字部分を置き換えれば、DNSプロトコル部分が作成できます。
dns_req1 = b'\x69\xE6\x01~一部省略~\x00\x00'
以下のようになります。
dns_req1 = b'\x69\xE6\x01\x20\x00\x01\x00\x00\x00\x00\x00\x01\x05\x68\x69\x74\x30\x30\x04\x74\x65\x73\x74\x03\x6C\x61\x62\x00\x00\x01\x00\x01\x00\x00\x29\x10\x00\x00\x00\x00\x00\x00\x00'
DNSレスポンスについても同様の手順で作成してください。
L3-L4部分
環境により設定変更する部分を赤文字で記載しておきます。
ip_gen_c = ASTFIPGenDist(ip_range=["16.0.0.0", "16.0.0.255"], distribution="seq")
ip_gen_s = ASTFIPGenDist(ip_range=["48.0.0.0", "48.0.255.255"], distribution="seq")
ip_gen = ASTFIPGen(glob=ASTFIPGenGlobal(ip_offset="1.0.0.0"),
                   dist_client=ip_gen_c,
                   dist_server=ip_gen_s)

# use default port 80
assoc_by_l7 = ASTFAssociationRule(ip_start="48.0.0.0", ip_end="48.0.255.255", port=53,
                                  l7_map={"offset":[0,1,2,3]})

templates = []
# UDP templates
udp_temp_c1 = ASTFTCPClientTemplate(program=udp_prog_c1, ip_gen=ip_gen, cps=1, port=53)
udp_temp_s1 = ASTFTCPServerTemplate(program=udp_prog_s1, assoc=assoc_by_l7)
udp_template1 = ASTFTemplate(client_template=udp_temp_c1, server_template=udp_temp_s1, tg_name='udp1')

udp_temp_c2 = ASTFTCPClientTemplate(program=udp_prog_c2, ip_gen=ip_gen, cps=1, port=53)
udp_temp_s2 = ASTFTCPServerTemplate(program=udp_prog_s2, assoc=assoc_by_l7)
udp_template2 = ASTFTemplate(client_template=udp_temp_c2, server_template=udp_temp_s2, tg_name='udp2')
その他の部分について解説は割愛しますが、VSCodeなどで変数名を追っていけば、概ね、どんなことをやっているかは把握できると思います。
<補足1>
ベースとなっている「astf/shared_port.py」のサンプルファイルを参照すると、HEXで書いた変数部分はStringで書かれています。
http_req = b'GET /3384 HTTP/1.1\r\nHost: 22.0.0.3\r\n~一部省略~compress\r\n\r\n'
http_response = 'HTTP/1.1 200 OK\r\nServer: Microsoft-IIS/6.0\r\n~一部省略~<\html>'
ASTFモードでは、やはりTCPがメインとなってきますので、上記のようにHTTPのパケットを生成することも当然可能です。
むしろHTTPのサンプルファイルの方が圧倒的に多いため、astf/配下のpyファイルは、ぜひ参考にしてみてください。
5.GTP-Uパケットの生成
おまけとして、最後にGTP-Uパケットを生成してみます。
HEX部分については、以下の過去記事で生成したPcapファイルを元に生成します。
metonymical.hatenablog.com
5-1.GTPヘッダ以下の抽出
先の方法で抽出しますので、ポイントだけ記載します。
Wire EditがGTPのParseに対応していないため、UDPのData部がHEXで表示されますので、そのままコピーします。

もし、不安であれば、事前にWiresharkなどで確認しておくと良いと思います。
「30 ff 00 54」から開始されていることが確認できます。

テキストエディタなどに貼り付けて、先の方法で加工します。
上記例では、Echo Request部分のみとなるため、Echo Replyも同様に実施してください。
5-2.GTP-Uパケットの生成
astf/gtpu1.pyというファイルを新規作成します。
udp_reqとudp_res変数に抽出したHEXを格納しています。
vi astf/gtpu1.py

[root@c77g232 trex]# vi astf/gtpu1.py

from trex.astf.api import *

udp_req = b'\x30\xFF\x00\x54\x00\x00\x00\x01\x45\x00\x00\x54\x08\x63\x40\x00\x40\x01\x0E\x3D\x19\x00\x00\x02\x0A\x0A\x00\xFE\x08\x00\x79\x1A\x07\xBA\x00\x17\xD7\x89\x0D\x5E\x00\x00\x00\x00\xC5\x59\x0E\x00\x00\x00\x00\x00\x10\x11\x12\x13\x14\x15\x16\x17\x18\x19\x1A\x1B\x1C\x1D\x1E\x1F\x20\x21\x22\x23\x24\x25\x26\x27\x28\x29\x2A\x2B\x2C\x2D\x2E\x2F\x30\x31\x32\x33\x34\x35\x36\x37'
udp_res = b'\x30\xFF\x00\x54\xCA\x6F\xE0\xDD\x45\xE0\x00\x54\x34\x1C\x40\x00\x3F\x01\xE2\xA3\x0A\x0A\x00\xFE\x19\x00\x00\x02\x00\x00\x81\x1A\x07\xBA\x00\x17\xD7\x89\x0D\x5E\x00\x00\x00\x00\xC5\x59\x0E\x00\x00\x00\x00\x00\x10\x11\x12\x13\x14\x15\x16\x17\x18\x19\x1A\x1B\x1C\x1D\x1E\x1F\x20\x21\x22\x23\x24\x25\x26\x27\x28\x29\x2A\x2B\x2C\x2D\x2E\x2F\x30\x31\x32\x33\x34\x35\x36\x37'

class Prof1():
    def __init__(self):
        pass  # tunables

    def create_profile(self):
        # client commands
        prog_c = ASTFProgram(stream=False)
        prog_c.send_msg(udp_req)
        prog_c.recv_msg(1)

        prog_s = ASTFProgram(stream=False)
        prog_s.recv_msg(1)
        prog_s.send_msg(udp_res)

        # ip generator
        ip_gen_c = ASTFIPGenDist(ip_range=["16.0.0.0", "16.0.0.255"], distribution="seq")
        ip_gen_s = ASTFIPGenDist(ip_range=["48.0.0.0", "48.0.255.255"], distribution="seq")
        ip_gen = ASTFIPGen(glob=ASTFIPGenGlobal(ip_offset="1.0.0.0"),
                           dist_client=ip_gen_c,
                           dist_server=ip_gen_s)


        # template
        temp_c = ASTFTCPClientTemplate(program=prog_c,ip_gen=ip_gen,cps=1,port=2152)
        temp_s = ASTFTCPServerTemplate(program=prog_s, assoc=ASTFAssociationRule(port=2152))
        template = ASTFTemplate(client_template=temp_c, server_template=temp_s)

        # profile
        profile = ASTFProfile(default_ip_gen=ip_gen, templates=template, # add templates
                               )
        return profile

    def get_profile(self, **kwargs):
        return self.create_profile()


def register():
    return Prof1()
cpsは任意の値に設定の上、Port=2152は忘れずに。
<補足2>
DNSとGTP-Uにて、HEX部分の構成例を記載しましたが、他のプロトコル(RADIUSとかDIAMETERなど)にも応用が効くと思いますので、色々試してみてください。
STLモードであれば、scapyが使えるようなのですが、ASTFモードのサンプルファイルでは、scapyによるパケット生成例が無かったように思います。*3
やりたいこととしては、L4よりも上位層のプロトコル部分のパケットを生成したいので、scapyの方がわかり易く設定できるだろうと考えています。*4
<補足3>
GTP-Uの場合、OuterのL4Src/DstPortは共に2152にて通信しているケースがほとんどだと思いますが、ASTFモードではSrcPortの固定ができません。
STFモードであれば、「keep_src_port」オプションがあるのですが。
このため、イマイチ実用性に欠ける部分があります。
ASTFのAPIリファレンスも確認したのですが、該当する設定項目がなく、githubで探してみたところ、以下の関数でランダム化されてしまうようです。
generate_rand_sport()
もし、どなたか、これの回避策などご存じでしたら教えて頂けると助かります。*5
以上です。
6.最後に
以下のサイトを参考にさせて頂きました。
https://trex-tgn.cisco.com/trex/doc/trex_astf.html
ここに紹介した例は、TRex利用方法の中でも、本当に氷山の一角です。
まだまだ応用例は多数存在しますので、またちょくちょく追加の記事を書いていくかもしれません。
また、VLANやNATにも対応していますので、その辺も追々書きたいなと考えています。
さらに、SSL終端について、もう少し理解できたら書きたいと思います。
現段階では、以下のようにHTTPをSSL(HTTPS)に変換した後、DUTにトラフィックを印加することで実現できています。
TRex Client --- HTTP->SSL(HTTPS)変換装置 --- DUT --- TRex Server
実際、大きな負荷をかける場合「TRex Client --- HTTP->SSL(HTTPS)変換装置」を仮想マシンなどで多数準備して、一台のDUTに一気に負荷を印加します。
ちなみに、SSLのPcapファイルをそのまま流しても、SSLを終端するようなDUT(例えば、LBなど)に対しては意味がありません。*6
今後は、DUTをVyOSからFD.io/VPPに変更してみたいなと思います。